
The Lighting System
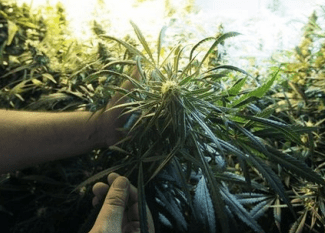
Marijuana plants love light, and LOTS of it.
Lighting is one of, if not the most essential ingredient needed for a quick, highyielding crop. Your lights may very well be your single greatest expense, but very well worth the investment. Maximizing light distribution to your plants will enhance photosynthesis tremendously. Photosynthesis is the process by which carbon dioxide and water are turned into sugary plant food and oxygen. In effect, the more light your plants receive, the faster and bigger they will grow.
There are many lighting systems available out there today, a complete one will have; a bulb, reflector, ballast, timer, and electrical inputs/outputs. Marijuana lighting systems allow you to emulate the sunlight outdoors for indoor growing as well as completely control and extend the natural “growing season” and manipulate it at will to affect the plant hormones.
When growing indoors, artificial lights produce bigger flowers (bigger bud) than natural sunlight from a windowsill. You will yield way more THC quantity with artificial lighting than you ever could with window-light grown marijuana.
Note: Sunlight is the single best source of light for growing, but for most growers this is not an option and indoor lighting is used as a great replacement.
Natural Sunlight Cycle
 In nature, the cannabis plant’s life cycle is one year long (annual). A seed planted in the spring will grow strong and tall throughout the Summer, and will flower in the Fall. The annual cycle will then start all over again when the seeds sprout the following year.
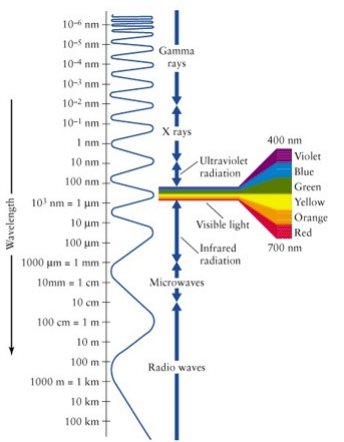
Alright time for a crucial lesson in light. The sun emits rays of color energy on a spectrum (High School science class anyone?) As far as marijuana plants go, due to the natural growth cycle of plants on our planet the sun tends to emit more blue spectrum (growth enhancing) ray energy during the summer. Also, general plantation growth is typically better this time of year due to longer days, hence the more sunlight exposure resulting from this natural growth-heavy season.
In the late Summer/early Fall, when plants produce flowers, there is more red spectrum energy rays. The change in light (and quicker, shorter days) cause hormones in plants to increase flower production (pollen sacks in males and THC sticky resin in females if left unpollinated).
It is absolutely essential that you select the proper spectrum depending upon what your individual unique needs as a grower are. Failure to do so will result in less than optimal bud production.
Basics About Light
The color of a light source is an important decision in determining the right light source for your garden. The advantage of Metal Halide lamps is that they provide high-quality, crisp white light in a variety of different color temperatures that meet the needs of many different growers.
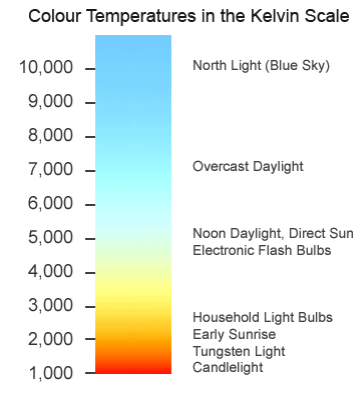
Correlated Color Temperature(CCT): The first factor in choosing a color of lamp is to determine whether you need a warm or cool light source. The CCT, expressed in Kelvin degrees, relates to actual thermal temperature. If you’ve ever seen a piece of metal being heated, you know that as the metal gets hotter, it’s color changes. The CCT rating of HID and flourescent light sources indicate how warm or how cool your light source is. For example a lamp with a CCT of 2700 Kelvin is considered warm; with a CCT of 4200 Kelvin is considered neutral; and one of 6000 Kelvin is considered quite cool.

Spectral Energy Distribution: When you look at a light source, you perceive seeing a single color, but you are actually seeing thousands of hues. The combinations of different wavelengths of light make up the color we see. The relative intensity of the various wavelengths are used to determine a light source’s Color Rendering Index (CRI).
Color Rendering Index (CRI): The CRI is an indication of a lamp’s ability to show individual colors relative to a standard. This value is determined from a comparison of the lamp’s spectral distribution compared to a black body at the same color temperature. Light sources, such as metal halide lamps, are rated with a CCT; however, CCT does not provide any information on the quality of the color. For this reason, a CRI is also necessary. In general, the higher the CRI rating of a lamp, the better the different colors will show.
 5K – 7K Kelvin: Strong Blue Light. Promotes bushy growth. Ideal for rapid growth phase of plants. This greatly enhances all-around plant growth when used with super high output, (such as high pressure sodium or 3K warm metal halide lamps).
4.2K – 4200 Kelvin: Cool White Flourescents. Can be used as supplemental blue lighting when used with a 3K source.
4K -4000 Kelvin: Neutral Metal Halide. Best single source for plant growth, producing shorter, bushier growth than 3700 Kelvin and color rendition. Used in general plant lighting.
3.7K – 3700 Kelvin: Softer Metal Halide(coated). This coated lamp is used in general plant lighting and for more rapid growth than 4000 Kelvin produces.
3K – 3200 Kelvin: Warm Metal Halide. Highest photosynthetically active radiation (PAR) value of all HID lighting for all phases of plant growth. PAR watts account for the nutritional value of light and are a direct measure of the light energy available for photosythesis.
2.7K – 2700 Kelvin: High Pressure Sodium Lamps. Redder color mix, used for propagation, blooming, supplemental greenhouse lighting.
Wattage
The first thing to look for before deciding upon and buying a lamp is its wattage rating. A lamp’s wattage is the measure of how much electricity it uses, thus how bright it will be. A common household light usually is about 75 watts. Growers commonly use 250, 400, 600, and even 1000watt high intensity discharge (HID) lamps. The more light you provide, the more your plants will grow and roduce. The power consumption of these lights mimics what an air conditioner, large refrigerator or other major appliance might add to an electric bill. In the United States if more than ~3500+ watts are used it is a red flag.
If you run your light for 24 hours a day then be sure to replace it after 6 months of use. If you run it for 18 hours a day, then replace it after 9 months. If on for 12 hours a day then replacing it after 12 months is perfect.
Lumens
Lumens is a measurement of how much light per square foot is emitted by your bulb. Lumens are determined by the actual design of the light, not the wattage. Manufacturers will almost always provide lumen specifications for the bulb. Typically a high number of lumens equates to a high quality light.
Never go any less than 2,500 lumens (even if you’re only growing one plant!) To ensure maximum light exposure and to produce big dank frosty buds, you must hit AT LEAST the 45,000 mark. This is enough to abundantly supply light to a 3×3 foot grow area, which will hold 6 – 9 plants. The idea here is to utilize as much of the light as possible. You should have enough light to provide 20-50 watts for every square foot of your grow area, the more light the better.
The number of plants in the list below is an approximation of the maximum number you can grow with various wattage MH or HPS grow light systems:
- 250 watts: will cover 5-12 square feet (a 2.5×2.5 ft. grow area). ~7 plants or less.
- 400 watts: will cover 8-20 square feet (a 4×4 ft. grow area). ~13 plants or less.
- 600 watts: will cover 12-30 square feet (A 5×5 ft. grow area). ~19 plants or less.
- 1000 watts: will cover 20-50 square feet (6.5 x 6.5 ft. grow area). ~32 plants or less.
These numbers assume you have a good reflector around your bulb and also light-reflective wall coverings. You can increase the figures a bit if using multiple bulbs, due to their overlapping effect. You can also increase coverage using a light mover. Use at least 40 (50 is ideal) watts per sq. foot of grow space.
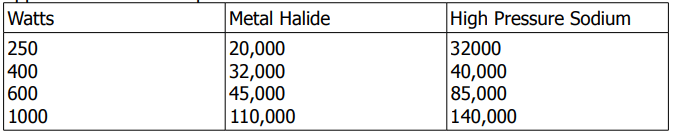
Approximate lumen output for HIDs:
Some lights may be more efficient than others. Divide a light’s lumens by watts to get its lumen per watt ratio. This will allow you to compare the efficiency of lights to different wattages.
Light Sources
See also:
There are many different types of lighting sources you can use for lighting up your indoor cannabis plants. But which one is the ideal for you?
Fluorescent Lighting
If you are planning on not growing full flowering cannabis plants, then fluorescent lighting is for you. Don’t use incandescent lamps for growing marijuana. Within the last few years the large light manufacturers have come out with an incandescent light made especially for use in growing plants. Even though they are superior to the standard incandescent light bulb we use in our homes, they can’t yield the results obtained with a fluorescent lamp. The light emitted from an incandescent lamp is in the red side of the light spectrum, but is very low in the blue. These can however be used for early stages of cuttings.
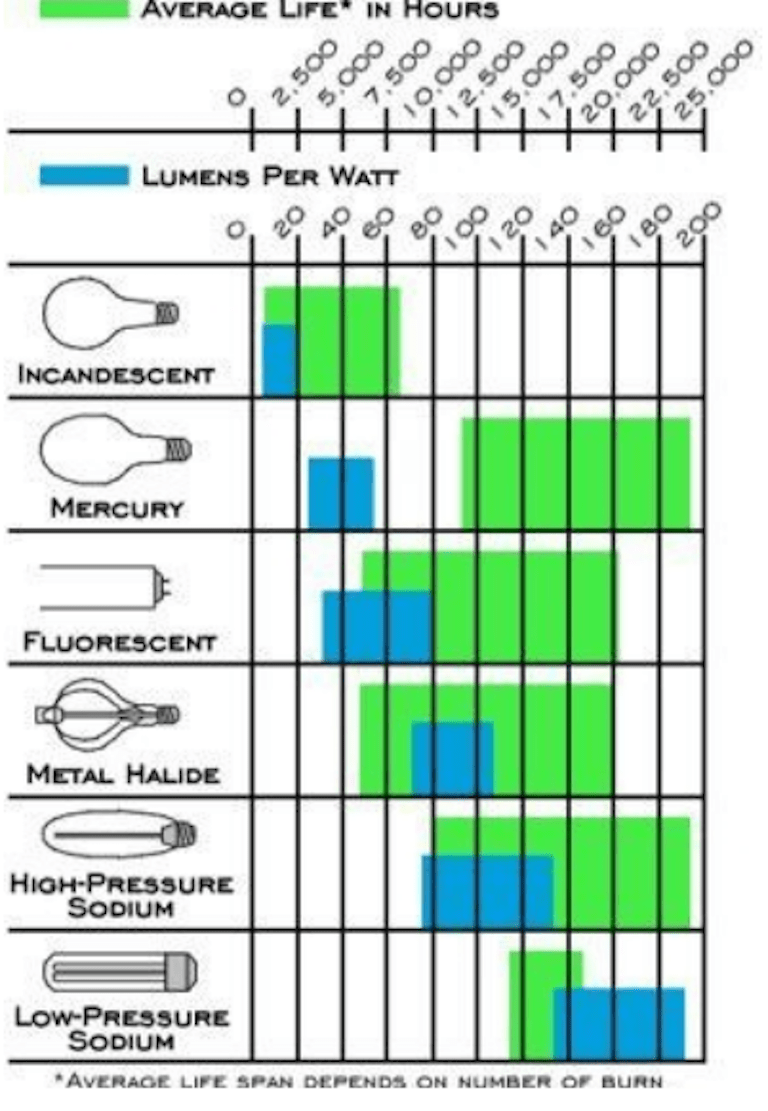
Fluorescent and some kinds of LED grow lights are good for the seedling and vegetative stages of growth, but they will NOT produce as big of a harvest as Metal Halide (MH) or High Pressure Sodium (HPS) grow lights during flowering. It will also take much more time for the plant to mature. If you compare their lumens (brightness) per unit of energy consumed, Metal Halides will produce up to 125 lumens per watt compared to 39 lumens per watt with fluorescent lights and 18 lumens per watt for standard incandescent bulbs. Due to the low output, fluorescent lights are a poor light source for flowering and budding.
But, since they are gentle, they do however make a GREAT source for starting off your delicate seedlings.
Never buy special grow fluorescent lights for full production such as “growlux”, they do not produce enough lumen output. Use normal full spectrum fluorescent lamps. Fluorescents are good because they don’t generate that much heat; High Pressure Sodium (HPS) isn’t that good in that aspect. Fluorescents can be equally a bad choice because they do not have good light penetration; High Pressure Sodium (HPS) lights are much better in this regard. Always pay attention to the spectrum of the lamp: cool white/day light has more light in the blue spectrum and warm white/soft white has more light in the red spectrum. You must combine those for the plant to have a healthy growth and flowering, and supply them at the right time. More on this in a bit!
If you are going to use Fluorescent lighting then set it up as follows:
Figure about one plant per two feet of fluorescent tube. Fluorescent light sources should be an average of 6-8 inches from the top of the plant. They may be mounted on a rack and moved every few days as the plants grow.
Please steer clear of shady fluorescent or incadescent light dealers that claim their lights will perform as good as mh or hps lights. This is complete bullshit. Some models can come close, but unless you’re planning on spending over $1000 on a Flourescent grow light system, then they don’t come close to the quality output that a mh or hps will. A good 400 watt mh or hps grow light can be purchased for well under $400.
Compact Fluorescent Lighting (CFL)
A Compact Fluorescent Light is a type of fluorescent that was originally designed to replace the standard E26 Edison Incandescent Light Bulb. The reason being, CFLs will put out the same amount of visible light using while much less power and have a significantly longer rated life span. Even though the price of the CFLs is higher than Incandescent bulb’s, they are generally rated to run anywhere from 8,000 to 15,000 hours. There many advantages of using CFL’s. Maybe you are just growing personal smoke, or you can’t afford a costly HID system, or an HID system just isn’t practical for your grow setup.
For some, HID lights aren’t available in their area. However, CFLs are sold almost anywhere. CFLs are in general a much cheaper growing solution, and they’re just plain simple to use being self-ballasted and screwing into a regular light socket. I’m not saying CFLs are better for growing than HID‘s, but in some cases it’s the only thing practical that will work.
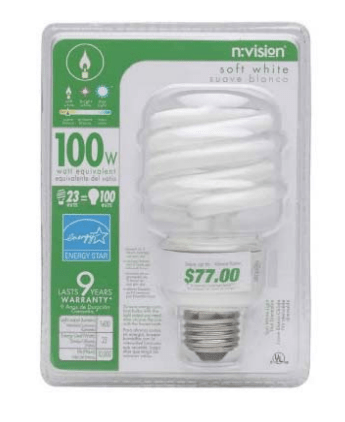
CFL Wattage: Normally light manufacturers that make CFLs will put two numbers on the box your CFL comes in. One is Actual Wattage and one is the Incandescent Equal. As you can see here on this CFL the Actual Wattage is 23 Watts, and it’s Incandescent Equal is 100 Watts. Totally ignore the Incandescent Equal and pay attention only to the Actual Wattage of the bulb.
 Color Temperature: You might see a lot of different labels when shopping at the store for CFLs. Labels including Soft White, Warm White, Cool White, Bright White, Halogen White, Daylight White, Full Spectrum. And also labels like 2700K, 3000K, 3500K, 4000K, 5000K, 6400K, and 6500K. These are all the color temperature of the light you are using. This is a measure of how warm or cool the light given off by a lamp appears, with warmer colors having a yellowish tinge and cooler colors being close to a blue. What confuses some people is that the warmer a color is, the colder its color temperature is. (ex. Warm White = 2700K.) Bulbs ranging in the 2700K-3000K spectrum are usually labeled Warm White or Soft White, bulbs ranging in the 3500K – 4000K spectrum are bright white or cool white, 5000K is labeled Full Spectrum, and finally 6400K – 6500K is labeled Daylight. You can grow an entire crop with CFLs if you chose the right spectrum of bulbs. For Vegetation you will want to use 6500K or 5000K, and when you flower you will want to switch to 2700K or 3000K.
The reason being, throughout the year the plants outside receive more 6500K (blue) spectrum light because the days in summer are long and hot and as Autumn/Winter gets closer the day gets shorter, and thus, plants gradually receive less 6500K light and more 2700K light as the plants begin to initiate the process of flowering. Do what you can to avoid bulbs within that 3500K – 4000K because they emit very little light that Is useful to your plant. Take note of (in the above diagram) the difference between the varying color temperatures.
How To Use CFL’s: In order to efficiently use CFL’s for growing Marijuana you will need to position the lights around 2 – 4 inches from the foliage of the plant. If you place the light too close, then your plant will have nothing to vertically stretch to and it will remain short and stocky. Some people combat this by adding CFL’s to the side of foliage instead of on top of it. On the other hand if the light is too far away from the plant, the stem will suffer elongation (stretching), which will result in loose and fluffy buds.
It is very important to note that when using CFL’s it is a daily “battle” to have your lights in the right spot. Also many people wonder is it better to have many low watt CFL’s or just a few high watt CFL’s. Both ways are capable of providing you a good harvest. Choose the configuration that is easiest for you and best suits your grow area.
In the end there are many different great setups so don’t set your mind on the one single perfect CFL setup. Just apply these basic tips when starting a CFL grow and you will see success (this applies to a lot of material in this post as well).
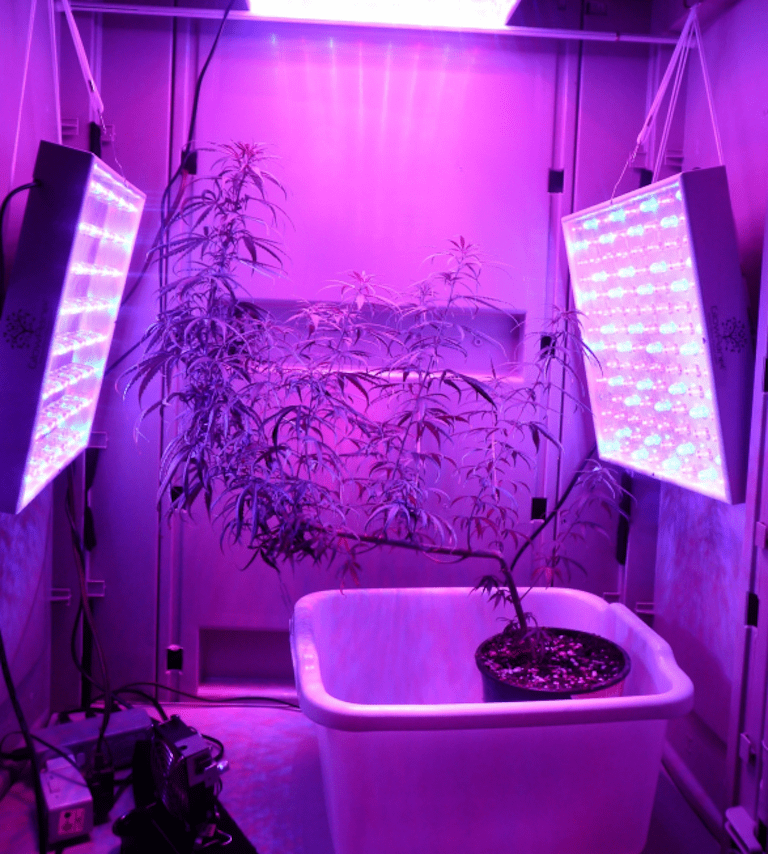
LED Lighting
 A couple of years ago if someone mentioned LED Grow Lights for growing marijuana you’d surely hear a chuckle. Nowadays with modern technology this light source is quickly gaining respect as an excellent grow light system.
LED lighting allows for a full-spectrum glow source, with a low heat output.
Benefits of LED Lighting:
- Using LEDs for growing saves around 80% from your energy bill vs. HPS and Metal Halide. This is a green solution which is not only easier on the environment, but also your wallet!
- Low Heat. How many times did you forget to raise your HPS light and burn the tops of your plants? LED grow lights emit very little heat. This also means your grow room won’t be so hot, so its easier to control temperature. Your thermal footprint will also be less, providing a more discreet growing experience.
- LED growing lights have a longgggg life span. Most are rated for 50,000+ hours!
- Wide Spectrum. The LED’s provide the right blend of light to be equally effective during vegetative and budding stage.
LED Grow Lights and Marijuana?
Yep! LED’s are a great light source and are proven to grow marijuana. They are a great inconspicuous way to grow for the modern gardener. According to research, your standard 90 watt LED light system has the same output power as a 400 watt HPS or MH bulb. Just by reading this single point you can see a clear picture as to why LED grow lights are great for marijuana enthusiasts!
LED lighting has a number of unique advantages. The lamps have a fixed angle so no reflector is needed, therefore all the light output is directed at the plants. LED lighting runs cooler and the plants can grow right up to the lights. These lights produce light in a fairly tight spectrum and lamps are available that can be combined to stimulate all the photo sensitive hormones in the plant.
The downside is that high quality full spectrum LED’s are extremely expensive, but as technology improves, cost is going down.
Take what you think you know about LED Grow Lights and throw it out the window.
You may have heard that they are decent for vegetative growth but fall short on flowering, that they are too expensive, and that they don’t work. You may have even tried them and were disappointed.
But that just isn’t the case nowadays – at least not with the company we are introducing to you today.
So what has changed?
LED Grow Lights have come a long way in the last few years. What once were overhyped Christmas lights, are now high powered bud producing machines with laser-like intensity and yields that can outpace that of traditional HID lighting. And they make economic sense – most growers see a positive return on investment in about 12 months.
Gone are the days of false marketing gimmicks and infomercials masquerading as genuine grow results. Thanks to the leaders of industry out there, you no longer have to put up with horrible customer service or the shady histories of the companies owners.
And best of all, you won’t be tricked into buying a 357 watt light only to find out it really only puts out 165 watts. After seeing many of my students being “burned” (pun fully intended) for years, we have desperately searched for a stable LED grow light company. Finally we found them: Platinum LED.
Platinum LED has changed the industry through truth-in-advertising, integrity, and a product line that does exactly what they say it can do – grow mountains of high-grade cannabis. Their customer service is top-notch, friendly, and most importantly – knowledgeable in growing everything from cannabis to cucumbers. They stand behind their products and will assist all growers from seed to harvest to ensure you get the results you deserve. In other words; they’re a no-bullshit tell-it-like-it-is company. This is why Platinum LED gets my highest personal recommendation.
So You Want To Grow Cannabis With LEDs?
So now that you have the most important step: A good, solid lighting rig, here here are some simple but crucial steps to follow to be sure your yields are bountiful:
Those of you that are used to growing with HID lighting need to pay special attention here because growing with LED is a little different.
The entire point to growing indoors is to have 100% control of all environmental factors – Lighting, nutrients, temperature, humidity, soil or hydroponic conditions, and air exchange.
What we need to do is create an environment that is optimum for plant growth and bud development. This means that we need to match what a plant needs for peak transpiration – the intake and assimilation of water and nutrients for a plant to grow.
Temperature & Humidity
These two factors are closely related and have a dramatic affect on how a plant transpires. Typical HID growers will have room temperatures of about 75 degrees F and relative humidity from 65-80%. The reason this works for HID growers is because the massive heat output from the lights creates a micoenvironment at the plant level that matches proper transpiration conditions.
But this will not work with LED! The reason is that LED Grow Lights do not put out the incredible heat that HID lighting does. So, we must compensate for this and give the plants exactly what they need.
When growing cannabis under LED, temperature must be between 80- 85 degrees F and humidity at 40-45%.
These are the ideal conditions for cannabis transpiration that will have a dramatic effect on plant growth and bud development.
Soil & Hydroponics
The choice to go with soil or hydroponics is a personal decision, however, here are some recommendations to be sure you get the best results under LEDs.
If growing in soil, you must be sure the mixture is well-aerated. A vast majority of nutrient issues and poor yields can be traced back to soil problems right from the start. If your soil mixture is not capable of proper draining, your roots become water-logged and root rot is sure to follow.
This is most prevalent in organic mixtures – they compact too much and, because LEDs do not dry out the soil as HID lights do, it is easy to over water your plants.
A peat-based grow medium is recommended. Products such as Fafard, Sunshine Mix #4, and Pro-Mix are a great place to start. To this, it is recommended to add 40-50% perlite to the medium. This ensures proper drainage and allows plenty of oxygen to the root system. If you choose to use an organic soil, up the perlite to 50% and you shouldn’t have any problems. You will know that it is time to water your plants when the first 2-3 inches of the soil is dry or the plant looks “thirsty” with slightly droopy leaves. Give a thorough soaking and allow the water to run out of the bottom of the pots to ensure aggressive root growth all the way to the bottom.
If you plan to grow your plants hydroponically, there is one crucial step to take to ensure success with Platinum LED Grow lights. As I’ve stated earlier, room temperature of 80-85 degrees F is ideal for plant transpiration. However, hydroponic reservoir temperatures must be kept below 70 degrees F.
Even if using an aerator in your reservoir, water is not able to hold onto enough oxygen if its temperature is over 70 degrees. The result is that your roots will suffer as will your yield! So you have two options – either keep the reservoir outside of the grow space in cooler temperatures or you need to use a water chiller. Ideal temperatures for water are 65-68 degrees F.
Air Exchange
Many would-be growers out there come to me saying how they have everything planned out for their UBER-GARDEN so they can grow 20lbs of dank in just 30 days…or something along those lines.
One of the biggest mistakes I see growers make is having a completely sealed grow space.
An enclosed room – one that gets no air exchange – can grow plants but you will be sacrificing yield in the process! To ensure the best yields, it is imperative that the air is exchanged 2-4 times per hour. Even if supplementing with CO2, your plants CRAVE fresh air and if you allow the air to become stagnant, your plants (and yield) will suffer.
This is one of the biggest mistakes I see, even if they are using LED grow lights because “they are safe now”, being within temperature requirements. But this is not the case!
Pick up an exhaust fan that is capable of providing enough fresh air for your plants. Feel free to ask the folks at Platinum LED about how to to properly size your fan for whatever grow space you have. Also – don’t forget to have a circulation fan inside the grow space to keep the air flowing through the canopy and stems. Not only does this strengthen your plants (they will need it for the massive buds you will produce) but it will ward off mold and fungal growth.
Light Height
In general, stick to the recommendations for light height as shown on Platinum LED‘s website. Proper light height depends a bit on the wattage of light you are using but is critical during vegetative and flowering stages.
Too much light intensity on a seedling can verwhelm the plant and kill it while too little light during flowering can result in light, airy buds. Vegetative stage plants need the light at 14-18 inches above the canopy while flowering plants need the light lowered to 10-14 inches.
The key to flowering with LEDs is timing. When you switch from a vegetative light cycle of 18 hours on and 6 hours off to the flowering cycle of 12 on and 12 off, you need to WAIT before you lower the light. Wait for a couple of days until you see genuine bud formation before you drop the light. Lowering the light too soon can stunt bud development and negatively affect yield. Once you see flowers, it is safe to drop the light to 10-14 inches.
Heat & THC Content
I would like to take a minute to point out a seldom considered fact, that has taken me many, many years to discover:
Heat degrades THC.
Many people know this but don’t realize the effect that your lighting can have on the potency of your final product. When growing with HID lights, your plants are bombarded with intense heat which can have a direct impact on the quality of your harvest. Because LED grow lights are inherently much cooler running, plants do not experience heat degradation and tests have shown that bud grown under LED can score higher THC levels than the same strain grown under HID. This is something to seriously consider when deciding on lighting for your grow room.
The bottom line is that LED Grow Lights are the one of the best methods for indoor cultivation. Low energy costs, no heat signature to speak of, long lifespan, very little heat and they grow big buds. Follow this outline and you can become part of the new generation of Solid State (LED) growers. So go ahead and check out Platinum LED‘s website today!
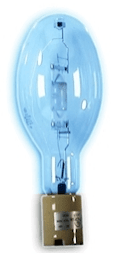
High Intensity Discharge (HID) Lighting
HID lighting is the most efficient & effective way to convert electricity into light that is available on the market today. There are two types of HID grow lights used for horticultural growing, and those are Metal Halide (MH) and High Pressure Sodium (HPS). This is an extremely important purchase decision( as important as choosing your strain!), so make sure you get a high quality light. Be warned, HIDs tend to produce a high electricity bill.
Note: some lights come with a phosphor coating on the outer-bulb, this enhances the yellow area of the spectrum at the expense of a few lumens. Phosphor coated bulbs will also diffuse light and reduce ultra-violet rays.
Metal Halide(MH)
Metal Halide (MH) light fixtures produce and abundance of blue spectrum energy and are best for vegetative (beginning) plant growth. MH lamps promote vigorous plant growth, the kind of light best suited for supporting green leafy growth and keeping the plants compact. The light produced looks very similar to a “cool white” fluorescent light found in modern schools and offices today. The average lifespan of your standard quality Metal Halide bulb will be about 10000 cumulative hours. The bulb will generally burn longer than this amount, but the amount of blue spectrum energy will gradually begin to decline after this point, so it is best not to wait for the bulb to burn out. Replace it after 10,000 hours.
Metal Halide:
- Well-balanced spectral emission.
- High lumen per watt ratio.
- Strong blue light emission.
- Ideal for vegetative growth.

High Pressure Sodium (HPS)
High Pressure Sodium (HPS) is the most popular type of bulb among growers today, and with good reason. High pressure sodium light fixtures produce large amounts of orange-red spectrum energy and are best for the flowering phase of growth, this is because this glow of light energy triggers hormones in plants to increase flowering/budding in plants. In other words, HPS lights emit the perfect spectrum for growing sparkling rich sticky potent big buds. They are the brightest indoor lights available. The light produced looks similar to the “warm” incandescent lights found in homes, but has a deeper orange-red color. The street lights you see in many cities around the world use HPS lighting.
The average lifespan of HPS lighting is twice that of metal halides, but it is important to note that around 18,000 hours of cumulative use, they will begin to draw more electricity than their rated watts while gradually producing less and less light. HPS bulbs are VERY efficient. They produce approximately 140 lumens per watt.
Their disadvantage: They are deficient in the blue spectrum. HPS lights do not contain enough blue spectrum light for abundant vegetative growth. (Ideally you would use both MH and HPS lights for both the different phases of growth.)
High Pressure Sodium:
- Mostly reddish light.
- Highest lumen per watt ratio.
- Ideal for flowering.
- Lacks blue spectrum strength.
WARNING: Be extremely careful when handling your bulbs; before using either bulb make sure you wipe them with a cloth (and screw it in with a towel), any fingerprint oil on the bulb will burn it out immediately and cause it to literally explode!!!
In general:
- Cheap cool white fluorescent bulbs: for germination/seedlings.
- 400 watt Metal Halide/HPS/LED: for personal home growers.
- 1000 watt Metal Halide and HPS or LED: for dedicated personal growers and commercial growers.
Don’t use regular incandescent bulbs (“grow bulbs”) or halogens to grow cannabis. Invest in fluorescent lighting (good) or HID lighting(best) which supply the high-intensity light that cannabis needs for good growth and large buds.
If you’re opting for the ultimate lighting setup to produce maximum yields & quality stick frosty buds, and have the money; then ideally it would be best to use both metal halide(mh) and high pressure sodium(hps) lighting fixtures during both the vegetative and flowering stages of growth.
Growers use metal halides for small single light grow room, because when high pressure sodium lights are used by themselves – they tend to produce long thin fluffy buds. Many professional weed growers combine the lights in a ratio of 2 metal halides(mh) : to 1 high pressure sodium(hps).
Here are your choices:
- HPS through both stages of growth (decent).
- MH through both stages of growth (decent).
- MH through the vegetative growth phase followed up by an HPS light through flowering (excellent).
- Both MH and HPS light through both stages of growth (best option).
 Now as far as lighting fixtures and bulbs goes, you aren’t able to use a standard high pressure sodium bulb in a metal halide fixture, but you can use a metal halide bulb in a high pressure sodium fixture ONLY IF IT IS THE SAME WATTAGE!!!
You can purchase specialty HPS bulbs that can be used in a MH fixture and vice-versa, but these conversion bulbs generally cost double the price of a standard bulb.
If you’re only able to purchase one light fixture for the time being, then you can go for getting a high pressure sodium fixture with a high pressure sodium bulb and a metal halide bulb (remember: both bulbs MUST be rated for the same wattage as your light fixture). Use the metal halide bulb for the vegetative growth phase and the high pressure sodium for flowering. When you have enough money, get a proper metal halide fixture. And don’t worry if you can’t afford both lights, you can still grow great marijuana with just one!
Lighting Your Plants

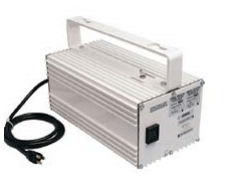
Ballast
HIDs cannot operate without a ballast. A ballast is a transformer used to alter the electrical current for use by the bulb. It is commended to get your ballast along with your bulbs so that you are sure to get the right type. If you don’t know very much about wiring and you don’t want to burn your house down, then be sure to purchase a pre-wired kit done by the experts so all you will have to do is screw in the bulb and plug it in.
Ballasts can become very hot. You need to properly house them, if this is not possible make sure that they are on a heat-resistant urface. NEVER put them on anything flammable.
WARNING: Incorrect wiring can severely damage equipment, injure or even kill you (and start fires!). So be careful.
Light Hanger
You can use a light stand or hang your light from the ceiling using hooks and chains. Your lights will need to be adjustable in order to lower and raise them depending on the phases of growth. The closer the light is to your plants, the more light they receive and the faster they grow, but the hotter they become. Be careful because some cannabis plants can grow up to an inch a day! If the plants get too close to the light they could burn, dry out, and die. It is also necessary to be able to adjust your light due to the heat emitted from these types of lighting fixtures. The recommended distance should depend on bulb size and phase of growth.
Note: If you accidentally get a light burn, do not worry, just clip off the burnt part with a pair of small scissors and move your light to the appropriate distance.
You can build a custom light hanger using parts from a hardware store, or you can buy a pre-made kit. A pre-made kit is great as it wont set on fire or break.
After starting each day lower your light a few inches until your light is as close to the plant as possible without harming the plant. You’re going to have to determine the ideal distance yourself, it varies based on reflector quality, bulb efficiency and heat generation, etc.
WARNING: Be extra careful, foliage that gets too close to the light will burn! A good general rule-of-thumb is; if your hand can’t stand the light, your plants can’t either.
Be sure to purchase (or build) quality lighting equipment as many growers have lost their homes in fires due to sub-par sketchy lighting systems. If you can afford a quality lighting system made for horticultural purposes with a good reflector and ballast, get it.
This is one of those things you DO NOT want to go cheap on!
(Please be safe. Check the Electrical Safety section for more information about your grow area’s safety.)
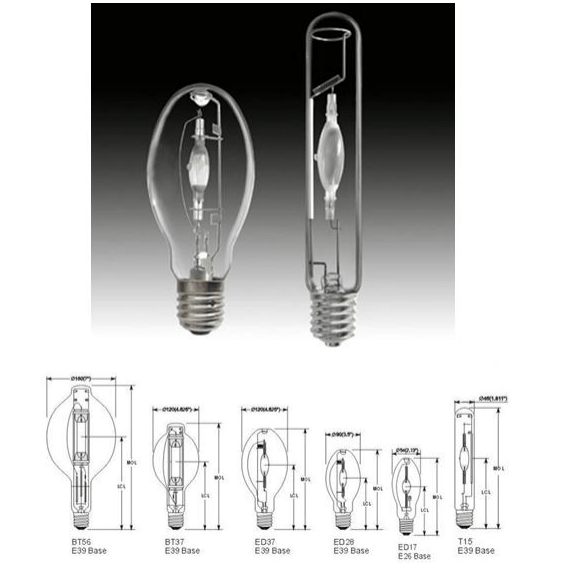
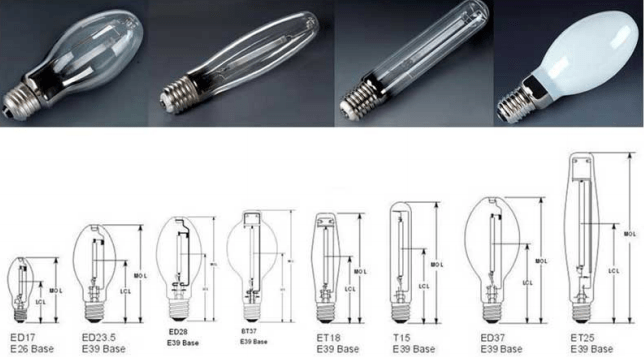
Bulb Orientation
Some bulbs are horizontal, others vertical, and then there’s universal bulbs. Vertical bulbs can only be used with fixtures in the vertical position. Horizontal bulbs can only be used with fixtures in the horizontal position. Universal bulbs can be used in a horizontal or vertical position. If you aren’t sure what to buy, go ahead and get a universal bulb. It will work in either type of fixture, hence the name “universal”.
HPS (High Pressure Sodium) lamps can burn in any orientation.
MH (Metal Halide) lamps come in three basic types:
- Base Up (BU): Must be operated in the base up position.
- Horizontal ( HOR): Must be operated in the horizontal position.
- Universal (U): May be operated in any position.
Orienting metal halide lamps in burning positions other than those specified can result in severe reductions in performance and potential nonpassive failure.
Lamp life, light output and color can be affected by the burning position. Some burning positions may need enclosed fixtures for safety reasons.
Hanging Your Lamp/Reflector Step-By-Step
Hanging your lamp is easy!
Step 1) First you need to find a stud in the ceiling. When you have located a stud, figure out which direction they run.
Step 2) Next (optional), take a 2×4 and screw it into the ceiling using a drill with screwdriver attachment and 3.5 inch steel screws.
Step 3) After hanging your 2×4, screw “hooks and eyes” in the proper locations along the stud or the 2×4 to correspond with your reflector brackets.
Step 4) Next, if necessary hang your chains to lower and raise the light, otherwise, just hang it and you’re ready to go!
Light Placement
In order to reap a heavy potent harvest, keep your plant growth within the penetration area of your lamp. It’s very important for indoor plant growers to get their light source as close as possible to their plants. The amount of light your plant receives is directly related to it’s yield/flower density. As the light rays get farther from the bulb they begin to disperse and become less intense.
Note: This is the primary reason growers will keep plants small so that way the entire plant is closer to the lights.
Remember not to burn them!!!! Growing Marijuana is more of an art than an exact science. You will need to rely on the experience your little buds are having rather than follow set “plant height” recommendations. Use those as general guidelines, but ultimately your plants are going to determine how close you can get your light to them.
The following chart shows the optimal penetration range for most HID lamps:
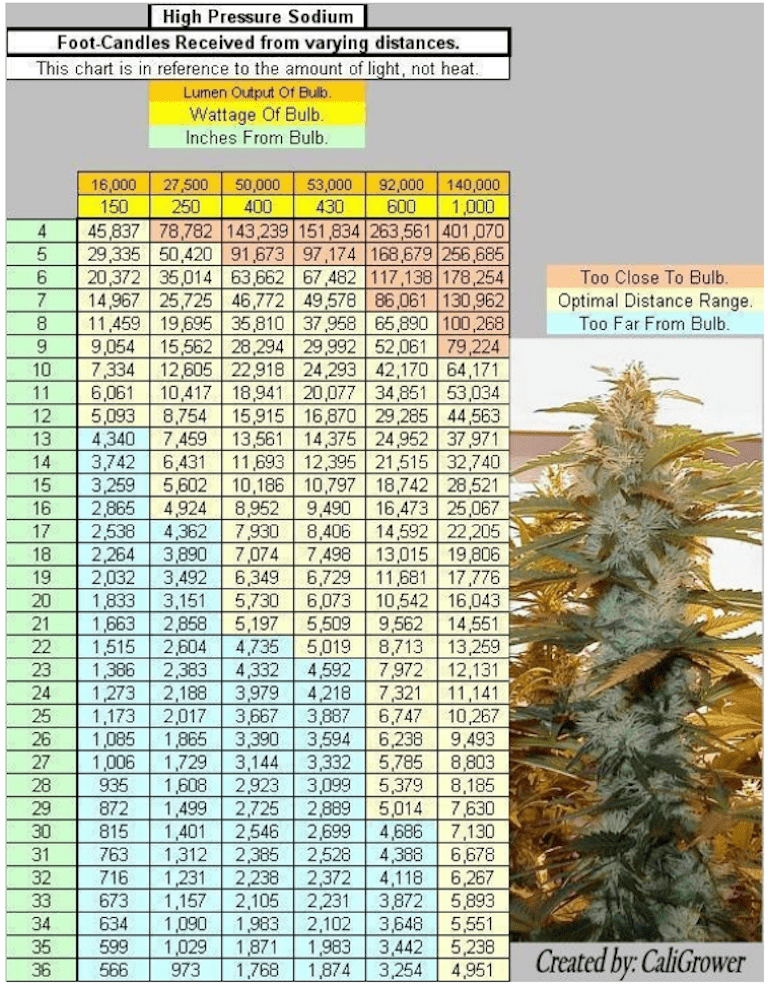
Optimum Lamp Height
When growing indoors, there is an optimum distance (height) between the plants and the light source. This distance fully illuminates the whole canopy with direct light from the source and is as close as physically possible to the plants for maximum lumen intensity which supports the best speedy growth. This is called the Optimum Lamp Height (OLH) where Effective Penetration occurs.
Here is a rough sketch:
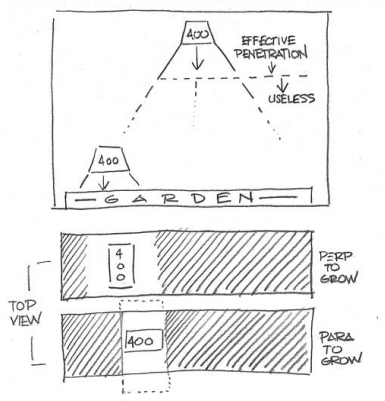
Ultimately, to get the best light efficiency from your lamp, you want it at the OLH at all costs. Many growers wonder how they can get it there without causing harm to their plants due to bulb heat. There is a way to do this.
First, try moving your light to the OLH and see what it does to your plants. If they have no problem, then you’re fine. If you have a high output HID, this probably won’t be enough, keep going.
WARNING: If the parts of the plants closest to the light start to turn brown and dry out, raise the height of the light source IMMEDIATELY, as they are too close.
Next, try actively exhausting your light hood by hooking up a direct exhaust system to the hood, and then move your lamp to the OLH and see if the plants are O.K. If the plants still seem affected by the heat, then you must add glass to your actively exhausted lamp hood. Glass will absorb/reflect/filter some of the light-heat energy being emitted by the lamp.
The number of effective filtering would be relatively low, around 2-3% of wattage, but it will effectively filter out almost all of what little UV-B is emitted by the lamp and a great portion of the heat. UV-B control is believed, and has been shown, to have a positive influence on the potency of Cannabis.
Light intensity is directly related to yield and flower density.
Almost all glass offered today for insertion in air-cooled lamp hoods is tempered glass, which is regular glass with low amounts of impurities. If one was looking for the most efficient glass for their hood, quartz glass will allow the transmission of UV-B, but is not made specifically for light hoods. Finding a custom quartz glass can be tough work, but it is the best option if you are looking to make the best buds on Earth.
And also remember, that if you have a rectangular garden, it is important to position the longest side of the reflector parallel to the shortest side of your garden.
You should periodically inspect and clean your light hood and bulbs, especially after foliar feeding or underleaf spraying for insects. The dust and dirt that collects will definitely decrease reflectivity. Isopropanol alcohol, glass cleaner or water (and a soft cloth) can all be used to remove streaks, dust and spots.
Bulb Heat Proximity
There are a number of factors which play a part in the temperature radiated from your bulb (i.e. watts, hood design, and air circulation).
A simple method of testing for temperature is to use the back of your hand; if its too hot for your hand, it’s too hot for your plants. Good ventilation is the key to getting your light closer to the plant tops.
Recommended typical Optimum Lamp Height distances:
- Flourescents: within proximity.
- 400 watt HPS: 1 feet.
- 600 watt HPS: 1.5 feet.
- 1000 watt HPS: 2 feet.
And here’s a rough guide for when first starting out:
- Fluorescent: Tips of leaves almost touching bulbs.
- 400 watt Halide: Two feet away from seedlings and one foot away from grown plants.
- 1000 watt Halide: Four feet away from seedlings and two feet away from grown plants.
Light Bending/Stretching
Light bending happens when your plant tries to grow at an angle towards your grow light. The problem is if your plants excessively begin to grow at an angle they may eventually grow towards and into another plant. This is bad because your other plant will then be smothered and not receive enough light. Also, during Flowering the buds can get really heavy and fall over. In order to avoid light bending be sure to switch your plants around accordingly. If your plant is bending too much one way, simply move it around. It shouldn’t take more than a day or two until your plant straightens up. If you can’t move your plants like in a most hydroponics systems, then you can tie your plants up so that they don;tbend. If growing major outdoor plants you can use mini Bamboo poles, PVC pipe, a garden stake, toothpicks, (even chopsticks will work!) etc.

Note: Bending plants are a loud warning sign from your plants – they need more DIRECT light! Bending is different than wilting, which is an entirely different issue.
Light stretching happens when your plants aren’t placed close enough to their light source. If your plants are too far from the light source they will grow very tall and skinny searching for more light. This is bad because then the nodes will develop fewer and farther between. That means is fewer sites for buds to grow. Keeping your plants closer to the light source will encourage them to remain bushy and more compact. This is ideal for MAXIMUM bud production. Remember, the closer your marijuana is to a light source the better it will grow!
Focus the light on your plants where exactly they need it the most. Areas such as tops that are the closest to the light source will produce the largest, most potent buds. Light stretching is all-too-common and occurs when plants crowd each other for canopy space. Lower parts of the plant will tend to stretch as high as a higher ratio of infrared light, rather than direct red light, reaches the lower canopy. This can be prevented by reflecting light from the floor to target lower plant sections. This unfiltered light is higher in red spectrum energy, counteracting the stretching effects of the infrared light. You can achieve this by covering the floor of your garden with some sort of reflective material or painting it a flat white. Also be sure to space the plants out properly. Due to most of the light in your grow area hitting the floor, covering your floor with Mylar or painting it a flat white will greatly increase the amount of light received by your plants. This will also prevent stretching because the lower canopy is being properly illuminated.
(Please refer to the Lighting and Setting up Your Grow Room sections for proper illumination guidelines.)
Reflectors
Light bulbs are spherical, tube-like, or egg shaped. Observe how these shapes direct the light out from the bulb, in all directions!!!! This means HALF of your precious light will be wasted by being directed it upwards out of the top of the bulb, away from your plants. There are two methods to ensure maximum light efficiency.
The first is to position your bulbs in between the plants (hanging from the reflective coated ceiling socket-up) so that the base of the bulb is below the tops of your plants. This will make sure all your light is being directed at the plants in all directions and any upward bound light will not be wasted. This method is good for large, multi-light gardens with very large plants.
The next method is to position the bulbs above the tops of the plants and use a reflective hood to reflect upward bound light back down. The closer the reflector is to the light, the more intense the reflection will be. This method allows the grower to concentrate more light to one plant area. Reflectors come in many different shapes and sizes, some being more effective than others. Retailers usually tend to sell them along with the bulb in a complete package. Remember, don’t go cheap on ANY part of your lighting setup if you want high yields and stellar potent bud.
Note: Clean your light reflector constantly. Dirt and grime can leach as much as 15% of your light!
Also before making your final purchasing decision be sure to take these factors into consideration; a hard or shiny white and mirror images are going to create massive hot spots as well as any folds or bends in the reflector. The best reflective surfaces are either a dull or matte finish, a pebble finish, an aluminum, or a silver.
Titanium whites are very good and tend to be the brightest.
WARNING: Do not EVER use a cone-shaped hood! These are the most ineffective, inefficient hoods ever created by all mankind, ever.
Horizontally oriented lamps are more efficient for several reasons and should be seriously considered as the grower shops for a good light solution.
In a horizontal lamp arrangement, the arc tube that produces the output is oriented with its full length exposed to the reflective hood insert and plants. This provides excellent efficiency due to a proper direct and indirect lighting arrangement.
The reflector should be small (for reasons already stated) and should be well designed with a gull wing insert which uses a quality baked-on white enamel designed to resist discoloration from the adverse affects of heat over time. A much better solution is to choose a corrosion resistant specular aluminum insert. The use of quality specular material is the way to go regarding getting the most from your investment.
Bulbs Matching Ballasts
Ballasts and bulbs should be matched. HID bulbs generally need specific ballasts, and any given ballast can usually safely and ffectively operate only one type or a few types of HID bulbs.
 The bulb wattage must be matched to the ballast. A smaller bulb will usually be fed a wattage close to what the proper bulb takes, and will generally overheat and may catastrophically fail. Any catastrophic failures may not necessarily happen quickly. A larger bulb will be underpowered, and will operate at reduced efficiency and may have a shortened lifetime. The ballast may also overheat from prolonged operation with an oversized bulb that fails to warm.
Even if the ballast and bulb wattages match, substitutions can be limited by various factors including but not limited to different operating voltages for different bulbs. Examples are:
Pulse-start sodium lamps often have a slightly lower operating voltage than metal halide and mercury lamps of the same wattage, and ballasts for these sodium bulbs provide slightly more current than mercury and metal halide ballasts for the same wattage would. The higher current provided by the pulsestart sodium ballast can overheat mercury and metal halide lamps. Mercury and metal halide lamps may also “cycle” on and off in lower voltage sodium ballasts, such as many 50 – 100 watt ones.
Metal halide lamps have an operating voltage close to that of mercury lamps in many wattages, but have stricter tolerances for wattage amount. Also, metal halides usually need a higher starting voltage. Most metal halide lamps 100 watts or smaller require a high voltage starting pulse around or even over 1,000 volts. 175 to 400 watt metal halide lamp ballasts can power mercury lamps of the same wattage, but the reverse is not recommended.
Mercury lamps 50 to 100 watts will work on metal halide ballasts, but hot restriking of mercury lamps 100 watts or smaller on metal halide lamps may be hard on the mercury lamp since the starting pulse can force current through cold electrodes and the starting resistor inside the mercury lamp.
1000 watt mercury lamps come in two operating voltages, one of which is OK for 1000 watt metal halide ballasts. A few wattages of pulse-start sodium come in two voltages. A low voltage lamp in a high voltage ballast will be underpowered, resulting in reduced efficiency, possible reduced lamp life, and possible ballast overheating. A high voltage lamp in a low voltage ballast will usually cycle on and off, operate erratically, or possibly overheat. This will usually result in greatly reduced lamp life in any case. One class of sodium lamps is made to work in mercury fixtures, but these only work properly with some mercury ballasts. Certain sodium lamps may suffer poor power regulation and accelerated aging in the wrong mercury ballasts, especially after some normal aging changes their electrical characteristics. Also, these lamps may overheat and will probably have shortened life with pulse-start sodium ballasts.
Many sodium lamps require a high voltage starting pulse provided only by ballasts made to power such lamps.
To prevent dangerous accidents keep remote ballasts away from tap points and on an elevated position (approx 5 inches off the floor) using a block or shelf.
A switchable ballast allows you to run a standard halide or sodium bulb from one ballast, you just insert the appropriate lamp and set the switch to the correct operating setting.
This type of ballast enables growers to bypass costly conversion lamps and maintains the higher light output from non conversion bulbs.
Conversion Bulbs
 A Conversion bulb offers you the opportunity to switch the bulb in your Halide or Sodium fixture without changing ballasts.
Many cannabis gardeners prefer Halide light for vegetative growth and a Sodium light during blooming but a separate fixture is normally required. A Conversion bulb is a convenient option when you only have room for a single fixture but want the advantage of both Sodium and Halide lighting.
Note: High intensity Discharge conversion bulbs are system specific. Sodium conversion bulbs are designed to be used in metal halide or mercury vapour fixtures only. Halide conversion bulbs are designed to be used in high pressure sodium fixtures only.
Replacing Bulbs
Bulb replacement really depends on what type of lamp you’re using.
These recommendations are based on 18 hours of daily use:
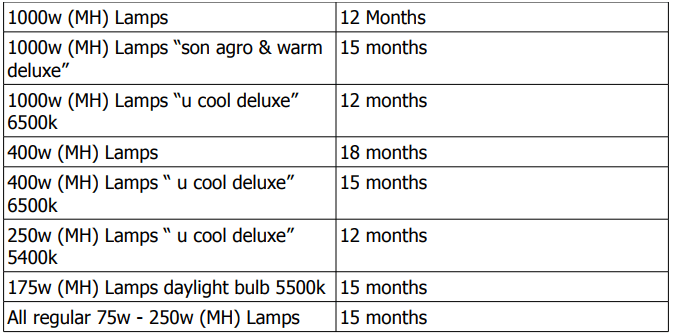
Replace all HPS after 24 months, with the exception of the son agro and super agro, replace after 15 months. Fluorescents should be replaced every 15 months. After 12 months, check the tubes if running more than one tube on a single ballast. Always replace all fluorescent tubes at the same time. Remember to always write down the day that you start using a new HID lamp. This will allow you to calculate when to replace it for optimal results.
Electricity
If you plan on using a 1000w or more than one 400 watt and one 600 watt lamp, then you should carefully consider the electricity available in your home. HID lights draw enough power to blow fuses or switch breakers if they share the same circuit with other household appliances.
Electricity comes in from the street and is dividable into useable circuits. (Can be seen inside your circuit breaker located on the side of your home.)
Depending on the size of your home and the construction the number of circuits can be as little as 2 to 3 and up to as much as 20 or more separate circuits!
A fuse or breaker switch will regulate the amount of electricity (measured in amps) that will be available to that circuit. Household circuits are generally set at 15 amps. Electrical devices all come with their own amp rating, which determines how much power they will draw. This can be found usually on a label or in the documentation that comes with the electrical device.
You can use multiple devices on any given circuit as long as their amp rating does not exceed 15 (or whatever your circuit breaker is set to).
A single 1000w HID light bulb + ballast will use about 9 amps.
Converting Watts to Amps
Watts divided by voltage (W/V) equal amps. A 400 watt ballast plugged into ordinary house current (120v) would draw 3.33 amps. Using a little math we can see then: Voltage = Watts / Amps.
A lot of growers wonder how many lights/watts they can I put on a standard 15 Amp service. The rule of thumb is to only load a breaker up to 80% of its capacity. On a 15-amp service with 14/2 gauge wire one should only load it up to 12 Amps MAX. Since most lights will draw 1 amp per 100 watts a 15-amp breaker can handle one 1000 watt light each.
This brings up another point in regards to indoor growing – it is always good practice to have the fans and the light that they cool on the same breaker. That way if the breaker is somehow tripped then both the light and its cooling system are down. Instead of the cooling system for the light going down and the light still shines away because it was on another breaker.
The above figures are estimated based on 110V supply. Purchasing a CAT III meter before doing any electrical work is a sound idea. It will allow for safe testing of the circuit before commencing work. A clamp meter is also handy for testing how many amps the circuit is drawing without having to break the circuit to do so, great to see if you get a peak when your lights first come on or just how many amps a given device is using.
Ground Fault Circuit Interrupter (GFCI)
A Ground Fault Circuit Interrupter (GFCI) is a device to protect against electric shock should someone come in contact with a live (hot) wire and a path to ground which would result in a current through his/her body. The GFCI will trip in a fraction of a second at currents well below those that are considered dangerous.
WARNING: A GFCI is NOT a substitute for a fuse or circuit breaker as these devices are still required to protect equipment and property from overloads or short circuits that can result in fire or other damage.
GFCIs can be installed in place of ordinary outlets in which case they protect that outlet as well as any downstream from it. There are also GFCIs that install in the main service panel.
If you are growing a hydroponics grow, there is no doubt that you need a GFCI. Any place where it is likely or possible that someone may be standing in a puddle of water and will come in contact with a plugged in electrical device needs a GFCI.
Converting Sockets
Some growers face a problem. The circuit which goes into their grow room only has two wires, but their light has a 3 prong plug! What should they do?
For starters they shouldn’t use one of those adapters that converts a 3 prong to a 2 prong unless they know for certain that the socket has been properly grounded.
They can install a new breaker in the service panel and run 3 wire Romax to their grow. Then they can install a 3 prong outlet (preferably a GFCI).
Buying a basic wiring book and following the instructions EXACTLY is crucial here. In fact, one would do better hiring a professional electrician to do the job. Compared to hospital costs they are pretty cheap.
The Cost To Run
In order to determine the cost of your lighting setup, you need to know three things:
- Watts: The wattage of the appliance
- Hours: The duration it will be on.
- Dollars: How much electricity costs.
Electric companies charge by the kilowatt / hr.
Say you use a 400watt HID light, and you run it for 18 hours at .06 cents a kilowatt, it would be 400 x 18 x .06, divided by 1000 = .432 (43 cents). This will give you the cost per hour of your light.
The average cost of running a 1000 watt light on 12/12 is about $20-$30 a month in electricity.
Reducing Your Wattage & Electric Bill
Suddenly spiking your electric bill is never a good thing as this may send up a red flag. Utility companies can tell your bill is way off from the same time last year, and growers are being found this way. When moving into a new place, immediately establish patterns of high electricity usage.
Here are some great tips you can use to offset and reduce your wattage and electric bill each month:
- Add a timer to your hot water heater. You can obtain one of these at your local hardware store. The installation info is easily available (or have an electrician do it – it’s a common request).
- Turn off any lights or other electronic devices when you leave the room! You don’t want to waste any wattage. This one single tip if adhered to can save you lots of money and wattage each month like you wouldn’t believe.
- Be sure to check the temperature your hot water heater is running. This can be viewed at a small dial right usually behind that small cover on the front. Some factory settings are ridiculously high and waste precious electricity heating to extreme amounts.
- One great solution many growers have used effectively is to use outdoor natural sunlight for flowering and use continuous light indoors for germination and vegetative growth. This takes advantage of the natural light/dark cycle and can cut your energy use in half compared to the same operation indoors. You can build a small greenhouse using fiberglass or PVC sheets that looks like a small storage shed or tool shed that will not raise any suspicions.
- Add a water heater “blanket” – available at any home improvement or hardware store. This will greatly assist the water heating process, conserving lots of electricity.
- Insulate the hot pipes running out of the water heater. Same as above. Check the caulking on all your windows and doors. Air leaks add up to extra heating / cooling costs. If you can afford it, replace your windows with newer, more energy efficient models.
- If you live in a very hot climate, it is advisable to apply a to tint the windows that get the most direct sunlight and heat during the day (east, west and south windows).
- Unplug any dryers, washers or other large unneeded appliances that draw a lot of electricity.
- Shower at another location such as the gym if possible.
- If you have an attic, install an attic fan. This will save your overall cooling costs a lot in the sultry summer months.
- Install, or have installed, a programmable thermostat. It is a complete waste to waste electricity on keeping the house too cool or warm when no one is home.
- Add insulation to your attic. If your house is older and you (or someone else) have been up there crawling or walking around for years, your current insulation may be compacted (that’s a bad thing). Check your local yellow pages to have someone come out and blow in some more insulation. It’s not cheap, but not as bad as you might think. And it will save you lots of money on heating and cooling bills.
- We have heard of some people steal their neighbor’s power through extremely careful stealthy wiring but we do not recommend this at all. Stealing power can cause a huge risk and create even more unwanted exposure than paying for it! Not to mention stealing what is not yours is morally wrong and as Maximus from Gladiator says, “What we do in life echoes in eternity.” 🙂
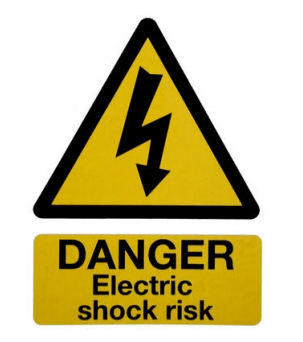
WARNING: Electrical Safety
There is nothing worse than coming home to a burned down house for not implementing the following effective safety precautions. Please be safe!
- Keep electronic hardware and cables organized and away from areas where you can trip on them. Make sure you keep all electrical devices and cables away from water.
- Place smoke alarms inside and out of your grow room. If your grow room is in an attic or basement, make sure you will be able to hear the smoke alarms going off from other rooms in the house.
- Safety glasses or goggles should be worn whenever power tools are used, especially if you wear contact lenses.
- Make sure the power is off at the breaker box before doing any electrical work.
- Always work in a clean, dry area free from anything wet.
- Wires should only be connected at accessible junction boxes (containing fuses and other protection). Never splice wires together and conceal them within a wall without a junction box.
- Never attempt to strip wires with a knife. Aside from endangering your fingers, you will nick the wire metal, which will create an electrical hazard.
- Ground fault circuit interrupter outlets should be used under damp conditions (basements, bathrooms, outdoors, etc.), as required by the National Electric Code.
- Don’t create fire hazards by over-loading an outlet with too many lights or by using an extension cord. Running too many lights on an ordinary household circuit can be VERY dangerous and can easily start a fire.
- ALWAYS have a full fire extinguisher nearby and know how to use it in case of an emergency.
- Avoid electrical shock by mapping and marking your switch and outlet boxes. Put the map on the door of the main power service panel.
- Leave a warning message that you are working on the circuit at the service panel, and tape the circuit breaker in the off position. With a fuse box, take the fuse out.
- Never change the size of a fuse or breaker in a circuit.
- Be certain your connector is CO/ALR rated when you splice aluminum wire. If it is marked CU/ALR, use only copper wire. Do not use aluminum wire with push terminals; use only copper or copper-dad aluminum wire.
- Always correct the problem that caused a fuse or circuit breaker to blow before replacing the fuse or circuit breaker.
- Replace wiring that shows signs of fraying or deterioration.
- Avoid breaking your knuckles by bracing the powerful right-angle drill so that it cannot spin around if it gets stuck while drilling.
- Before working with wires or electrical connections, check them with a voltage tester to be sure they are dead.
- Plumbing and gas pipes are often used to ground electrical systems. Never touch them while working with electricity.
- Don’t use metal ladders with overhead electricity.
- Never ignore safety to save money or to rush a project.
- Use the proper protection, take precautions, and plan ahead.
Be safe, and remember; it CAN happen to you!
Lighting Schedules
As you can recall, at different stages in a marijuana plant’s growth cycle it requires varying amounts of lighting. Marijuana regulates it’s growth and flowering stages in response to the hours of daylight and darkness.
Seedling Phase: Plants receive 16-18 hours of light each day.
Vegetative Growth: In this vegetative growth stage the plants will receive light 18 to 24 hours per day. The longer it is on, the faster the plants will grow.
Flowering: 12 on, 12 off. Total and complete uninterrupted dark period. Ensure that your environment is completely dark during the dark cycle (12 off).
Note: In Veg 24 hours is best. In the words of famous Ed Rosenthal:
“Cannabis under continuous light will grow 33% faster than the same plants on an 18-6 light regime.”
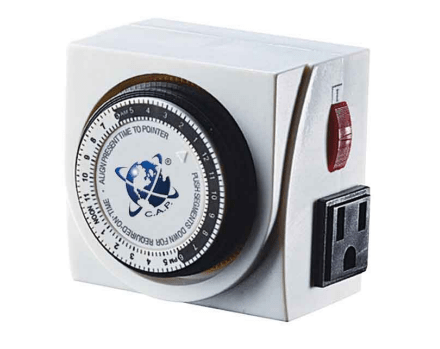
Lighting Timer
You will need to purchase a lighting timer that will turn your lights on and off automatically respective of their lighting cycles (dependent upon what phase of growth the plant is currently in). If you’re using fluorescent lighting, then you can use any standard light duty grounded timer. Fluorescent lighting doesn’t take up much power.
If you are using High Intensity Discharge lighting then you’re going to need to get a heavy duty grounded timer. You can find these industrial-grade heavy duty timers in any hardware store. Heavy-duty timers are strongly recommended primarily due to their durability, quality, safety, and longevity. A decent one will last you a very, very long time.
After you make your lighting timer purchase, all you need to do is set it properly according to whatever phase of growth your plant is currently in – it automatically handles the rest. That way you can relax and enjoy watching your buds grow without stressing about turning on and off the lights at proper times.
Next: Part 4. Growing Marijuana
Previous: Part 2. Cannabis