
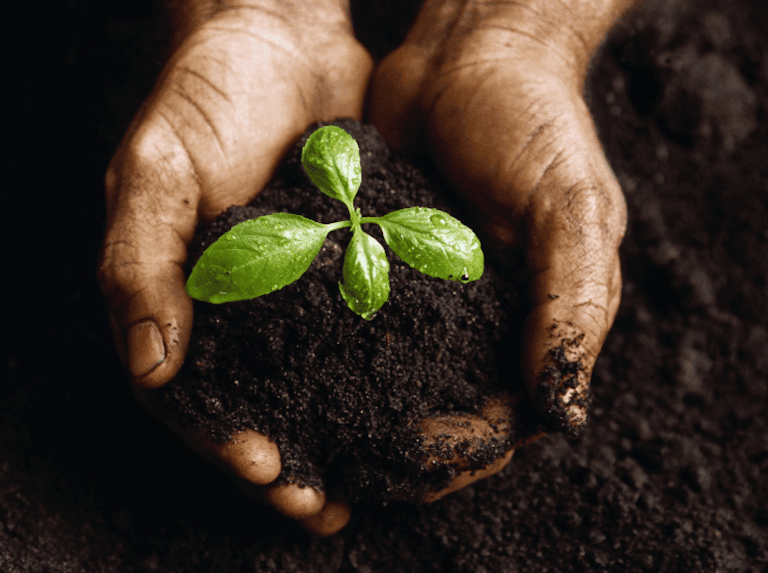
Growing With Soil
There are many benefits of growing marijuana in soil. For one thing it is very cheap and easy to get started right away if you cannot afford your hydroponic system immediately (that can come later so relax!) If you’re going to be growing with hydroponics feel free to skip ahead, but be warned; a lot of great information that applies to hydroponics can be learned in the following sections as well. (If you are a total newbie, hydroponics is a growth system that doesn’t use soil.
To help you out, here are the best cannabis seed banks that work in any country.
It is of the opinion of many growers that soil is the only medium that can produce the best tasting bud. Soil tends to be more cost effective, forgiving and simple for inexperienced growers to manage. The single most important benefit soil provides is the “live soil”. When you feed organic fertilizer to a soil-based grow setup, most people think they are directly feeding their cannabis plants.
This is true in some cases, but it’s mostly false. When we feed organic matter into the soil, we are actually feeding the MICROGRANISMS that reside there. These microorganisms feed on the various constituents within the soil, and poop out fertilizer. Ever hear of worm castings? One of the richest organic fertilizers known to man? This is the same thing, but just imagine this similar process going on a microscopic level with literally MILLIONS of microorganism species in the soil. They’re eating up all the elements in the soil, decomposing organic matter, and converting it into extremely bio-available plant nutrients.
That is why you must NEVER water with chlorine. Yes, that means tap water. Tap water kills off the microorganisms in your soil and will literally starve your plants to death! You will be SHOCKED at what using pure, filtered alkaline water can do to your buds when you sustain a healthy & flourishing microorganism growth environment. Also, this is why composting is important, and adding lots and lots of healthy inoculants to your soil, as well as plenty of raw organic matter for these little guys to feed on. Your plants will be very very healthy!
I can sum up the whole process of composting simply: It’s like my best friend said to me one time, “If it was alive and growing at some point, throw it down on the ground and it will return to the soil!!!!” Organic food for plants comes in ANY living form. Ever watch a deer carcass totally disintegrate after a few months? Or watch a discarded apple wilt away back into the Earth?? It’s not magic!!! These little guys, nature’s helpers, are literally eating up this organic raw material and returning it back into power-packed nutrition that can now be utilized by the surrounding plants, and then the cycle stars over again.
Soil has some disadvantages though. It is difficult to ascertain and maintain consistent and optimum moisture, nutrient and pH levels. It is more messy, and one has to deal with things such as transplanting.
Containers
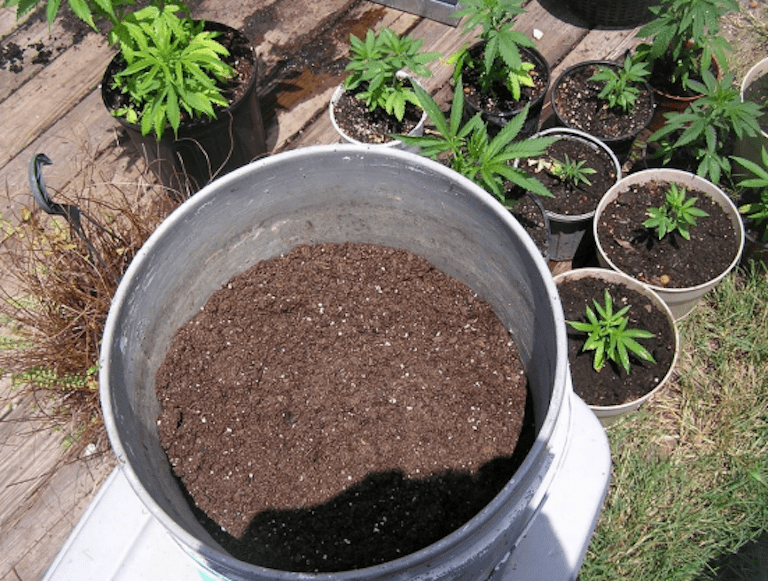
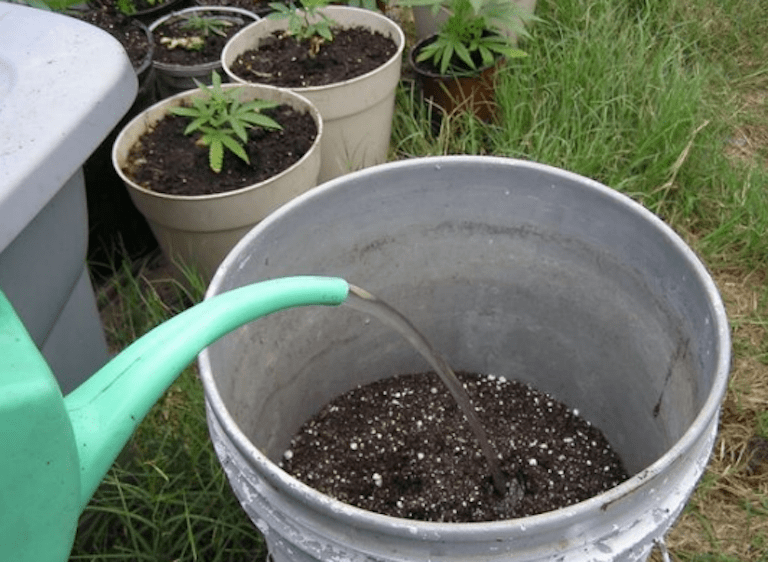
Containers allow you to care for your marijuana plants each individually. Weak, sick, and problematic plants can be easily removed from your garden. You can grow your soil-based marijuana in virtually any container. Examples include troughs, pots, buckets, aero-pots (my favorite) or the method of using a large growing container such as a wooden box/bed aka the “full dirt” method, which allows your roots and plants the maximum amount of space. Many veteran organic cannabis cultivators swear by this bed method when growing in soil.
Make sure your containers are a solid color, preferably black. This will ensure no light reaches your roots, and this is a critical step to ensure flourishing growth.


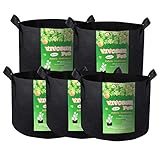


Because you will probably want to move and rotate your plants from time to time, you will most likely want some sort of container that is portable and lightweight. Your primary concern is size. You will probably start off using small pots for young plants, and soon transplant them to larger pots. Starting with smaller pots for smaller plants will allow you to fit more plants in a smaller grow area (wow I said “smaller” a lot). The pot size that works best for growing marijuana in soil are large 3 – 4 gallon ones (a 4 foot plant will be very happy in a 4 gallon container!). Cannabis tends to grow very long roots, so large growing pots are absolutely essential. The two most common containers are plastic pots, and growing bags. They are both light and inexpensive, but aero-pots are best.
You can easily also purchase or make your own plastic containers to house the soil in. You can really use anything that hasn’t had chemicals stored in it, just make sure the containers are clean & sterile! The height of the planting container should be 12 to 26 inches. The width should be approximately 12 inches. Same goes for depth. Growers agree; 3–6 gallon containers work best. You will need enough soil to fill each container to within 4-6 inches of the top.
Note: A Russian study showed that seedlings with at least 4″ of soil to grow the taproot were more likely to go female. This may be why some farmers get female/male ratios as great as 80%/20%.
When picking a container it is important start in as large a container as possible, square is best. 16 ounce plastic cups work OK, and 2 litter soda bottles cut down may be big enough for the first harvest when growing hydroponically. One-gallon plastic milk or water containers (squarish-style) will work too.
You can also start seeds and rooted cuttings in 16 oz plastic cups. It’s better to have fewer seedlings than it is to have many seedlings that need constant transplanting. These larger cups take only a little more space, and allow you to transplant only one time before harvesting the first crop.
Next step is to add drainage holes at the bottom of the containers if they do not have them already. The holes need to be large enough for excess water to drain out, but small enough so no soil washes away. Place your container or pot on a dish so the excess water can be collected in the dish then emptied to avoid excessive messing.
Using a pot or container with perforated holes in the bottom is actually a safety net and is not used by experienced growers. The holes prevent over-watering your plants which cost you time, nutrients, and can even kill your crop. These perforated holes also supply quality oxygen to your plant’s roots. In time you will be able to determine the exact amount of water to add so you never run the risk of over-watering your prized Cannabis Cup Winner plants.
Some last words: clean your pot or container out thoroughly before use. Make sure it’s clean! Also make sure not to place more than one plant per pot. This ensures each plant will get it’s share of optimum nutrients and water, and also if you happen to screw up on one your mistake wont affect your entire garden.
Note: If using a used container be sure to sterilize it with hot water and diluted bleach. Never use containers that once had chemicals in them.
Spacing
The amount of space a plant needs depends solely on the height the plant will grow. For example an 8 foot plant will be wider than 4 foot plant, and so forth. Remember, as a marijuana grower you should be interested in beautiful buds, not beautiful plants. Bigger is not necessarily better when growing marijuana, as the leaf matter tends to shade and suppress the smaller plants in your grow area from gaining adequate light!
Allow plants to be spaced to allow for adequate side growth. Generally 1 or 2 square feet per plant is best, and tends to yield the highest.
Grow Medium
See also:
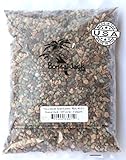
There is no one perfect soil (growing medium) for marijuana. The two main important factors to take into consideration are the texture of the soil and the nutrient content (fertilizers). You want a soil that has good drainage, but doesn’t drain COMPLETELY – it must retain some water, without drowning your plants. Many growers never spend a lot of money on soil, and so they cut down on it.
Cheap soil lacks good nutrients and a stable pH level. It’s a good idea to purchase it locally, due to soil being very heavy. A 1.5cu/ft bag can be anywhere up to 60lbs!! This is expensive to ship. A premium potting soil self-made works fine. Stay away from soils with a lot of bark dust in them as these tend to be way too acidic and have too much nitrogen concentrates. Also stay away from anything that is a heavy clay. A nice, light potting mix is what you are going for. Ideally you should mix your own though using the guidelines outlined below.
There are three main factors to consider when buying soil. These are the Texture, Nutrient Content (fertilizers), and pH level. Complete, balanced, organic-based soil produces the most healthy viable delicious crops with the most beneficial bacteria present. All true organic soils contain bacteria populations that drastically support plant growth. They literally contain “alive” elements in the soil that assist in various growing abilities of cannabis crops, including enhancing & protecting root mass, providing nutrients, and even buffering pH!!! Organically grown pot also has more flavor and taste than pot grown on synthetic salt-based or harsh chemical products. Also later in the plant’s life cycle it will produce more mature, healthy, viable seeds.
Soil is many master grower’s favorite medium, and for good reason.
So how much? When growing, for each foot of growth, a ¾ gallon of growing medium is required (provided fertilizers are applied during the growing period).
Example:
2ft. Plant – 1 ½ GAL
5ft. Plant – 3 ½ GAL
10ft. Plant – 7 ½ GAL
Ideally the soil should range between 60-70°F (15.5-29°C). Anything above that, you will have fungus trouble, insect problems, rotting roots etc.
Texture
Texture of your soil should be course, light, and spongy to allow drainage, sufficient moisture retention, and proper air circulation. Head to your local hardware / gardening supply store and ask around for a potting soil for growing vegetables indoors extremely fast. The salesperson will most definitely point you in the right direction and recommend the best brand they have available.
Things to look for: Make sure the soil becomes fluffy when moistened, in other words, it doesn’t clump together if you gently squeeze it in your hand. The medium must be heavy enough for the roots to take a firm hold, but light enough for them to be able to push their way through and for air to be present. It also needs to allow for a good balance between water retention and drainage. Too much water retention will lock up the fresh air the roots need, causing them to rot. Not enough retention will leave the soil too dry making it difficult for the roots to obtain nutrients.
Some soil is labeled wet, and others are labeled dry. Try to find a middleman. If the soil gets too wet and muddy it will drown your roots and they will not be able to get any oxygen and breathe. If the soil is too dry it will dry up quickly and require frequent watering. Try to get organic soil if it is available, as this is the best due to it being pesticide and chemical free. If you’re confused, relax, just try to get something that is medium-soft. The store employees are usually really helpful! Stay away from heavy wood products that contain very few nutrients, or are way too moist and acidic etc.
Testing Soil: Here’s a simple test to determine optimum soil structure. Squeeze some soil in your hand to form a clump. The clod should break apart when poked. If the clod stays together, you can add vermiculite, perlite, gardener’s sand, etc. Soil mixes that are made up of peat moss, vermiculite, and perlite have no nutritional value and are pH balanced (neutral) so it is like starting with a clean slate. You will then need to provide all the fertilizer. Typically I like to go 1/3 Organic Compost [Humus], 1/3 Peat Moss, and 1/3
Vermiculite as a foundation. After that I’ll add an incredibly rich supply of organic material such as worm castings, bat & seabird guano, kelp meal, fish emulsion, worm castings, inoculants, mycorrhizae fungi, chicken manure, bone meal, blood meal, and I top it off with some heavy organic mulch, like wheatgrass clippings or leaves from around the yard. Then I like to throw in some red worms. These little guys keep the soil fresh and dig little caverns, providing aeration. They also help to break down and re-condition the soil over time. I suggest you get some!!! They’re fun little guys to take care of!
Remember, soils only purpose is to supply a growth medium for the plant’s roots. The nutrients and water is what the plant needs for excellent growth.
Warning: Never reuse soil. Pathogens and toxins will contaminate soil over time. Start new crops with soil.
Amendments
Soil amendments increase the soil’s air, water, and nutrient retaining abilities. These remain very close to neutral on the pH scale and contain few, if any nutrients. Using a mixture of peat moss, perlite, and vermicuite will ensure these needs are met.
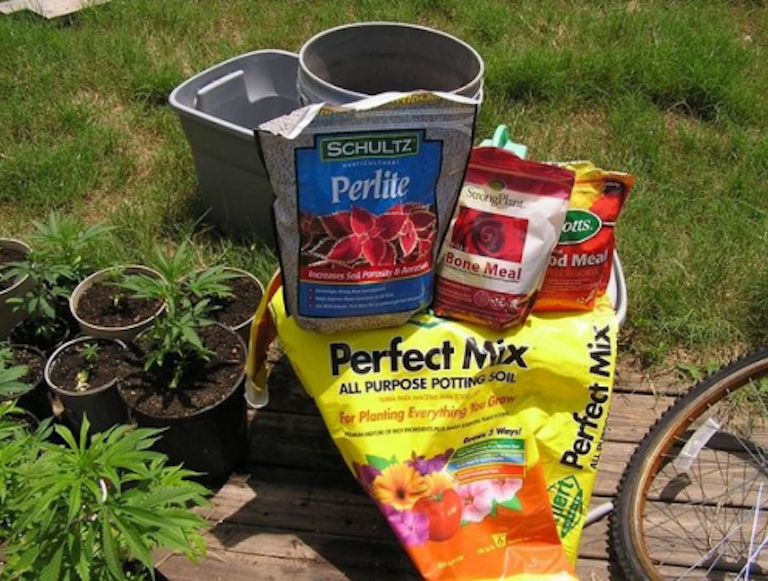
Follow the instructions when adding these ingredients to your grow medium (soil) so you don’t end up causing any unwanted effects. Generally you will mix these three ingredients in equal amounts. By adding more perlite the mix will be more airy and drain faster. Adding more vermiculite water retention will be greater and watering can be done less often. Use a mix that best suits your needs.
Note: Organic soil amendments such as coco fiber, peat moss, and compost contain carbon, food (they supply nutrients), and bacterial activity.
Soil amendments are added to a planting medium in order to provide plants with various nutrients. Here is a comprehensive listing:
- Guano – Dried excretory wastes. May be derived either from bats or birds. Guano is available in high Nitrogen, high Phosphorous and balanced formulations. Guano will burn your plants, so use conservatively.
- Worm Castings – Worm poo. An excellent source of micronutrients. Also functions as a supplemental source of Nitrogen. Castings ought to be in every soilless mix. They will not burn your plants, and, when cut with perlite and vermiculite, make a fine medium in their own right.
- Bone Meal – As the name implies, this is ground up bones from the slaughter house. Bone meal provides phosphorous. Be careful – will attract animals to your grow if used outside. Will attract pets if used inside.
- Blood Meal – Again, made from animal blood on the slaughter house floor. A source of nitrogen. Also, attracts animals to your grow. Particularly odoriferous. Blood meal will burn your plants, so use conservatively.
- Kelp Meal – Made from dried and ground seaweed. If made from ascophyllum nodosum, provides a growth hormone which promotes rapid growth of both roots and foliage. Also contains trace elements and enzymes. The first time I added this to my plants, the results were nothing short of fantastic!
- Perlite – A non-porous volcanic byproduct, perlite is pH neutral and improves the drainage of planting mediums.
- Vermiculite – A porous volcanic byproduct, capable of nutrient and cation exchange. Helps with drainage and aeration as well.
- Dolomite Lime – Frequently used in planting mediums to offset acidity, that is, lime raises pH. Dolomite lime is slower acting and more buffered than hydrated lime.
Soilless Mixes
As the name implies; a soilless mix is a mixture of components in which it is possible to grow a plant but which does not contain soil in the traditional sense, that is, no garden soil or compost. Soilless mediums can contain peat moss as an ingredient along with worm castings, perlite, etc.
Here is a simple example of a Soilless mix:
50% Perlite
50% Vermiculite
Here’s another:
40% Worm Castings
30% Perlite
30% Vermiculite
Soilless mixes are great, but can cause problems. If you happen to miss a couple of waterings the plant can dry out very quickly. This is because the mix will not hold much moisture. Soil is much easier and will provide nutrients throughout the grow, lessening the need for fertilizers.
Backyard Soil
Many growers often inquire if they can use backyard soil. The answer is yes and no. Backyard soil contains weed (the bad kind) seeds and pathogens. Soil can be sterilized and weed seeds killed by baking the soil in a hot oven at at least 392°F (200°C) until the core of your lump reaches 140-212°F(60-100°C), and is maintained there for a while.
But, baking a lump of garden soil will release pungent smells into your kitchen. Unless you have a spare oven out in the garage, you might skip this one and just use commercially made potting soils. Some have had success with this method by adding some Perlite, vermiculite, worm castings, bone meal, chicken manure (or compost, generally) to it to restore micro-bacteria growth.
It is generally not recommended. Stick with the other safer mediums.
Transplanting
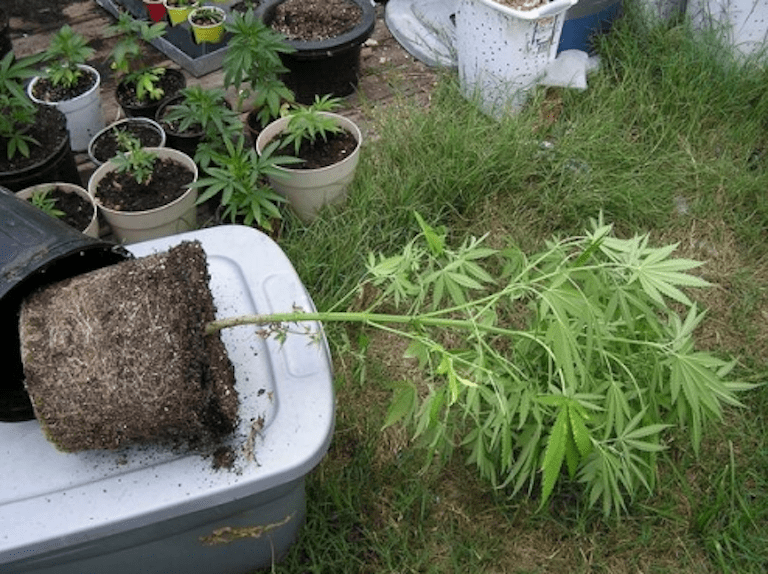
Once your plant becomes too big for its container, its growth becomes severely stunted due to the cramped root system. Changing to larger pots (transplanting) allows the root systems to grow very large inside the new container, supporting healthy flourishing vigorous plant growth. You see, small containers hinders the growth of your plants root system which will cause sickly stunted growth and sickly wilted weak plants, so transplanting is absolutely crucial. Starting seeds and clones in cubes or peat pots makes them super easy to transplant.
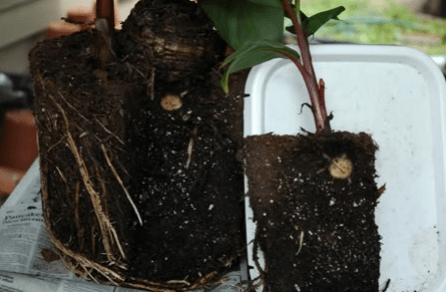
You know your crop is ready to transplant when strong healthy white roots are surrounding the entire outside of the grow medium. To do this remove the plant from its pot and examine its roots to see if they are deeply matted on the bottom and surrounding sides of the pot. Roots should be everywhere around the edge of the container.
Ideally you should initiate the traumatic process of transplanting your crop when it is in its healthiest, strongest state.
Keep in mind transplanting is the second most stressful procedure as plant can undergo other than cloning. Roots thrive in a dark, moist secure environment. When roots are taken out and are in contact with light, air, or human hands too long they dry up and die. When you transplant your primary goal should be to upset the roots as little as possible, be very careful! Keep the entire grow medium and root area moist so that they don’t dry out.
It is best to transplant at night so that your plants have a full night of rest to recover. Newly transplanted crops need subdued light at first so that the foliage grows at a slower rate, enabling the roots to supply sufficient water and nutrients. To help your transplanted marijuana plants, give them filtered lessintense light for a couple of days. A fluorescent light, if available, is a good substitute lighting source for a couple days for transplanted plants.
WARNING: Always transplant into the same, or similar type of grow medium. If you fail to follow this advice a water pressure differential could develop between the two varied growth mediums which will slow water movement and cause severe stunted slow root growth.
Feeding
As far as nutrients go, transplanted cannabis plants require low levels of N (Nitrogen) and K (Potassium), but high levels of P (Phosphorus) for maximum transplantation success. Also, as mentioned in the Cloning section, any commercially available product that contains trichoderma bacteria will greatly help ease transplantation plant shock. You don’t have to worry about this if you follow the following steps carefully, take special concern not to disturb your plants roots, and give it adequate rest (by transplanting it at night); there will be zero symptoms of transplant shock or wilting.
Note: If you want your roots to develop a dense, healthy, vigorous root system then it is best to transplant them RIGHT BEFORE they have outgrown their container.
Transplanting slows you down. It takes time, it’s tricky, it’s hard work, and threatens the plants. There will be little or no shock if you are quick and tender in your handling of the plants. Make sure you only need to transplant twice, or better yet, once if possible, through the entire growth cycle. Pick the right containers.
Transplanting Step-by-Step
Step 1. First soak the entire grow medium and wait several minutes for the excess water to drain.
Step 2. Prepare the larger container by making a moist layer of grow medium at the bottom.
Step 3. Gently flip the plant upside down and gently place it in the new container. Fill the outer edges with more soil and finish by soaking the entire container again(a mild trichoderma + vitamin B solution is best). Make sure you make a good strong contact with the root edges and your new grow medium.
Note: Containers that have the same width on the top and bottom are ideal for easy transplanting success.
Once transplanted your plant will immediately require low levels of nitrogen and potassium, and increased levels of phosphorus. Water and nutrient absorption is slowed as the plants get used to their new grow environment. Transplant during the evening so plants have all night to recover. To minimize shock, you may also want to give your transplanted crop filtered, less intense light for just a couple of days, then from there it’s smooth sailing.
Maximizing Root Growth in Soil Containers
Space is one of the major concerns for indoor growers, who generally cannot move to bigger and bigger pots to allow for bigger root masses. A lot of container space often goes unused, because roots will not grow into the top inches of soil that are often dried out from powerful lights and low humidity. (This is where mulching comes in – it drastically helps to conserve moisture and simultaneously feed the topsoil with lots and lots of organic nutrients.)
Since marijuana soils are typically very airy and light, the top inches of soil are easily disturbed when watering as the dirt is pushed and moved around by the water. This inhibits roots from growing into the top inches of soil too.
Say for example in a one foot tall pot the top three inches of soil will not allow root growth, you are wasting 25% of your soil mass that could be used for roots! In pots that are wider at the top than the bottom, this wasted soil could be even greater.
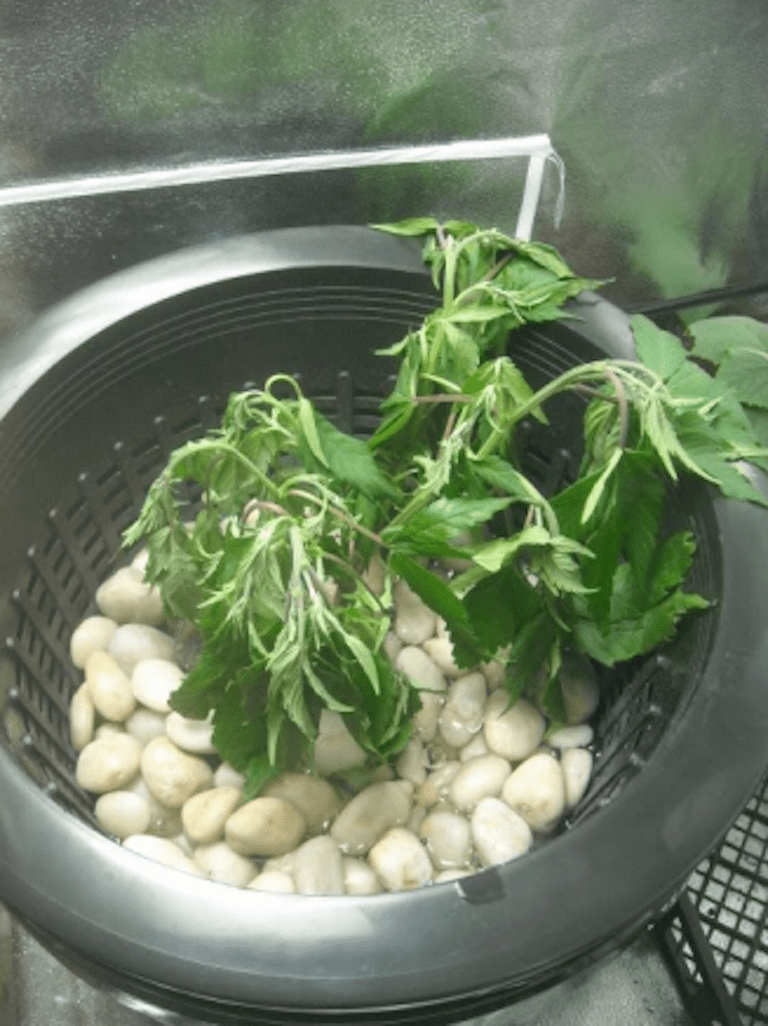
You need to prevent the soil from being disturbed and keep it moist. You can use a cool little technique to do this. Hydro growers have been using an ideal product for similar purposes for a long time – Hydroton clay balls. Hydroton clay balls are very light. They won’t compact your soil the way putting pebbles on top would. A layer of hydroton clay balls on top of the soil will help the soil underneath it lose moisture through evaporation and low humidity. Some growers even put them at the bottom of their grow containers and add small pvc pipes to increase their root oxygenation even more!
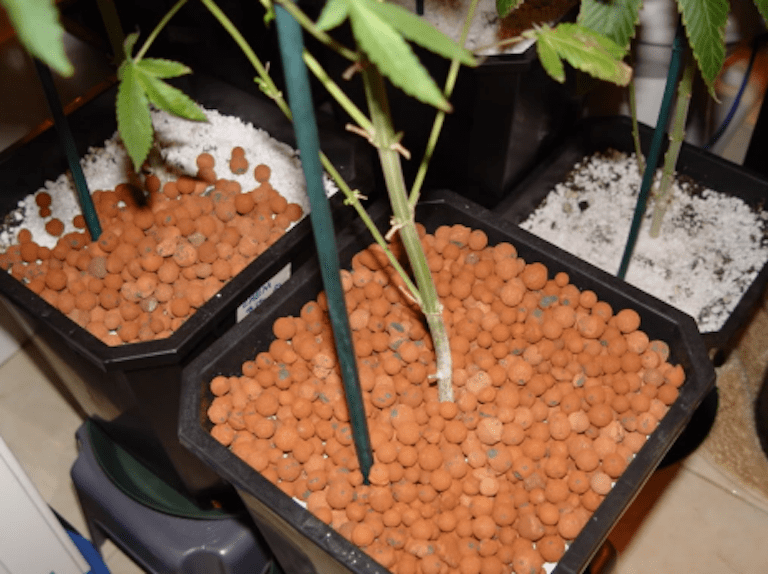
By adding a layer of hydroton on top of the soil, soil disturbance is prevented since the water does not directly touch the soil until it has filtered through the layer of hydroton balls. Soil moisture is then trapped underneath the hydroton and less likely to evaporate due to heat and/or low humidity.
This way it is possible to grow plants with roots stretching up all the way to the top of the soil. Those roots will rapidly provide nutrition to the plant when it is watered. It also will help the plant be able to go a longer time without watering since moisture that would have been lost to evaporation is now available to the plant.
Note: A strong root mass is critical in flowering if you want to reap a big frosty harvest. Wimpy roots = Wimpy yields.
Oxygen
Proper oxygen supply to the roots is a big concern, since the plant requires O2 for nutrients to be available, and to rid itself of toxins etc. One of the easiest things to do is use food grade hydrogen peroxide in the water to increase the availability of oxygen in the water. H2O2 has an extra oxygen atom that will easily break away and can be used by the plant. Certain commercially-available additives such as Oxygen Plus are plant foods that contain 25% hydrogen peroxide and is perfect for this use. Oxygenated water helps, too.
Using a planting medium that allows for plenty of aeration is also really important. Be sure you have good drainage by using perlite, sand, or gravel in your mix and at the bottom of pots. Don’t use a medium that holds too much water, or you may significantly reduce the oxygen available to the plant and quite literally suffocate it. Aerating the water before watering is also a good idea. In the case of soil potted plants, use an air pump to aerate the water overnight before watering your plants, or if you’re on a budget; put the water in
a container with a cap and shake it up really good before giving it to the plants.
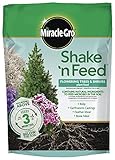
Fertilizers
Basically you need two kinds of fertilizers when growing marijuana. One for vegetative growth, and one for flowering.
Vegetative Growth: Needs high amounts of nitrogen, adequate calcium, magnesium, and trace elements.
Flowering: Needs low amounts of nitrogen, high potassium & phosphorus, adequate calcium, magnesium and trace elements.
Most soils and potting mixtures available in nurseries are fortified with nutrients. These mixtures should provide enough nutrition for marijuana for several weeks. After this you will need to add fertilizer. You will get the biggest harvest possible if you give all your plants exactly what they need, and NO MORE.
Plants growing in containers have a limited amount of nutrients in the soil. Their growth and health is curtailed until more nutrients become available to them. The solution to this problem is then to supply the missing nutrients. It is easiest for growers to use a high-quality, prepackaged, sterilized mixture. Modern potting mix is made of many ingredients. Each brand is different. Remember unless the fertilizer is added the plant will have no nutrients. Fertilizer can also take the form of organic live matter if your bacteria population is sufficient.
Depending on the various growing phases you will want different concentrations of these nutrients. During vegetative growth you will want high nitrogen and low phosphorus and during flowering you will want high phosphorus and lower nitrogen. Essentially, these are what “nutrient ratios” are for.
WARNING: Beware of potting mixes with time-released fertilizers. They will make it very difficult to judge what is available to the plant at any given time and are not recommended to use.

Growing Organic
In many countries it is illegal to grow medical marijuana. Many suffering sick people rely upon the positive effects of marijuana to help soothe their various dis-eases and ailments. I have personally witnessed the incredible joy and healing this magical herb can provide for patients in need.
In order to obtain their precious herb, these people must rely solely on third party growers that supply the medical marijuana distribution facilities. This may be you! Patients depend on your expertise and ethics to supply them with high- quality medicine, 100% free from contaminants such as pests or chemical toxins. It is your duty to supply the best organically grown marijuana to those in need. An organic grower’s goal is to cultivate top quality organic pharmaceutical-grade marijuana.
Note: If pests do happen to invade your organic garden, instead of using those harsh chemicals you can use alternate natural pesticide solutions such as oils, soaps, and biocontrols.
In order to grow the healthiest plants possible you must honor the basics. Too often do people look for the flashy techniques, tips, and tactics, when rather if they just followed and mastered the basics of cannabis cultivation their bud potency and yield would increase naturally!!!! The basics of quality light, water, air, and nutrients must be very carefully and properly maintained. Simple as they may seem, these are the building blocks of great cannabis and the foundational skills mastered and deployed by veteran growers. The flashy tips and tactics come only AFTER you master the basics of cannabis cultivation.
Chemical vs Organic
Quality is the most important aspect to growing marijuana. You can only grow top quality marijuana in soil using organic biological 100% natural fertilizers. Many growers agree that organic fertilizers are best as they produce a delicious better tasting bud than hemical fertilizers. Buds grown from organic soil and products just taste so much better, and the yields are eye-popping!!! Growing
organic marijuana is also essential for medicinal cultivation purposes.
Also with organic fertilizers plants cannot be over-fertilized. Chemically-based fertilizers are precise, sterile, and simple to administer. But, organic fertilizers on the other hand are not always as simple to use, and usually tend to have foul unpleasant odors. Plants grown with organic fertilizers will produce slightly more bud and it will be of legendary quality in terms of taste, aroma, and potency, you just have to get used to handling their unique aromas and, uh, forms.
Worm castings and bat guano are the two of the most effective fertilizers. They both contain a dense amount of nutritional content that the plants will consume to supercharge their growth. They are mixed with water and applied twice a week. If you want the upmost top-shelf quality buds when growing in soil with high yields, these are CRUCIAL. Get your hands on these awesome fertilizers immediately, you will be ecstatic with the results they produce for you!!!!!
However some growers argue that the plant “material” that cannabis uses to grow is identical in structure and content regardless of hich method you use. The plant only uses basic building blocks, taking molecules from the air and the nutrients and assembling them into the organic plant matter. The by-product of this process is oxygen. The real (practical) difference between organic and inorganic growing is how the raw materials are provided. I find this to be false.
The organic grower will utilize larger elements that will be broken down by a system of organisms living in the nutrient solution, grow medium, or the soil. An inorganic grower uses nutrients that are already broken down into a form that the plant can utilize. Non-organic nutrients might contain organic components. For instance, many fertilizers intended for soil will include urea nitrogen. This nitrogen requires micro-organisms to break it down before the plant can use it.
These organisms won’t thrive without soil organism present so these fertilizers may not work in hydroponic systems. There are hydroponic mixtures that are organic and there are those which are not. Either way, you have control over what you feed your plants and can be sure that no harmful pesticides or other chemicals are used in your own marijuana. Provided you flush your plants properly they won’t contain any of the nutrient solution so the actual plant material that results should be the same.
To sum things up;
Chemical Nutrients
Pros:
Permits precise adjustments and formulations with high element availability and purity.
Cons:
Health concern questions regarding buildup of heavy metal impurities and residual taste. Also the waste from hydroponic reservoirs can contaminate the area’s ground water.
Organic Nutrients
Pros:
Addition of live and beneficial compounds much improves the aroma, flavor, harvest yield, and resin (both quantity & quality).
Cons:
Difficult to ascertain exact amounts of required nutrients, and can be harder to maintain and ideal growth environment to support healthy micro-organism populations. Without regular food and water they, too, will die.
Nutrients
All plant food is measured in the N-P-K format:
(N) for Nitrogen.
(P) for Phosphorus.
(K) for Potassium.
Nitrogen(N): Used to build proteins and chlorophyll. It is responsible for leaves, stems, and overall size and growing other plant elements.
Nitrogen:
- Most essential nutrient.
- Needed for stem and leaf growth.
- Provide lots of nitrogen during vegetation.
- Nitrogen deficiencies will result in yellow leaves (oftentimes yellow leaves that appear in vast amounts are because of nitrogen deficiency).
Note: During vegetation use a lot of nitrogen to ensure vigorous growth. But during flowering taper off the nitrogen to ensure bud growth and avoid unnecessary leafy buds or any other unnecessary veggy matter.
Phosphorus(P): Used to photosynthesis, respiration, and creating energy compounds to help the plants develop efficiently. It is also a critical factor for healthy seed and bud production. During flowering is when you provide more phosphorus than any other nutrient.
Phosphorus:
- Crucial for bud, flower, and seed production.
- Provide more phosphorus than nitrogen during flowering
Potassium(K): Used to build and transfer sugars. It is also important for water and nutrient absorption. Potassium assists in the growing of strong sturdy stems, root growth, and helps fight off disease.
Potassium:
- Helps with nutrient absorption, aiding in faster, better growth.
- Provide a relatively steady, moderate amount of potassium throughout the plant’s entire life cycle.
At different stages of growth you will emphasize different elements. The three numbers on your fertilizer is the percentage the fertilizer contains of these three primary nutrients. A 15-15-15 solution contains 15% Nitrogen, 15% Phosphorus, 15% Potassium. 20-10-5 solution contains 20% Nitrogen, 10% Phosphorus, 5% Potassium. The remaining percentage of the solution makes up the rest of the soil material.
N-P-K can come included within the actual soil or in a separate stand-alone fertilizer.
Cannabis plants grow best with a good level of Nitrogen and a normal level of Phosphorus and Potassium during vegetative growth. You’re going to need to pick a bag that has all three, not just a 10-20-0 ratio. There are a lot of N-P-K ratio strains out there but the 12-12-12 and 20-20-20 are the best ones to find. Something like 8-20-20 is not suitable for vegetative growth. Bags with higher Phosphorus are for flowering plants. The method is never to transplant to a new soil with higher phosphorus levels, instead we simply use plant food to bring up the Phosphorus levels during the flowering phase, as this is easiest.
Micro-Nutrients
As well as N-P-K there are also secondary supplements and “trace minerals” – These are Calcium(Ca), Magnesium(Mg), and Sulfur(S) – aka CaMgS. Secondary supplements can oftentimes be found within the soil but sometimes not all of them are present. In addition to secondary supplements there are also micronutrients. These are zinc, iron, manganese, boron, chlorine, cobalt, copper, molybdenum, selenium, sulfur, and silicon. You can purchase a formula for these. Don’t worry too too much about micro-nutrients as when compared to the big three, they do very little to affect your plant’s overall health, the primary N-P-K and CaMgS nutrients are the most important and newer growers should focus their energies on mastering these three levels first before worry sets in!
Check your bag to see if it has secondary supplements included.
Organic Fertilizers NPK Values (and amounts to use)
Here is a list of common organic fertilizers, NPK values and how much to use per square foot of garden:
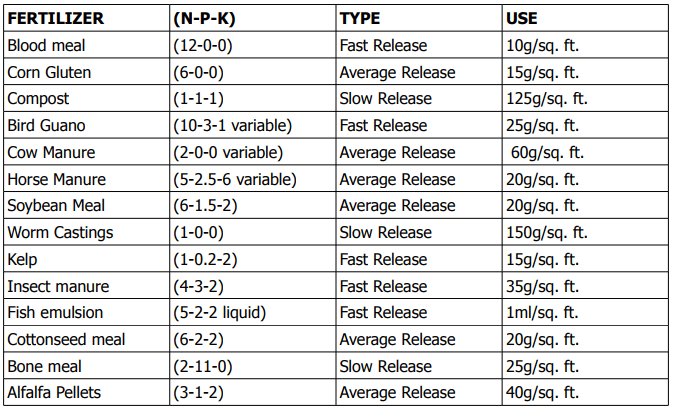
Note: Bird and Bat guano have variable compounds and can be very rich in Phosphorous (Peruvian/Chile seabird guano, for instance). Poultry manure is also more balanced. Worm castings and composts are low in nutrients and are considered more like soil mendments than ferts. Cow manure and Horse manure should be composted. Don’t use fresh crap. Sewage sludges should never be used.
WARNING: Do not over-fertilize. It will kill your plants. Always read the instructions for the fertilizer being used. Use ½ strength if adding to the water for all feedings in soil or hydroponics if you are unsure of what your plants can take. Build up slowly to higher concentrations of food over time. Novice soil growers tend to over fertilize their plants. Mineral salts build up over time to higher levels of dissolved solids. Use straight water for one feeding in hydroponics if it is believed that the build up is getting too great. Leach plants in pots every month. If your plants look REALLY green, withhold food for a while to be sure they are not being over-fed, or you’re doing something right.
Feeding
Feeding your plant is basically resupplying the nutrients that the plant has absorbed to aid in it’s growing processes. Throughout your entire plants growth cycle you will only need 3 different types of feeding solutions. Plants deficient in any type of the major primary three (N-P-K) nutrients will not develop.
Overfeeding plants is probably the most common mistake made by novice growers. Overfeeding can harm plants severely so make SURE you properly read the instructions on your product label.
The first feeding solution you’re gonna need is a bottle where the N-P-K has equal or higher levels of N than P & K.
The second feeding solution you will need is a bottle that has higher levels of P than N and K.
The third solution you will need is a bottle of secondary nutrients.
Only ever feed your plants when they need it!!! You should never have to feed your plants once a day. Also be sure to never mix your solution at 100%, the marijuana plants are sensitive and they can burn easily. Check the label for recommended dilution and feeding levels. (For example 1 cap full per 3 gallons of water is pretty standard.) During flowering simply switch the feeding bottle over to the one with the N-P-K, where P has higher levels than N and K.
Note: For enhancing plant growth, once every 3 weeks add the most important secondary nutrient of Mg(Magnesium) to your plant. This can be done easily by using Epsom salt, as it is very rich in Mg. To do this simply feed your plant a 1/3 spoonful of Epsom salts per 3 gallons of water once every 3 weeks.
Feeding must be done throughout the entire plant’s life cycle to ensure optimal flourishing growth. Administer properly as dictated by your product’s instructions. Following directions is critical and will save you from much stress and frustration further down the line.
Organic Fertilizer Super Grow Tea
Here’s a recipe for my favorite organic tea fertilizer. I would suggest this when your leaves show signs of yellowing. It often means lack of N (Nitrogen) and store bought chemical fertilizers don’t always do the trick, plus they build up salts in the soil and don’t do much for acidity!
Try this:
Step 1. Put 2 cups of high-nitrogen bat or seabird guano (found at your local garden center or nursery, or online) in the corner of a cloth bag. Old pillowcases are perfect. You can also throw in there nettles and some kelp powder.
Step 2. Tie it in a knot around a stick and suspend it in a 5-gallon bucket of fresh (preferably distilled or RO) water. It is now like a tea bag. Just shake the tea bag around several times a day. It should emit a dark secretion from the bag. After 2 days the water should be pretty dark.
Step 3. Take out the tea bag and dispose of it, or rinse it out to be reused. Use this dark water at a rate of 1-2 cups per gallon of fresh water and mix it up. This will give you a “tea” to water your plants with. Use it to water once, and then wait a few days to see if your plants like it. You can use this high Nitrogen tea whenever your plants tell you they need it (yellowing leaves).
To make a potent flowering tea for frosty heavy bud development, use the same steps but replace the high-nitrogen guano with high-phosphorous guano. It will provide the essential nutrients for a long time before your girls tell you they need something, by showing symptoms of deficiency. You can also use either tea more frequently, according to the growth rate of your plants, to greatly increase growth rate and flowering.
WARNING: Never fertilize the plant just before you are going to harvest it since the fertilizer will encourage foliage production and
slow down resin production.
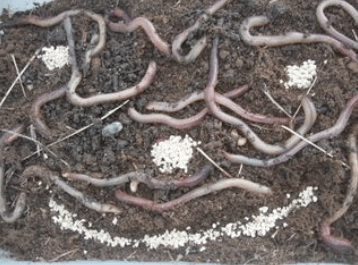
Worm Castings
 A word here about the most organic of fertilizers: worm castings. Worms are raised commercially for sale to gardeners. The breeders put the worms in organic compost mixtures and while the worms are reproducing they eat the organic matter and expel some of the best cannabis food on the planet. After the worms have eaten all the organic matter in the compost, they are removed and sold and the remains are then sold as worm castings. These castings are so rich that you can grow cannabis in pure worm castings. This isn’t really necessary, however, and it is somewhat impractical since the castings are very expensive. If you can afford them you can, however, blend them in with your soil and they will make a very good organic fertilizer.
Worm castings contain many beneficial bacteria. These bacteria are responsible for turning ammonium in soil into nitrates. Nitrates are the most easily used form of nitrogen for the plants. As well as containing these beneficial bacteria, they also contain amino acids which help in the growth and development of your plants. For hydroponics, worm castings are available in liquid form to cover all stages of plant development or additives to give your plants an added boost. Worm castings are a cost efficient way of supplying the needed nutrients to the plants and in most places are readily available.
Worms improve soil airation due to their tunneling action; this keeps the soil loose. The worms will stick around so long as there is enough organic matter for them to digest, especially if you add blood and bone meal, or other various organic fertilizers. If the worms are crawling out of your medium, then its time to add organic fert or transplant into a more organic decomposing medium.
Why Worm Castings Are a Beneficial Soil Additive:
- 10% worm casting in soil mix improves germination rates, plant growth, and gives them a healthy appearance.
- Great fertilizer that can be used a lot but wont burn the plant.
- Hold water and give nutrients in a consistent natural way.
- Introduce micro organisms to the soil, increasing disease resistance.
- Castings also contain plant growth hormones.
Making Your Own Worm Castings
Making your own worm castings is a lengthy process and takes anywhere from 6 months up to 2 years, depending on comparison to how much decomposed matter vs number of worms you have. But it is well worth it. This method takes a little time, but then again, a little time and effort will certainly beat the store prices!
Which Worm Species To Use
The best worms to use for homemade worm castings are Red Wrigglers, a common worm that can be almost found anywhere. Night Crawlers can also be used – they are much larger and also eat a lot more than the wrigglers. You can find Night Crawlers easily around your yard.
What Compost To Use
Raw scraps are indigestible, and must be broken down first by bacteria. Worms are better able to digest and process organic scraps that have been predecomposed.
Cow manure: Cows are poor digesters, they only digest about 15% of what they eat, leaving another 85% of the stuff an organic sludge; worms absolutely love cow manure! It is better to have the manure pre-decomposted prior to the vermicomposting. Consider cow manure an essential ingredient.
Any vegetable/fruit scraps: Recycle your food waste! Take your scraps, and place them in a blender, mix it around for a couple seconds. Mixing makes it easier and faster for the scraps to decompose and makes it easier to mix in with other ingredients for a blend.
Dry leaves, grass clippings, rotting wood: These ingredients take a bit longer to decompose, but they seem to be richer in the end. Anything you rake up for your lawn is great. DO NOT kill the mushrooms growing on logs!!!! They provide a whole host of beneficial nutes to your soil composition by breaking down woody organic matter.
Note: Meat scraps and sauces tend to make things a little too rancid and stinky, as well as attract flies and large pests. Keep to egetable scraps.
Materials and Directions For Making Worm Castings
Here is a list of the materials you will need:
- A standard Rubbermaid tub (15 gal)
- 50-150 worms, the more the better.
- Your decomposing matter
- Water spray bottle
Directions
Take your pre-decomposed matter and fill up your tub with it (up to 6 inches from the top of the tub, so the worms can’t escape). Even it out gently. Now take your worms, and place around the edges of the tub – the worms will dig down and eventually find their way into the soil.
Maintenance
Spray water on the surface of the scraps to keep everything moist (including the worms). Typically, you can do this about twice a day. There is no turning, or sifting required, as the worms will do all the work.
Harvesting the Worm Castings
The top layer of the matter should turn a dark brown when your worm castings are finished. This new soil looks like brown chunky sand. It looks like dirt, and it smells like dirt. But its genuine, fresh worm castings – the best soil additive known to man!
Using Worm Castings In A Soil Mix
Worm castings can be used in a multitude of ways – mixed into a soil mix, a soilless mix, or as a tea or slurry.
Usually worm castings is thought of as an additive. Recommendations vary wildly, but I would recommend adding one tenth to one fifth in any organic mix (10-20%).
Top dressing with worm castings would work well too, especially with indoor containers. Make a worm castings tea by steeping the castings in clean well aerated water makes for a life giving plant-nutrient. Filter your worm tea before use and returning the dregs into the worm bin after a couple of rounds.
One can use plain worm castings as a growing medium, it works very well. But usually finished worm castings tends to be mud-like in consistency, and needs something to aerate and lighten up the texture. Perlite and expanded clay work very well for this. 50% of expanded clay (multiple size) and 50% worm castings makes for a nice quick-n-dirty primo soilless mix.
The Classic Worm Castings Mix
The mix that many elite growers will use is basically nothing but castings and drainage. Including soilless peat-based mixes like pro-mix and other additives will just introduce a source for pH problems – especially when others try and duplicate it but can’t find the right brands then substitute with a peat-mix that is too acidic.
A Basic Mix:
40% castings
30% perlite
30% vermiculite
Casting Tea
You can simply spoon some more or less finished castings into a cheap nylon stocking and dump that in a bucket and a reservoir.
Another effective way is by using 100% finished worm castings with a high quality filter material. You simply place that in a bucket with water, aerate the water for 48 hours, and then use that water for watering (provided it doesn’t contain visible pests and doesn’t smell like rotten fish).
Watering
Using HID lights cause plants to grow very fast but also consumes a lot of water. Plants grown in soil are watered ONLY whenever they dry out, usually only after the top layer has lost a bit of it’s moisture. When soil that is too fine is used, drainage problems will develop. For roots to remain healthy, air and water must be able to penetrate deeply. So by knowing this, you must understand that 200 it is perfectly healthy for the soil to become drenched in water as long as it doesn’t stay that way and drains properly. Roots need air to breathe so some dryness is good, but not too much or the plant will dehydrate. Ideally a good soil grow mix will hold a great deal of water, yet become over dry if left unwatered for 2-4 days. Your grow mix can be modified to allow plants to hold more water for longer periods (less watering is then required) but plants will not grow well due to poor root growth. Excess water = suffocating roots.
Note: It is very important when watering for the first time to make sure you COMPLETELY saturate your soil with water. This will ensure no dry pockets form that will block fertilizer and roots from growing there. An easy method to do this is to wet your soil, wait a little bit for it to drain, and then wet it again.
When To Water
Usually you will have to water every other day. An example is on Day 1 you water your plant, Day 2 it dries, Day 3 you again water it etc. Watering really depends on the size of your pots, and the intensity of your lighting source.
Sometimes it can be hard to tell if your soil is dry or not. A great method I have found is to physically lift up your pot or container when the soil is completely dry, then water it like normal, and then pick it up again. This will give you a good base judgment on how each water level feels. Be careful because if over or under-watering your plant continues it could die. 🙁
WARNING: Be sure to NEVER get a SINGLE drop of water on a hot bulb: this may cause it to burst!!
Before watering break up the surface of the soil with your fingers. This will ensure water is distributed evenly to all of your plant’s roots. Your plants leaves will be a good indication as to if you are over-watering them or under-watering them. If the leaves point happily upwards to receive more light than good job, you’ve got it right! But, if they wilt or curl downwards like claws then you are
either over-watering them or under-watering them. Check the soil using the methods mentioned above to determine your next course of action.
Note: Quality water is important to support extraordinary plant growth. Always use water that is room temperature. Using water that is too hot or too cold will damage your precious roots. Also be sure to keep the pH of your water between 6 and 8. If it isn’t it is advised to use an amendment to remedy this.
Over-watering your plant generally is OK, but you must make sure the excess water fully drains away. Dehydrated plants on the other hand will show obvious symptoms. The leaves will become droopy. The plant will go back to normal when proper watering is resumed.
The chlorine in most tap water can eventually cause the soil to become acidic. Letting tap water sit in a tub for a day or two will allow all the chlorine to evaporate, but it’s still risky. And here’s a cool tip; you can purchase a small aquarium-type pump to blow bubbles that will ensure your water is well aerated. Bubbly, oxygenated water is amazingly beneficial for the roots. This will greatly enhance your bud development, and deliver extraordinary results!
Never pour the water OVER your plants, only around the stem! You can spray your plants leaves tops and the undersides of the leaves with a mist bottle in order to keep any dust off them and any micro pests. This misting can only be done before bud production ecomes visible. Applying water after buds appear may lead to mold growth. Moldy buds are a no-no, as they are completely toxic.
To help prevent mold when utilizing heavy misting be sure to use an oscillating fan to supply proper ventilation and drying.
Watering once a week is ideal for soil and twice a day with a hydroponic flood and drain system. Another good indicator is when top 2 inches of the topsoil dry out. Occasionally provide periods of extra dry and wet soil and allow 10% extra water to drain out of the bottom of the tray. This will prevent and toxic fertilizer build up and keep your buds healthy & strong.
The “Lift The Pot” Method
The “lift the pot” method is a widely practiced, and very accurate method of knowing exactly when to water your container plants.
Many growers agree – one of the best ways to know when soil grown potted plants need more watering is by checking how heavy the pots feel. This method is very simple to learn once you get the feel for how light a ready for watering pot of soil feels.
Get an equal size pot and fill it with your soil. The medium should be about as moist as a new bag of potting soil. Use this planter as a learning tool to get a rough idea of how much the pots should weigh before watering again. The pots with your plants will feel only just slightly heavier when the soil is ready for more water. Pick up one of your planted pots, if its noticeably heavy, do not water it until it feels “light”. Next time you water a planter, pick it up and feel how much heavier it feels compared to the sample pot of soil.
It only takes a few times picking up the pots until this skill is like a “second nature” to you. You wont even need the sample pot after you get accustomed to the lifting method. Sure, your plants are always putting on more weight as they grow larger, but once you’re proficient at lifting the pots, you’ll also know how to compensate for the weight of the plants with ease. It’s instinct. Anyone who learns this method will always know when its time to water their marijuana plants in a surprisingly accurate way.
Watering Drooping Plants
Plants droop after flushing or heavy watering due to lack of O2 in the rootzone. Take a thin wood dowel or pencil and poke some holes down into the mix for aeration.
Many growers wonder how they can tell if their drooping plant is overwatered or underwatered. Determining the difference is simple once you know what to specifically look for:
-Leaves that are drooping from underwatering will look limp and lifeless.
-Leaves that are drooping from overwatering will be firm and curled down, even from the stem of the leaf.
Best Water To Use
Depending on the area in which they live (especially in the snowy mountain areas), most growers will have no problems using tap water. You can have the tap water analyzed to determine if it will give you problems or you can buy a good filter and start with a totally clean slate.
The most common problems with tap water will be:
- pH – usually caused by lime or calcium in the groundwater supply.
- High parts per million (lots of dissolved junk in it) – prominent in city water. Certain elements dissolved in the tap water may cause lockups and then deficiencies if you are using chemical fertilizers.
- Chloramine/Chlorine – used in wastewater treatment.
The best filtration system to use is called Reverse-Osmosis. Under-the-sink models can be purchased at any home improvement store for around $200 USD. They will require cleaning and filter replacement around once a year, depending on how many gallons you put through it. The typical model can clean 50 gallons of tap water down to 0 ppm and 7 pH daily.
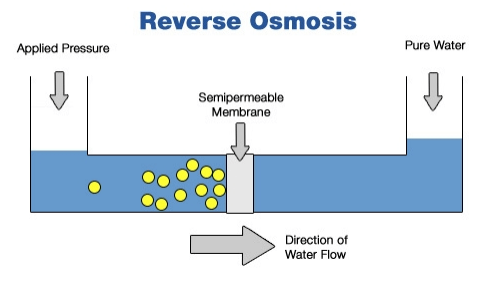
The downside to R.O. is the amount of wastewater it produces in the filtration process. This loss to drain can be cut by up to 85% with the addition of a “permeate pump” to the R.O system, it is an easy installation that should require no tools in most cases. Permeate pumps require no electricity and can be purchased online or at your local water filter supply company.
Permeate pumps are the newest breakthrough in Reverse Osmosis System Technology. Designed to operate as a non-electrical energy recovery device, the Permeate Pump uses the available energy from the brine (wastewater out of the R.O. Unit) water after the flow restrictor to essentially force purified water into the R.O. storage tank. The permeate Pump eliminates the need for hydraulic shut-off valves and can be used for replacing booster pumps in well water applications. The Permeate Pump advanced technology is capable of bringing the tank up to incoming water pressure and shutting the R.O. system down when the storage sank reaches full capacity.
Distilled water is also great to use. Mountain or spring water will generally tend not to be 0 ppm as it will have dissolved minerals. Using cheap home filters like Brita pitchers is pointless as they do little to clean the water.
Note: It’s not advisable to use plain R.O. water in a hydroponic medium for flushing. The shock of 0 ppm will start leaching nutrients from the roots. Clearing should be done around 100 ppm instead.
Tap Water
Tap water in most areas is highly chlorinated, this kills off all of the microorganisms in the soil, causing nutrient deficiencies. Stay away from it!!!
Chlorine is introduced to water as the gas Cl(subscript)2 which formulates slightly acidic water, the chlorine could influences the plants indirectly by killing beneficial microorganisms in the soil and creating a highly acidic environment, blocking the uptake of certain trace minerals. Organochlorine takes longer than chlorine to dissipate, so the best procedure is allowing the water to stand in an open container for three days at room temperature, if you must use it.
If the water has dissolved CO2 in it (like some bottled water labeled as pure), the pH will rise as that comes out. Letting it sit out is used to evaporate the chlorine, which is fine if thats what your district uses. Some areas have switched to chloramine, which is chlorine and ammonia. This will not evaporate and you need a reverse-osmosis filter (or you can use a distiller) to remove the chloramine.
To determine which is in your water, have a sample tested or call your utility company. Even with chlorine or chloramine, your plants may grow “okay” from the tap, but if you wouldn’t drink it, why should your plants?
Distilled Water
Some growers report purified or distilled water helps their plants grow faster. This is perhaps due to sodium and heavy metals found in hard water that are not present in purified water. Hard water tends to build up alkaline salt deposits in soil that lockup trace minerals, and cause iron, copper, and zinc deficiencies. There are several types of purified water, but many are not free of minerals that could be causing salt build up over an extended period of time. Tap water comes in two flavours; Hot and cold. The cold pipe has less calcium and sodium build up in it, and should be freer of sediment once the water has been turned on and allowed to flow for 30 seconds. Hot water will have rust, lead deposits, and lots of sodium and calcium (you will see it easily).
Use only the amount of hot water needed to make the water the correct temperature 70-80°F (21-26.6°C). Tap water filtered through a carbon (charcoal) filter will be free of chlorine and most large particles, but will still contain dissolved solids such as sodium and heavy metals (lead, arsenic, nickel, etc.). Purified bottled water will be either Reverse Osmosis or some form of carbon/sediment filtered water. When purchasing water at a store, unless it says R.O. or Distilled, don’t bother buying it. It could still have the same dissolved
solids and heavy metals your tap water has.
pH Level
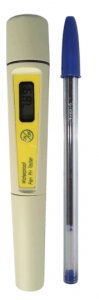
A lot of gardeners have trouble with the pH (potential Hydrogen ions) of their soil. It is very important to keep the pH level within certain limits when growing marijuana. Even newer growers need to monitor the pH of their nutrient solution or soil to keep it at optimal levels.
The pH level will determine how well your plants are able to absorb nutrients. If the pH level is out of the optimal range, the growth rate of the plants will slow down or even stop entirely. A high pH can lock out needed nutrients and mimic other problems like Fe and Mg deficiencies. The biggest mistake new growers make is to try and correct pH problems too quickly. The first step in determining if high pH is the real problem, is to pick up a good pH tester. Don’t be afraid to shell out the cash for a good one, it’s well worth it!
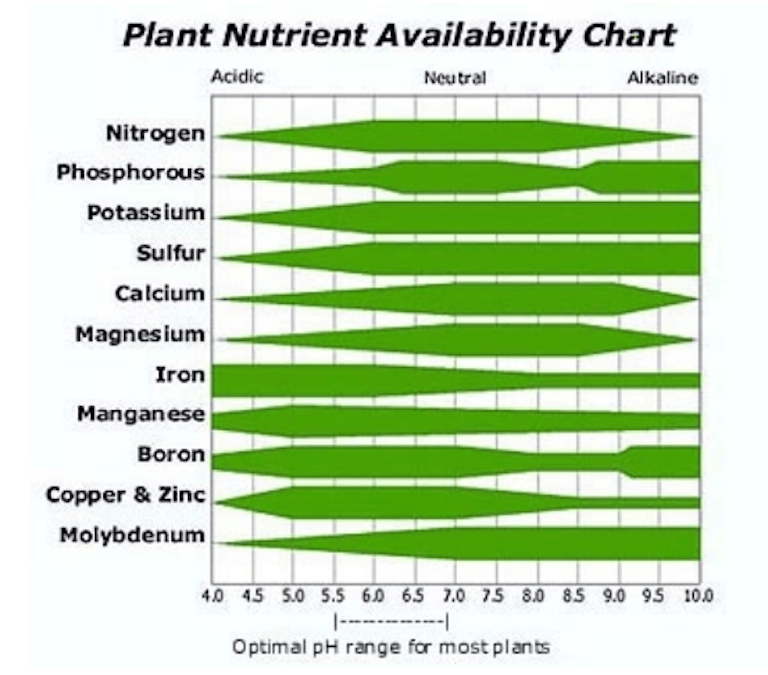
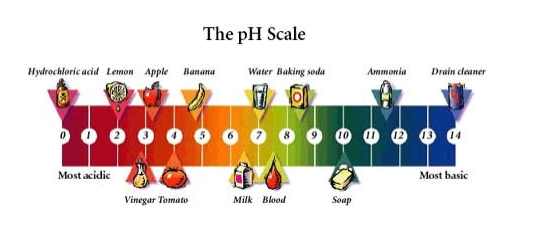
pH is a scientifically based measurement of acidity levels. The pH scale ranges from 1.0 – 14.0. 7.0 is “neutral”, 1.0 is VERY “acidic”, and 14.0 is “alkaline”. Cannabis plants grow best when the pH level of the soil is kept at a range of 6.2 – 7.0 . When pH levels are too high or too low, the roots cannot absorb nutrients! This can commonly lead newer growers to believing their plants aren’t getting enough fertilizer, which isn’t the problem. When purchasing soil be sure to check it’s pH levels and opt for a 7.0 . If you’re serious about growing then it is important that you monitor the pH (acidic level) of the soil. Your soil should be in the range of 6.0 and 7.0 at all times. In order to do this, if you are serious, you’ll need to purchase a pH tester.
As your plant grows it will naturally consume the minerals and nutrients in the soil. The plant also naturally expels waste products during this process through it’s root system. This may increase or lower the soil’s pH levels. Again, we must strive to keep it between 6.2 and 7.0. Marijuana thrives in neutral to slightly acidic mediums. Soil and soilless mixes should aim for pH of 6. Hydro growers should go slightly lower which helps prevent pythium and other root rots – 5.5 to 5.7 is ideal. 7.0 is safe.
pH Meters
 Here are some popular reliable pH meters used today (get a good one, it’s so worth it!):
Milwaukee – makes two styles of hand-held pH meters. A small “pen” called the Sharp and the larger Smart Meter. Both are easy to use. The Sharp pens are splash-proof (although not totally waterproof), and have a large easy to read display. They also have a detachable, replaceable probe.
Oakton – Same type of pH tester as Milwaukee makes, but it’s made a little better. These are totally waterproof. It even floats!
Shindengen ISFET – these are state-of-the-art pH pens and work with a totally different method of measurement. This pen uses a solid state Ion Sensitive Field Effect Transistor (ISFET) instead of the fragile glass electrodes used by traditional pH pens. They have replaceable tips that change from opaque to clear when they need to be changed.
Controlling the pH Level
Once you have determined the pH of your soil with a good tester, you can amend the soil if needed to accommodate the plants in your garden using inexpensive materials commonly available at your local garden center.
Note: Adjust soil pH slowly over several days time, and check pH often as you go. Radical changes in pH may cause osmotic shock damage to the roots.
As a general rule, be sure to check the pH level about once a week for the plants you grow in soil. Another ideal time to check pH levels is right after you fertilize your plant. Most grow shops sell pH testing kits. If you find your pH level has fallen out of the 6.0 – 7.0 range then there are methods of bringing it back.
It is generally easier to make soil mixes more alkaline than it is to make them more acidic. The addition of dolomite lime, hardwood ash, bone meal, crushed marble, or crushed oyster shells will help to raise the soil pH.
In soil add dolomite limestone to the soil; use small amounts of hydrated lime. Another easy way to stabilize soil pH that is too basic is to add a fertilizer that contains sulfur.
Raising Soil pH: (to make it more alkaline)
If your soil pH becomes too acidic you need to bring it back to neutral. This can be done using lime. You can purchase lime in small containers in most grow shops. The next time you water your plant, add some lime to the mix. Start off with small amounts and then the next day check the pH level again, and adjust as needed until your pH is back in the 6.0 – 7.0 range. It is generally easier to make soil mixes more alkaline than it is to make them more acidic. The addition of dolomite lime, hardwood ash, bone meal, crushed marble, or crushed oyster shells will help to raise the soil pH. Add dolomite limestone to the soil; use small amounts of hydrated lime.
Lowering Soil pH: (to make it more acidic)
If your soil becomes too alkaline then you will need to bring it back as well. This can be done by making your soil more acidic. You can use the following ingredients to induce a mild acidic environment in your soil to bring it back to neutral; cottonseed meal, coffee grounds, lemon peels, and some fertilizers.
Sawdust, composted leaves, wood chips, cottonseed meal, leaf mold and especially peat moss, will lower the soil pH as well. You can use bloodmeal/cottonseed meal during vegetative; bonemeal during flowering.
Again with both the suggested methods above be sure to only apply a small amount of pH altering solution at first, then check your results. Make moderate adjustments! Don’t be afraid to experiment and learn but don’t go overboard, either.
Note: You can also find pH up and pH down agents in most grow shops that do exactly what they sound like. These chemicals are becoming quite popular nowadays.
You can also use vinegar to lower pH, and baking soda to raise it.
WARNING: Never ever mix pH up and pH down together directly in a concentrate. This stuff is very dangerous and needs to be handled with care. Use one pipette for each job and color code the pipette to the bottle.
Stabilizing pH with Dolomite Lime
One of the easiest ways to stabilize the pH of soil is to mix one cup of fine dolomite lime per cubic foot of soil. The best way to stabilize pH is by adding 1 ounce of Dolomite Lime per 1 gallon of planting soil.
Dolomite Lime is available in garden nurseries. The best is the fine Dolomite powder (depending on your area there may be several kinds of Dolomite such as Rough, Medium, Fine). Dolomite lime is also high in two secondary nutrients that can often be overlooked by fertilizers; dolomite is high in both (Mg) Magnesium and Calcium (Ca).
Dolomite Lime has been a useful pH stabilizer among commercial growers for years. This is because it has a neutral pH of 7.0 and when added to your soil it stabilizes your soil at pH 7.0
Mix the dry soil medium and dolomite together really well, give the mix a good watering then after the water has had chance to settle and leech into the soil a bit give the mix a really good stir. Then water the soil/lime mix and give it another stir.
The best plan is to mix fine dolomite lime into your mix before planting. Fine Dolomite will help stabilize your pH; however, if the pH becomes unstable or changes, you can then use Hydrated Dolomite Lime. You can add some of the hydrated lime to lukewarm water and give it a good stir and then water your plants with it. Give the plants a good watering with this hydrated lime added and your pH should fall or rise back to 7.0.
Adjusting pH in Organic Solutions
To lower pH use acetic and citric acid. This will facilitate the “kreb” cycle.
To raise pH add small amounts of sodium bicarbonate or lime.
pH And Fertilizers
pH can make or break your carefully crafted nutrient solution. 6.7-6.2 is best to ensure there is no nutrient lockup occurring. Hydroponic systems require the solution to be pH corrected for the medium before exposing to the plants. Phosphoric acid can make the PH go down; lime or potash can take it up when it gets too acidic. Invest in a pH meter for $10 and use it in soil, water, and hydroponic mediums to make sure you’re not going alkaline or acidic over time.
Unless composted, most fertilizers cause a pH change in the soil. Adding fertilizer to the soil almost always results in a more acidic pH level. As time goes on, the amount of salts produced by the breakdown of fertilizers in the soil causes the soil to become increasingly acidic and eventually the concentration of these salts in the soil will stunt the plant growth and cause browning out of the foliage. Also as the plant gets older it’s roots become less effective in bringing food to the leaves. To avoid the accumulation of these harmful salts in your soil and to ensure that your plant is getting all of the food it needs you can begin leaf feeding your plant at the age of about 1.5 months – dissolve the fertilizer in worm water and spray the mixture directly onto the foliage. The leaves absorb the fertilizer into their veins. If you want to continue to put fertilizer into the soil as well as leaf feeding, be sure not to overdose your plants.
Next: Part 6. Cloning
Previous: Part 4. Growing Marijuana