How to DIY Hydroponic System for Beginners
What does ‘Hydroponics’ mean?
The word itself literally means “water working” and typically refers to methods of growing without soil and the use of a water solution that is rich in nutrients. Typical mediums for use with marijuana are coco-coir, perlite, fiber-glass wool (or ‘Rockwool’), or some combination of these elements. The key to success with hydroponic growing methods is that you are able to control the entire atmosphere in your hydroponic system.
What Nutrients do I Need for a Hydroponic Setup?
| Image | Product name | Main features | Price |
|---|---|---|---|
 | Humboldts Secret Golden Tree | Increases yield by 50% decreases vegetative time by 20% | $$$ |
 | General Hydroponics Flora Grow Bloom Micro Combo Set | Building Block Nutrient System PH-balanced used by NASA scientists | $$ |
 | FoxFarm FX14050 Big Bloom Grow Big & Tiger Bloom Fertilizer | Trio pack for maximum effectiveness increases nutrient cycling enhances yield | $$ |
 | Advanced Nutrients Voodoo Juice Fertilizer | Eight microbial super strains increases root mass by as much as 17% | $$ |
 | Root Organics Buddha Grow Fertilizer | Finest organic ingredients does not clog hydro systems | $ |
 | General Hydroponics MaxiGro | pH-buffered water-soluble fertilizer dry concentrate formula | $ |
 | Superthrive VI30155 Plant Vitamin Solution | Contains 53 soluble ingredients highly-concentrated non-toxic | $$ |
 | Advanced Nutrients Big Bud Liquid Fertilizer | Contains L-form amino acids formulated for easy absorption | $$ |
 | Flower Fuel Superior Bloom Booster | 40+ proprietary ingredients treats 200 gallons of water | $ |
Although plants, including marijuana, don’t need soil, they do need the nutrients and micro-elements that a well-crafted soil can provide. Fortunately, hydroponic systems allow you to provide this through a bath of water you place your plant pots, filled with your inert and sterile growing medium, in.
To get the best out of your home-grown weed, you’ll want to ensure you’re providing a good balance of Potassium, Nitrogen, Sulfur, Phosphorous, Calcium, and Magnesium. You’ll also see super yields if you can add a good mix of copper, boron, zinc, chlorine, manganese, and Iron into your water bath and adjust your nutrient solution throughout the growth stages. However, for beginners, it’s a good idea to just go with an all-purpose solution to start with rather than mixing your own.
Best DIY Hydroponic System: The Ebb and Flow (Flood and Drain) Method
This inexpensive and homemade system is great for people with a bit of experience growing their own cannabis plants. Make sure your containers have lids and are big enough to hold enough water and nutrients to last one or two weeks, as well as the space to house 6 mesh plant pots.
You Will Need:
- Rockwool
- 6 X Mesh Pots
- 2 or 3 X Containers
- Aquarium Pump
- Air Stone
- Timer
Step 1: House your Plant Pots
Place your upside down plant pots on top of your container lid and draw around them making sure none of the lines are touching. Set a compass to the radius of the base of the plant pot and draw another circle inside with the point of the compass in the center of the larger circle. Cut away the smaller circle and cut out towards the larger circle leaving an inch or so between cuts so that the plant pot snuggly fits inside the lid whilst retaining the seal.
If you have grown small plants from seed already, these can be transferred into the pots, placed in. Rockwool, and are good to go. If you want to grow from seed it’s a good idea to put these in soaked Rockwool seed cubes and water them by hand until they have germinated.
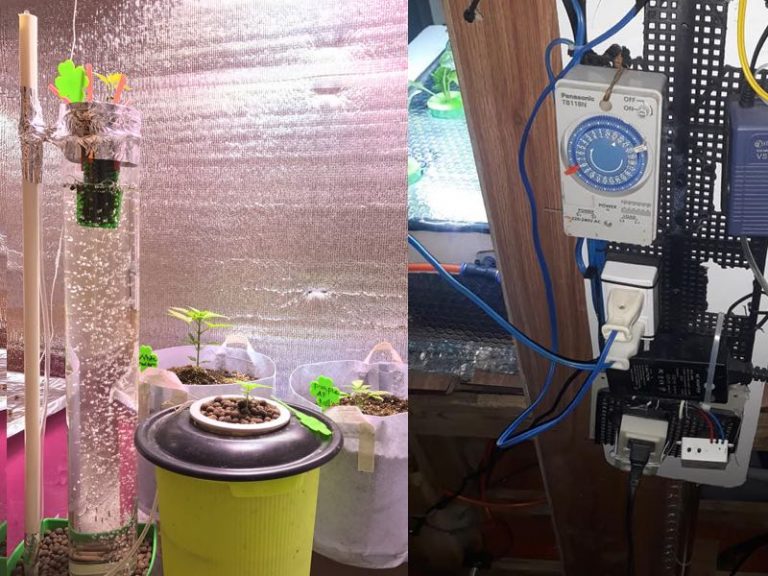
Step 2 Install Timer, Air Stone & Aquarium Pump
In an ebb and flow system, you are constantly flooding your plants in their pots, draining the reservoir you’ve filled, then repeating after constant periods. To do this you will need an aquarium pump and an air stone to make sure your plant’s routes do not get starved of oxygen. If you want to make your system work automatically you should also connect your aquarium pump to a timer.
Cut a hole in the bottom of your container which will be placed above your second container or ‘reservoir’. Feed the pump down into the reservoir by making a hole and seal in the container lid. You now have the means to pump water up into your top container and just need to set your timer to the desired schedule. The pump tube also allows any left-over solution to return to the reservoir.
Step 3 Insert a Water Level Gauge
Connect a clear, straight hose between the top and bottom containers with a seal. In the top container, this should go up to the maximum level you wish to fill to in the top container. This will work as an overspill to ensure the container never fills beyond the appropriate level and you won’t lose the water as it will drip back down into the reservoir below.
Step 4 Sterilize and Fill
As you want complete control over your plat’s environment, it’s important to sterilize your containers before filling them with your first growing solution. Do this with a mixture of bleach and chlorine, turn on the pump, and give it at least 30 minutes sitting time in your containers before draining and allowing to air dry to remove the chlorine. Now you’re ready to fill your container for real, just follow the instructions on your nutrient solution for the amount of water your reservoir holds.
Step 5 Refills
You will need to replace your nutrient solution at least every other week or whenever the water level of your reservoir gets low as there will always be some loss from your system and the water will become toxic for your plants if left for too long.
For a useful video to help you build this setup check out this video on YouTube:
| Picture | Product | Features |
|---|---|---|
 | SuperPonics 16 Hydroponic Grow System | 16-plant hydroponic grow system 3‣ cup Eco Air 4 air pump and high output air stones 185 GPH pump Analog single timer |
 | VersaGrow Pot 10 Plant System w/ Pumps | 10 planter pots Submersible pump Access door for easy watering Water level indicator |
 | Deep Water Culture (DWC) Hydroponic Bucket Kit 5 Gallon 6 inch by PowerGrow® Systems | 5 gallon bucket (reservoir) 6 inch net pot lid 44 gph air pump Air tubing and air stone 3 rockwool starter plugs Water level indicator 1 year warranty |
 | General Hydroponics Waterfarm Complete Hydroponic System Grow Kit | 2 gallon container reservoir Basket container Air stone and air pump Tubing for the air pump Clay pellets and nutrients |
What Other DIY Hydroponic Systems are there?
If the ebb and flow system doesn’t sound right for your setup or sounds a little bit too complicated for your first try, why not try one of these systems:
- The Passive Bucket Kratky Method – This is great for absolute beginners, all you need is a bucket with a lid filled with nutrient solution (just make sure to leave some space for oxygen between the lid and your nutrient solution). Follow step 1 above to install a plant pot in the lid and you’re good to go. Just refill the bucket when it gets low or when the pH level is off. Check out this video for a useful guide:
- The Drip Irrigation Method – This is a great way to save both nutrients and water. You feed the plants from above through small droppers which prevent evaporation. This is good if you want to grow stealthily. Check out this video for a detailed guide to a DIY Drip Irrigation System for Cannabis:
Conclusion
These are just 3 methods to set up your own hydroponic systems and show that it is not as scary or complicated as you might think to set up your own fully hydroponic setup at very little cost in either time or money.
