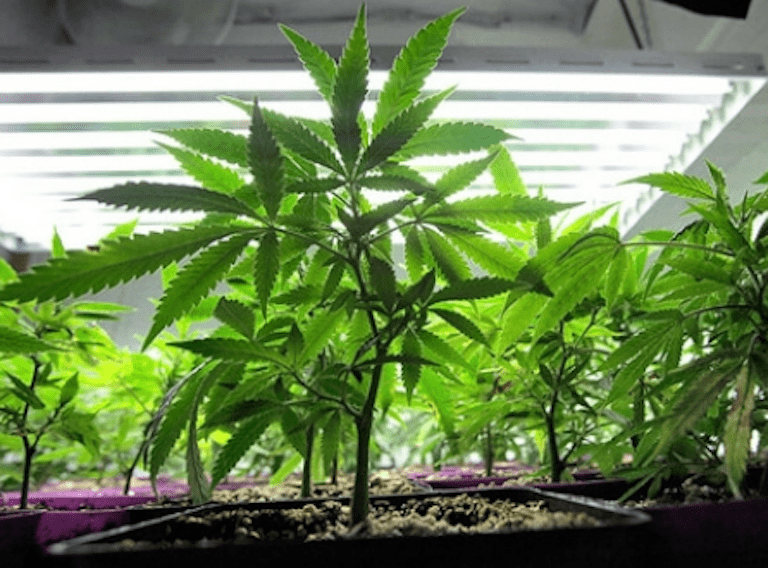
Part 6: How to Clone Weed – A Step by Step Guide for Beginners 2023
To help you out, here are the cannabis seed banks that work in any country.
Cloning offers growers many benefits. For one it allows them to have a constant supply of female plants – by using clones, a grower has a healthy, steady supply of guaranteed female-only plants. A clone is an exact genetic duplicate of its parent. So, you can use your most vigorous and potent plants to use as mothers, and every clone you take from it will be vigorous and potent as well!!! Clones will always keep the same sex and vigor of the mother plant. It is also possible to create a garden of plants that will last for decades through cloning from a single female “bonsai” mother plant.
Introduction to Cloning
Mothers(“Bonsai Mothers”) can be kept alive for a very long time to continue to produce healthy offspring, but, the longer you keep it alive the longer it has the chance to fall prey to insects, mold, fungi and disease.
Cloning is a popular simplified method of replicating your plants. To clone marijuana is to take a “cutting” from a growing branch tip and root it. Cloning is by far the most efficient and productive means of cannabis propagation for
growers, both indoors and outdoors. The best time to make and use clones is when you have an exceptional unique plant whose particular genetic code is worth preserving and perpetuating. Uniformity is a common cultivation goal
among quality cannabis growers. Since indoor grower’s usually cannot devote time and space to plants that may have quite different habits in growth, flowering time, or yield, clones offer the advantage of uniform genetics.
Uniform genetics simply means that your plants will be the same height, have the same growth habits, will ripen and flower at the same exact time, and have the same potency, taste, aroma, smell, traits, etc. They will also respond to the same external stimuli in the same exact fashion (such as fertilizer, lighting, bending, cutting, stress, etc). After a while the grower will then know exactly what to do to his crop to ensure a quality, heavy harvest every time.
The benefits of creating a garden of genetically identical cuttings from a specifically favored mother plant will allow you to produce a consistent, known quality and quantity from each plant and expect that all plants will mature at the
same time. This guarantees the same consistent, quality, harvest from consecutive crops (as long as the same high quality clones are used for planting!) This method is CRUCIAL for commercial-oriented weed farmers.
Genetic uniformity works both ways though. This means if your chosen stock plant is lacking potency, health, harvest weight etc; it’s clones will be lacking those traits as well. That is why choosing healthy parent plants is essential.
If you find a seed strain you really like with an awesome genetic profile, you can keep it indefinitely by cloning her correctly. You can create literally 100’s of healthy female plants from one single mother! Cloning is great for those
growers who have little cash to spend on multiple seeds.
Cloning has the added benefit of reducing the time it takes for a plant to mature. Clones can flower as soon they reach 12 inches, so cloning can shorten the total growing time (which normally takes 90 – 130 days from seed to
harvest) to only 10 days! In this way, cloning allows the grower to plant THC potent plants that will continue to grow into full potency at a very rapid rate.
A one month old rooted clone acts exactly like a four month old plant and can be triggered easily to flower by using the 12/12 photoperiod.
An exceptional plant can be rejuvenated and cloned even after it has flowered and been harvested! If a small amount of vegetative matter is left growing on the bottom of the plant and it is placed under an eighteen hour light cycle then
all the little nuggets will stretch into vegetative shoots, which may then be cloned and grown into a full mother plant, which can then be cloned indefinitely. This will provide you with many uniform harvests of your favourite plant.
When using clones for regenerating, your garden can be designed and used most efficiently because you know the plant’s exact growing habits. Also when commercial growing, since the plant’s qualities are already known, you can establish a perpetual income generation cycle properly. The downside to clones is that they can be tedious to prepare and are subject to heavy failure rates.
WARNING: It is imperative that you take clones from a mother plant only. Taking clones from clones may cause the plants to suffer from “genetic drift” and form mutations or undesirable growth characteristics.
Growers often will make clones from their plants when they are still in their vegetative growth stage (cuttings are made easier while the plant is still in its vegetative growth stage). This method of propagating growth asexually to
ensure uniformity in growth, yield, and consistency is quite popular nowadays.
Starting From Seeds vs Clones
Many novice growers ask; “should I start from seed or should I grow clones?”
Growers commonly face the decision to begin their grow from seeds or rooted clones. There are distinct advantages and disadvantages to both. The traditional way to begin growing a new marijuana plant is to plant seeds. About half of the seeds will develop into plants that turn out to be male. The males are then removed from your garden and the remaining females will be of varying quality. But what about clones? Let’s just say you get an AMAZING female plant that you now want to continue to produce. How do you do it so that you can grow out future generations of the exact same identical awesome plant uniformly, producing a constant flow of incredible buds? This is known as recropping and is the method of obtaining a second identical harvest from the same plant. The answer of course is to take a cutting (clone) of the desirable female mother plant. This is the only way to get a uniform crop.
Growing from clones means that you will harvest more bud sooner. Many people who start a garden nowadays know someone who will give them a few clones for the simple pleasure of sharing a good thing. Some people sell clones only, often growing an exclusively vegetative garden without ever flowering.
These clone aficionados keep a variety of select mothers from high-quality strains, and grow them on a continuous eighteen hour light cycle. They can make good money selling trays of cuttings, either rooted or simply fresh cut. Rooted clones are more expensive than fresh cuttings.
If you have access to someone who grows, you can ask them for some clones, as this will be the easiest way to obtain them. If you don’t have access to any clones you will then have to buy seeds as mentioned above. Some people sell
specific strain clones only, utilizing an exclusively vegetative garden without ever flowering their bud. They can make good cash selling trays of cuttings, either rooted or freshly cut. Rooted clones are far more desirable than fresh cuttings.
I recommend growing from seeds so you can choose the particular plant that suits your needs, and so you can select the best “leader” plants. Make sure when you’re starting from seeds to take two clones from the bottom of each plant right before putting the plants into the flowering phase of growth. Keep them alive, and watch future generations soar!!!
It doesn’t matter which grow system you use, you are bound to use clones sooner or later. They can greatly improve the efficiency of your growing area, and are a fantastic way to preserve your favorite plants.
Advantages of Starting With Clones:
- An excellent way to keep a steady supply of plants around.
- Saves a ton of time.
- Guarantee of having a female plant.
- Clones are much faster to veg up and flower than starting from seed, resulting in a quick harvest and a much shorter turnaround time.
- Clones can be quickly grown into mothers and re-cloned, for an instant vegetative and flowering crop
- Since indoor growers usually cannot devote time and space to plants that may have quite different habits in growth, flowering time, or yield; clones offer the advantage of uniform genetics.
- Clones are genetically identical, but some differences will still be evident in the phenotype. In general clones will exhibit even growth and uniform growing characteristics.
- Rooted clones can be flowered immediately if space or time is a problem.
- Clones can quickly provide the grower with a strain’s characteristics (smell, vigor, branching pattern, Sativa/Indica dominance, rooting quality, etc).
Disadvantages of Starting With Clones:
- Genetic uniformity means similar resistance and susceptibilities to insect attack, disease, microbial infections, nutrient deficiencies, and any other kind of weakness the parent plant may have that normally would be less
likely to harm the plant had it been bred of many different strains. In other words, degeneration is likely to spread more quickly. - Lack of variety. Clones from the same parent will all taste extremely similar and create the exact same high. This is perfect for commercial growers seeking uniform standardization growth to increase profits on a large scale, but most smokers growing their own cannabis tend to prefer many different strains of pot.
- Clones can be difficult to find. Clones from unknown sources are of suspect quality and questionable genetic predisposition.
- Growers run a high risk of inheriting problems from the last grower: Root rot, spider mites, powdery mildew, etc. If these problems are not identified and treated, they can quickly spread to an entire crop (and garden!)
- Unhealthy clones may die or remain in shock for an extended period.
- Availability. Shipped clones may be in shock and take weeks to recover. There are countless horror stories of medical clones shipped without any protection and arrived flat!
- Clones are more light-sensitive and delicate than seeds. Clones take time to become established, and are easily burned by excessive light (and nutrients). They require more attention and care in the early growth stages.
- As clones are almost always female, breeding options are limited. Hermaphrodite development is always possible with unstable clone crosses.
Advantages of Starting With Seeds:
- Seeds obtained from reputable seed banks are of known lineage and genetics. You will have a reasonable idea of what the strain will do in terms of yield, quality and flowering time.
- Your seeds should produce healthy plants, free of disease and pests.
- Hybrid vigor. Females grown from seed are often higher yielding than clones. Strains can lose their vigor over time; growers may want to rejuvenate their grow with the same successful strain.
- Breeding and crossing options are possible with male seeds. (Feminized seeds produce a higher percentage of female seeds, but 100% female is never guaranteed.)
- Gives growers more control over evolution and selection.
Disadvantages of Starting With Seeds:
- Problems with ripoffs, shipping/customs seizing seedbank deliveries, switched seeds.
- Cost. Seeds can be expensive, not only per seed pack, but in the time they take to produce a flowered crop.
- Unstable hybrid strains.
- Not all seeds will be viable (germinate) and only 50% of the unfeminized seeds will be female (feminized seeds may produce up to 90% females).
- It may take many seed packs to discover an excellent mother.
- Seeds take a long time (and there is more labor, money and time involved) before a harvest can occur.
- The final results are uncertain.
- Indoor grower’s usually cannot devote time and space to plants that may have quite different habits in growth, flowering time, or yield.
Cloning
See also:
So let’s get started! But before you begin cloning you need to prepare an ideal parent.
Preparing Bonsai Mothers
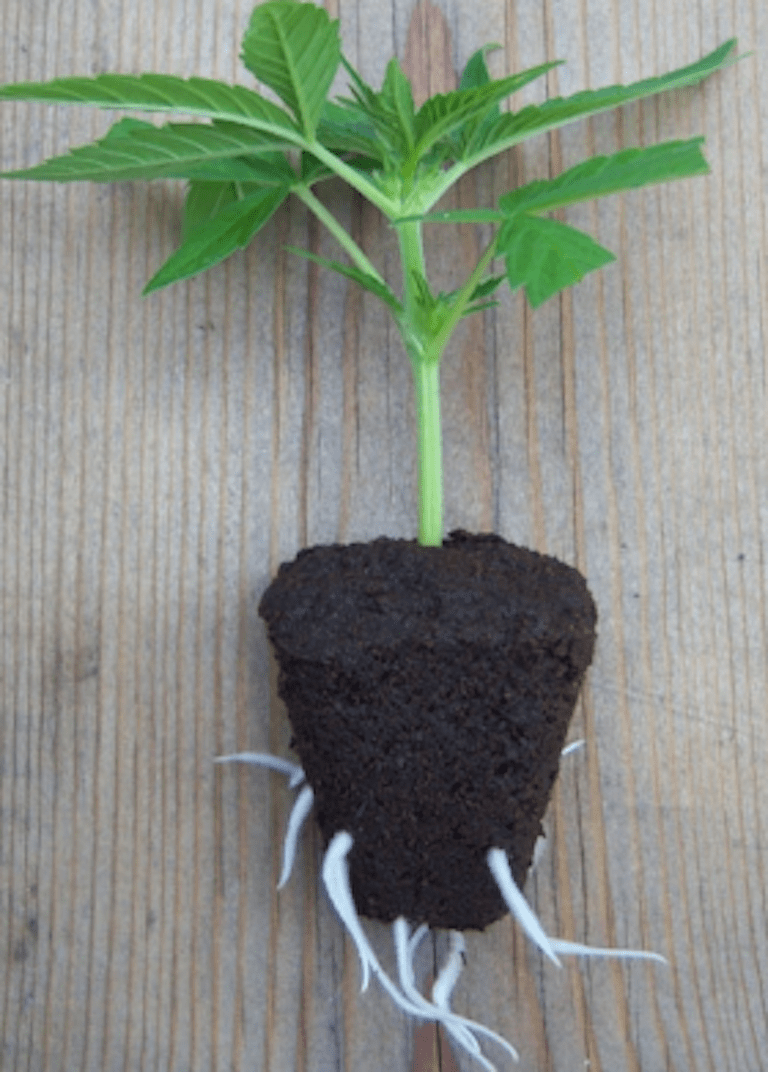
The most important process when selecting clones is to properly choose a mother plant. A Bonsai Mother is a female strain kept in the vegetative state, never allowed to flower. Female plants will produce 100% females, all exactly like their mother. A Bonsai mother can be kept for several years, but it is suggested to begin anew each year by seed in order to propagate a new fresh healthy mother. You take cuttings/clones from your Bonsai Mothers. Take clones from mother plants that are at least two months old. Plants that are clones before 2 months may most likely develop unevenly and have excruciatingly slow growth.
Any female plant can be converted into a bonsai mother. She can be grown from a seed or be a clone of a clone. The moms should be healthy, pest/disease free and fully into vegetative growth. Clones can be taken off moms up to 2 weeks into flower; however, these flowered clones experience reveg shock and are often difficult to root. It is wise to keep several bonsai mother plants in the vegetative growth stage for a consistent source of cloning stock. If you want to ensure maximum quality bud production, then start new mothers from a seed every year.
A common secret cloning habit among professional weed growers is to foliar feed the mothers with a formula containing a Nitrozyme kelp extract containing growth hormones 3-4 days prior to cloning. This will encourage unbelievable lush and healthy shoot growth.
Bonsai Mother Growth Tips
Lighting: Under 24 hours of constant light the mother will have a very hard time flowering, the downside being that the mother might grow faster than necessary. Under 18 hours of light and 6 hours of darkness (generally referred
to as 18/6) that plant will have much slower growth, the plant will receive a nice rest period, and you get a lower electrical bill. The downside of 18/6 is that sensitive strains might begin to flower or at least produce pre-flowers,
particularly if the mothers are kept for long periods of time. Some strains are more prone to flower. Generally pure sativas require maximum light in order to trick the plant into thinking it’s summer, while stable indicas cope better with 18/6. Going with a lower light regime then 18/6 should be considered experimental. 1200 lumens of blue spectrum rich light is plenty. You want to give mothers 18-24 hours of light per day to maintain fast and vigorous growth.
Note: Always start with the best mothers you can find!
Nutrients: While the plant is active in vegetative growth stage, feed it with a good quality, all-purpose or high Nitrogen fertilizer. One week before taking a cutting feed the Bonsai Mother plant with a low nitrogen, high Phosphorus flowering fertilizer. Lower nitrogen promotes rooting in clones, so about 1 week before you take your cuttings lower it. Reduce the amount/ratio of Nitrogen in the mother’s nutrient solution 3 days prior to cloning (flush soil mothers with water). Nitrogen inhibits root growth; reduced N levels in the mother help the clones to root faster.
The flowering fertilizer will lower the amount of stored nitrogen in the plant and increase the amount of stored carbohydrates necessary for the production of roots. Spraying the foliage with water daily will help accelerate this process.
Taking Clones From A Flowering Plant
If you take clones during flowering, the clones will take at least 2 weeks to start vegging again. It might also take a few more weeks for the buds to be reabsorbed. During this time root growth is often painfully slow. Since you’ve
never harvested any buds from these clones future yield will not be compromised. You should however not trust that clones taken from a flowering plant will survive, because clones taken from a flowering plant generally will not survive – if you do not know what you are doing and know your strain then you are gambling. It is recommended to take clones only from plants in Vegetative Growth.
Since a cutting taken while the stock plant is flowering will need to be forced to revert back to a vegetative state under a 24 hour light, this causes additional stress, slowing growth and development. Rooting may take up to three times longer when the cuttings are taken during the flowering cycle. The cutting may not have enough stored nutrients or carbohydrates to survive. If you must do this then take the cutting when the mother plant is only a week or two into flowering.
Some growers do not like to top their moms, preferring to take clones from lower lateral branches to maintain vertical growth and prevent bushy growth. Topping will produce 2 more shoots at the same node, and even more clones can be taken the next round.
How Many Clones Should I Cut?
There will always be natural differences between clones. Clones taken in large numbers will compensate for poor performers and mortality. The fastest rooting clones have the most vigorous vegetative growth and usually the best flowering potential. Taking approximately 50% more than you need is a good starting point.
When Exactly to Take Cuttings?
Although cuttings can be taken at any time in a plant’s life cycle, the best time to take them is before the plant is flowering. This helps the cutting to root more easily. Many growers will grow out a plant until it has begun to grow internodes, then they take their clones and discard the plant.
Perpetual Harvesting
Productive growers have two grow rooms! One for vegetative growth / cloning, and the other dedicated for flowering. Commercial growers combine eight-week flowering/harvest cycles with continuous cloning to form what is known as a “perpetual harvest”. An example is to take two clones every four days, and harvest one ripe female every other day. This way, every time a plant is harvested, one or two rooted clones are moved from the vegetative room into the flowering room. The above example will yield the grower 30 flowering clones that are on a 90-day schedule. This means it will take ~90 days from the time a clone is cut from the mother plant until the day it is harvested. If this
schedule was used, the grower would have 30 clones, 10 vegetative plants, and 30 flowering plants growing perpetually at all times.
The key of course is to have a separate veg and flowering chamber going at the same time. Each time a plant is harvested it gets replaced with a clone from the veg room – so that the bud chamber’s always filled to capacity. Eventually, as you learn the flowering times and cloning times of your strains, you can close in on the goal of 100% occupancy(with no extra clones laying around and no place to put them). This does take a little calculating, but once done you can get on a fairly precise schedule to where you’re picking your buds like clockwork. It’s the ideal setup for growing multiple strains with different flowering times.
Hydroponic/soil systems: Since the plants will be of varying sizes, you’ll want a hydro or soil system that’s conducive to moving them around under the lights – to keep them in that bowl formation (or, if you’re vegging under fluorescents, in a staircase arrangement with the lights hanging diagonally). You want it to be easy to position the plants wherever you want in the chamber, plus be able take them to the next chamber. Good systems include ebb/flo and drip, and also soil/pots. Systems with fixed plant spacing (aero and nft tubes) and/or systems where the roots intertwine may prove difficult in an ever-changing perpetual harvest setup.
An exceptional plant can be rejuvenated and cloned even after it has flowered and been harvested. If a small amount of vegetative matter is left growing on the bottom of the plant and it is placed under an eighteen hour light cycle then all the little nuggets will stretch into vegetative shoots, which may then be cloned and grown into a full mother plant, which can be cloned indefinitely. This will provide you with many uniform harvests of your favorite plant. This means you wont have to continually purchase seeds!
Cloning Technique
 There are several methods of taking cuttings from your selected parent plant. The techniques with the most success rate and easiest to do will be outlined in this section.
Successful cloning requires cleanliness, warmth, healthy stock, and a little care. Clones are sensitive to their environment. Harsh conditions (ie. bitter cold) will delay rooting and increase mortality rates.
Before Beginning
Before you begin cloning in order to ensure as close to a 100% success rate as possible please review the following suggestions:
- Select a strong healthy female mother plant (“Bonsai Mother”).
- Wash your hands thoroughly beforehand.
- Keep your work area, tools, and work surfaces clean and sterile. (You can sterilize tools such as a razor, sharp scissors, x-acto knife etc by dipping them in alcohol or vinegar. Bleach that is diluted to a 5-10% solution also
works wonders.) - Have your pH balanced grow medium ready for immediate planting.
- Be sure to have all your cloning supplies in reach and immediately available before you start to take clones.
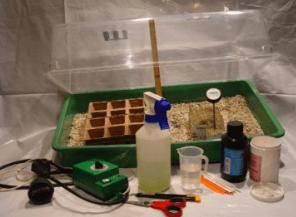
Taking Cuttings Using Rockwool
Rockwool is an excellent medium for cloning: sterile, cheap, biodegradable, and portable – rockwool can be transplanted into any system with minimum transplant shock.
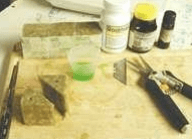
Required Materials:
- Rooting gel / hormone.
- Fresh sterile razor blade(s) / quality trimming scissors.
- Cutting board.
- 1″ rockwool cubes.
- Slotted tray / solid tray / High hat humidity domes.
- Flourescent lighting.
Optional Materials:
- Heating mat.
- Isopropyl alcohol.
- Tray inserts (to keep cubes upright, evenly spaced, and slightly raised off
the slotted tray).


Note: always use “high quality water” when watering clones – distilled, reverseosmosis (RO) or “24 hour” tap water left for 24 hours to dissipate chlorine. All water should be at room temperature.
Prepping The Rockwool
The first step is to treat the rockwool by soaking overnight in a pH treated solution:
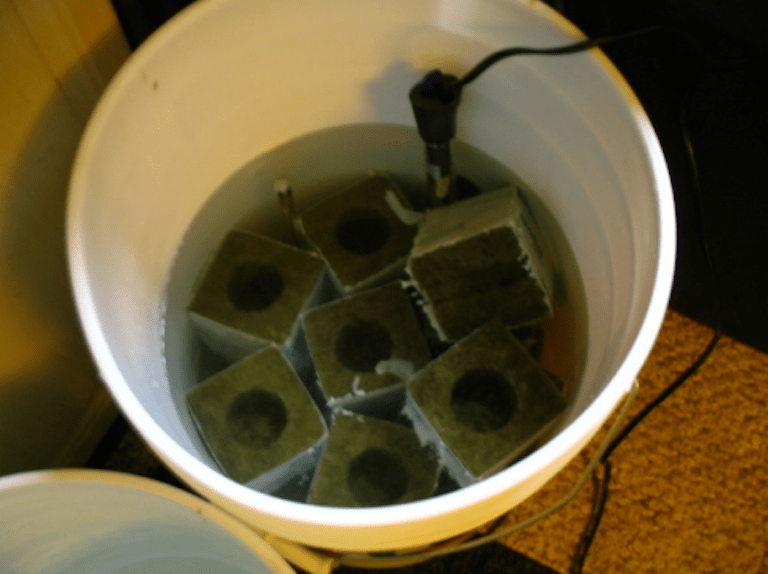
Step 1. Remove plastic wrapping from cubes (The plastic can incubate algae)
Step 2. Prepare some pH 5.5 – 6.5 water.
Step 3. Immerse cubes for 24hrs.
Here you can use plastic inserts to keep cubes upright, evenly spaced, and slightly raised.
Many find the standard 1″ cube too big; it remains damp and cool (even on a heating mat). A better idea is to cut the 1″ cube into 2 halves; the ½ sized cube dries out faster, stays warm, air can reach all sides, roots exit faster, and you get twice as many! Cutting a cube into 4 makes even more…
Note: Labeling your mom and the clones taken from a particular mother plant is a good idea to backtrack on a “monster mom”.
Prior to cloning exposed clones will wilt within a few minutes, so it is best to have all materials ready before you start to take cuttings:
- Dip scissors and razor blade into alcohol.
- Wipe cutting board with alcohol.
- Drain cubes, place into tray.
- Poke a 1/8″ hole halfway into the center of each cube.
- Cover prepped cubes with dome until you are ready to start(prewarming the rockwool by putting the filled tray on the heating mat for ½ hour before you start to take cuttings ensures a damn-near 100% success rate).
Choosing Clones
Actively growing tops are preferred, as they contain the most growth hormones. Clones taken lower down are often spindly and less developed. The best is 3″ top clones with a 1/8″ stem, 2-3 fan leaves and a slightly firm (but not yet
woody) stem.
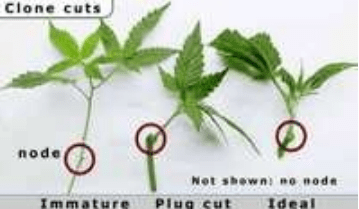
Short clones are best (no more than 2-3 nodes), otherwise the newly forming roots must support a large leaf and shoot. The clone should also be “mature”, with alternating leaves. Immature clones have leaves opposite each other and are usually pale and spindly.
Avoid stem cuts (no node) and plug cuts, as they do not root nearly as well (roots form primarily at the nodes). Trim large fan leaves in half to minimize the leaf area the newly forming roots must support.
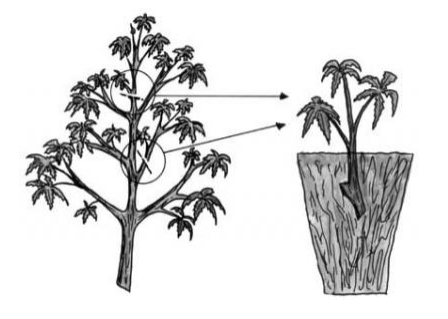
Selecting The Clone – Where Do I Cut?
Select a vigorous growing top on the mother, cut the main stem just above a fan leaf / auxiliary shoot node about 2 nodes down (as shown in red in the image below).
The cut can be done with sterilized trimming scissors or a razor blade.
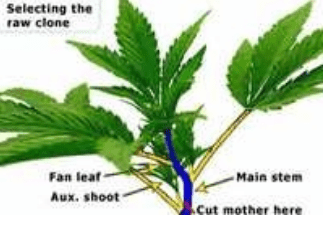
Leaving a shoot and fan leaf on the mother allows the remaining shoot to continue growing and another shoot to grow from that node.
When taking a cutting you must cut it long enough to have at least one trimmed internode under the medium. Try to take a cutting that is at least 3 inches long. Once the cut has been made, trim off all leaves and branches except the top two fan leaves and the growing tip of the branch. This will leave a nice stem for planting. Make sure you use a sterile clean tool when making your cut.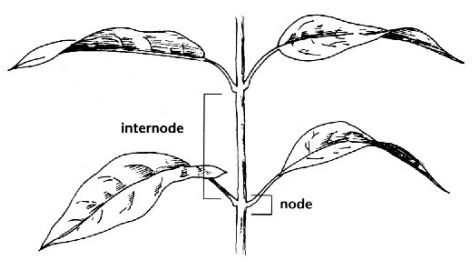
An internode is the place on the stem where the leaf (plus it’s stem) intersects the main stem. Cuttings taken from wood-like parts of the plants won’t root as well as cuttings taken from the soft veggy part of the plant. Take them from the fresh soft parts to ensure maximum rooting success.
The larger branches of a cannabis plant will oftentimes have little white protrusions near the base of the stem. These are known as “adventitious roots”. These most commonly will appear in a humid environment and readily grow into
roots when placed into a grow medium.
Cuttings taken from the lower branches are best as these often contain a higher amount of sugars and they root much faster than the slips from the top of the plant.
Note: Be very delicate with your clones throughout their entire life cycle. Any kind of stress will greatly disrupt hormones and slow its growth.
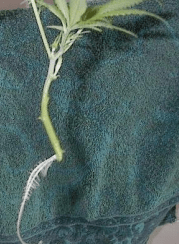
Pre-Trim The Raw Clone (Removing Lower Nodes)
Once the growing top has been selected and cut from the mother, trim shoots and fan leaves from the lowest nodes (as seen in the below image). The lowest node will be inserted into the rockwool.
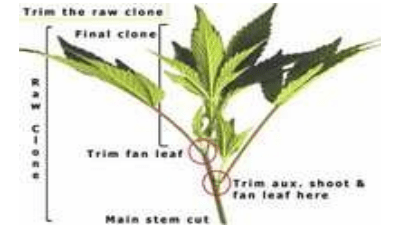
Cut ¼” below the lowest node with the razor blade at a 45 degree angle on the cutting board for a clean cut.
Removing the large fan leaves ensures that the fragile cutting’s water and nutrient uptake processes won’t be overburdened.
The Trimmed Clone:
This “ideal” trimmed clone was taken from a vigorous top. A fan leaf and shoot were both removed at the lowest node. The clone will soon be inserted dipped into rooting gel / solution, then inserted into a rockwool cube.
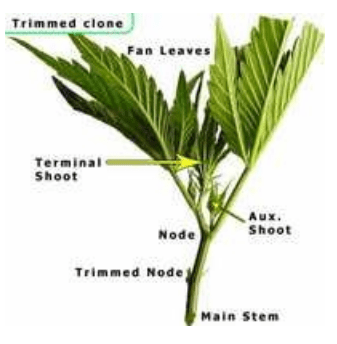
Trim large fan leaves in half. This will vastly affect enhance your clone’s early development – (It reduces transpiration; so the newly forming roots don’t have to initially support as much leaf matter.)
Planting The Clone
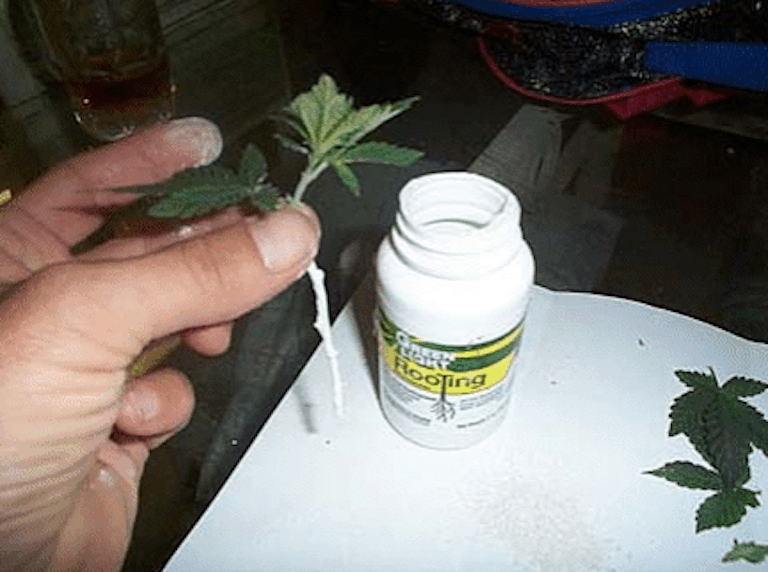
Before placing your cutting in a medium if should be treated in a rooting solution such as fungicidal-b¹ mix, or the powerful Willow Water as described below. Rooting solutions promote healthy root growth which is an essential building block for growing dank, heavy sensational buds.
WARNING: An embolism might form in your stem (an air bubble) if you lay your cutting down on a counter before placing it in a grow medium. It is advised to take your cuttings only under lukewarm water. This will remove the possibility of an embolism forming. An air bubble inside your stem will stop fluid uptake and kill your clones. The best way to prevent this is right after taking your cutting to immediately dip them into your grow medium or water. This will prevent air from getting trapped in the hollow stems.
Dip the trimmed clone into the cloning gel / rooting solution, making sure the lowest node is also thinly coated with gel. Remove any excess on the cut surface itself (so the cutting does not suffocate).
Gently push the stem into the rockwool. If the hole is too big, gently squeeze the rockwool around the stem to seal it.
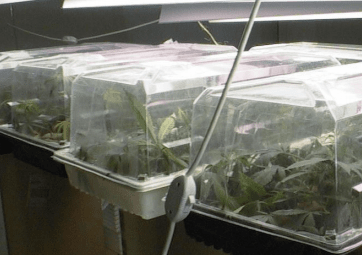
Dome and Lighting
Spray inside of humidity dome with No-Damp solution or similar, you can simply mist them. Do not spray clones directly, as this can encourage powdery mildew.
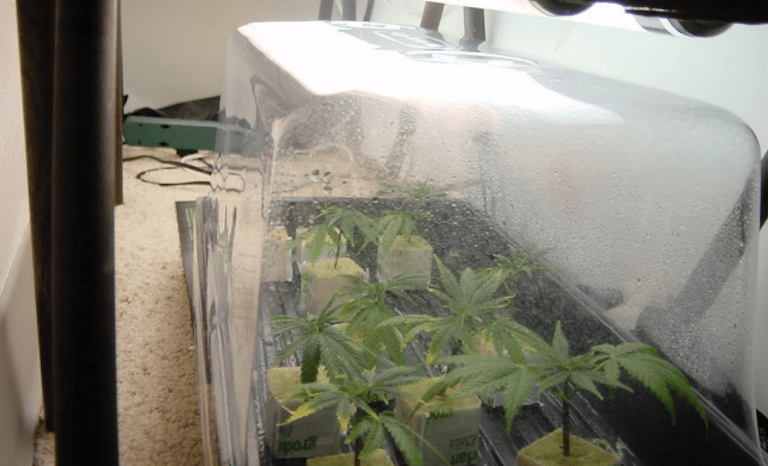
Rotate edge clones to keep their leaves inside of the tray. Cover the freshly cut clones with the dome.
Put the clone tray + dome under “warm white” fluorescent lights (delicate unrooted clones require low light levels at first. Do not blast them with direct HID lights or direct sun just yet!!).
The humidity dome should be left on for 3 days, lifted daily for air exchange. On the 4th day prop up the dome ¼” (slightly) on one side to acclimatize them (if wilting occurs, leave dome on for another day and try again).
On the 5th day remove the dome. Roots should begin to exit the cube after 10 days or so.
If the lower leaves start to turn yellow and die, don’t worry that’s perfectly normal. It is the plant feeding off of itself to sustain life by moving valuable nutrient and water from the older growth. Do not remove any dead growth until the plant is well rooted. If you remove the dying growth the plant can starve and die completely. When the clone has developed roots, replant it where you want it.
Daily Maintenance

Air exchange: Lift the dome at least once a day (for first 3-4 days, then remove dome). Here’s a little trick; exhale inside the dome to increase CO2 levels. As the Native Americans say, when we exhale, the plants inhale.
Watering: Water every second day when the clones are under the dome, then once/day thereafter. Once roots show, you may have to water twice a day to keep the roots moist.
The pH of the water inside of the rockwool will rise slowly; re-hydrating at 5.6- 5.8 will restore proper pH levels inside the root zone. Allowing the cubes to dry slightly will force roots to search for water and encourage vigorous rooting (but dont allow the cubes to completely dry out!)
Mix 5.6-5.8 pH “24 hour” water and fill solid tray about halfway with water.
Note: After the dome has been removed, add small amounts of nutrients.
Dip clones + inserts + slotted tray into the ½ filled solid tray. Make sure all clones are getting water by ‘swirling’ the edges of the tray.
Lift clone tray out and allow to drain. Shake tray to remove excess moisture. Place clones back under fluorescent lights, and a gentle fan.
Root Check
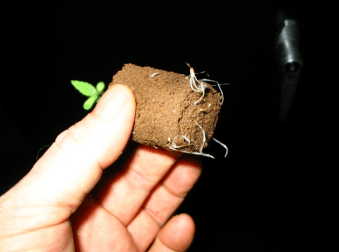
Roots should begin to exit the cube in 7-10 days. A gentle upward tug on the clone will tell you if it is rooted (only do this after 10 days). Unrooted clones will pull out. Roots may be present, but not yet exiting the cube. If in doubt, carefully open the cube to see if any roots are exiting.
Initially clones will draw their nutrient needs from the fan leaves, and may turn slightly pale. This is a good sign, as it is proof the clone is rooted, and is actively growing. Often unrooted clones appear healthy and green (and will stay that way for weeks!!!).
To make things easier, you can sort out the clones (unrooted, few roots, vigorous) into their own trays. Roots should be white and fuzzy. If a clone has not shown roots in 2 weeks, I’d consider removing it. Brown roots indicate rot, and nature is beginning to return your plant back into the soil. (It’s dead.) Occasionally, root tips will become air burned: a sign to water more often!
Weak nutrients (50-200ppm) should be started on the rooted clones, and watered more frequently to avoid drying the exposed root tips out. You could also try a weak foliar feeding with any kelp extract. Gradually begin to increase Nitrogen levels.
Once Rooted
When you first see the cutting is rooting through the cube bottom, you can stop spraying and start watering the cube, and let the solution drain from the cube.
This is a critical time:, when you see roots, water the cube and open the tent a little to allow humidity to escape and check every twenty minutes for ANY sign of wilting. If after the first hour with no wilting open the tent a little more, and check every hour. After 4 to 6 hours with no wilting, you’re ready to rock n’ roll.
If any clones start to wilt replace the tent, spray leaves, and try again the next day. If you have some rooted, some not, go for the humidity for a couple more days.
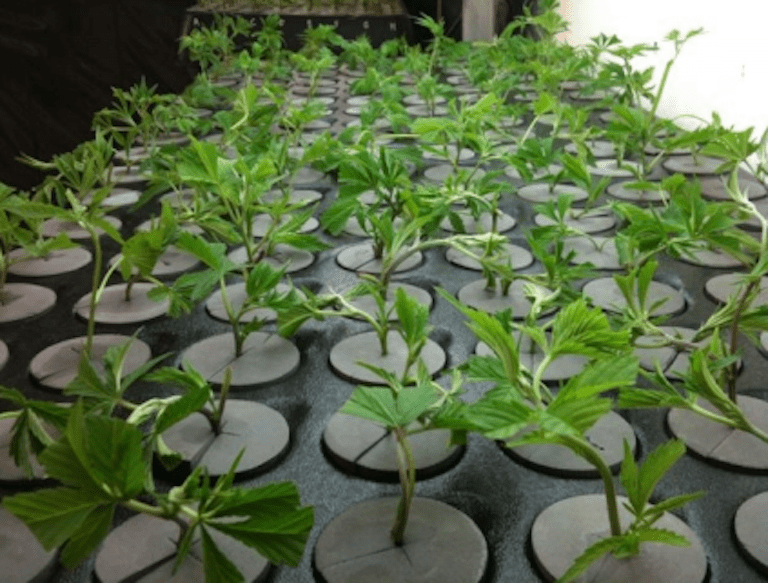
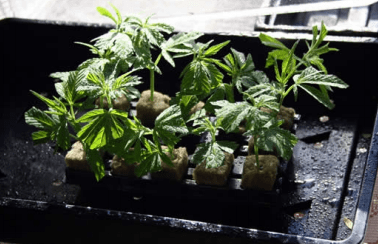
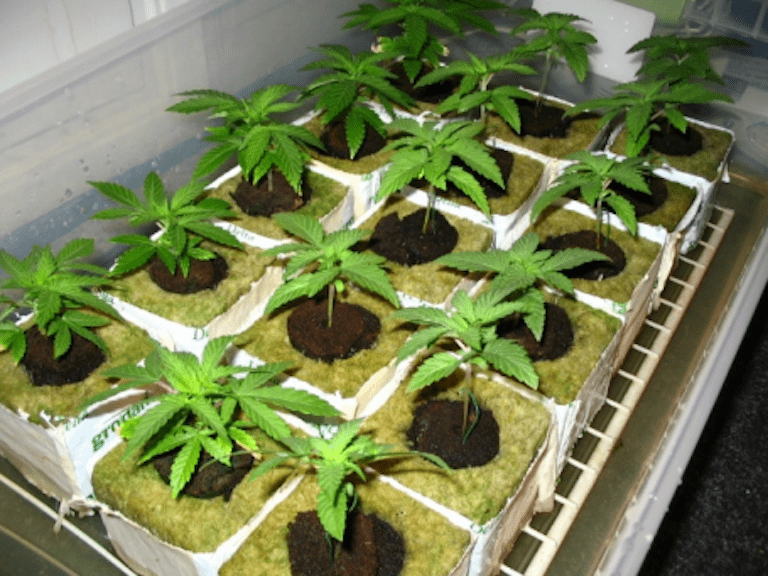
Once the clones have fully established roots, they can be put under weak HID light and a weak (250-500ppm) nutrient regime, or outplanted into soil, hydro or aeroponic systems. Clones are given 18-24 hours of light so that they stay in the vegetative growth stage. Clones generally will take 10-20 days to grow a strong healthy root system. Once the root system is established, clones are transplanted into a larger container or grow medium.
Now they are ready to grow for 1-4 weeks in the vegetative growth stage before they are forced to flower.
Tips
- Do not put the clone tray directly onto a heating mat. The heat will cook the roots, even on a timer. It is better to raise the tray off the mat. A coroplast strip or two to sit the tray on works great raising the tray approx. ¼”.
- A low-level continuous heat is preferred, but a timer may be required to reduce temperatures. Running your mats 30min on, 30 min off, 24/7 is perfect. But keep close watch – the heat will dry out the clones, and frequent watering may be required.
- Occasionally, fresh cloning gel will be very thick. Add some water to container, shake. The gel should pour easier.
- If you are using rooting powder, take care to remove excess powder from the stem cut as you plant the cutting, as this can inhibit the uptake of water.
- Give your rooted clones a foliar feeding with any Kelp extract to give them a quick growth boost.
- Cut many tops at once to speed up the cloning process.
- Mark and date all trays, so you know when to expect roots. Try to keep different strains organized in their own trays, watered separately.
- Use a fresh mix of nutrients, and keep the bottle sealed. pH can shift radically, but usually wont do so for the first 10 days if the bottle’s kept sealed, out of light, and at room temperature.
- Although most clones will be ready to plant within 10-14 days, you can keep them for months if need be by utilizing certain preservation methods(discussed below).
- And don’t forget HUMIDITY, HUMIDITY, HUMIDITY. But don’t overdo it for too long or you risk mold and damping off.
Cloning – Step-By-Step
If it’s your first shot at cloning, to help make things easier, I have created a simple step-by-step printable section (condensing the above information and adding a few extras) so you can print it out and follow along easier:
Step 1. First you must select your mother plant. Refer to the section above titled “Bonsai Mothers”. Begin by taking a sharp blade and cutting a healthy 2-4 inch branch (about 4 nodes[branches] down) from the mother plant with a sterilized, clean, SHARP razor blade or scissors. Take clones from the lower branches of the vegetative females. Look for branches that are firm and healthy (0.125 – 0.25 inches wide). You will make an angular cut right before the first set of nodes. Make the cut at a 45 degree angle (diagonal) so there is more surface area at the base of the stem for roots to initiate. Take your time to cut very precisely, make sure you do not smash the end of stem when you’re making the cut. Immediately dip your clone into water until you are ready to dip it into growth hormone and plant it (or you can store your cut clones in water while you are making more clones). It is also recommended when making your cut to slice it halfway between the sets of nodes.
Step 2. You may have to trim off a set or two of leaves and growth nodes so that the stem can fit into the medium. Quickly trim off extra little branches/leaves and when ready to plant, immediately dip the clipping into your already prepared rooting hormone. You need to leave at least two sets of leaves above the soil line and one or two sets of trimmed nodes should be below ground level.
Step 3. After applying your rooting hormone, gently place the cutting into a moist (wet with distilled water) TREATED grow medium (Rockwool or Oasis cubes are preferred). Take some sort of chop stick, unsharpened pencil, bottom of a pen etc to make a hole in the medium(a little larger than the stem) about half an inch deep, leaving room for the root structure to develop. Next gently pack down around the stem. (Cuttings and rooted cuttings can also be planted in hydroponic units at this time.)
Note: If using a rooting hormone powder or gel, make sure to keep a solid layer around the stem when gently packing the soil.
Step 4. Lightly and evenly water the surface of your rooting medium until moist, taking special care not to over-water and drown your clone’s delicate developing root system. Keep your clones moist at all times. At this point in order to keep your clone success rate as close to 100% it is recommended to place them under a moisture dome (this will keep humidity in and help stimulate root growth beyond measure) to retain high humidity.
Step 5. Place the clones 6 to 12 inches from a Flourescent light(cool-white and warm-white bulbs being ideal), and provide an 18-24 hour daily photo period (lights on).
Step 6. After planting roots generally tend to start after around 7 days and within 14 days a complete root system will be grown and your plant is ready to transplant.
Cull any clones that show signs of brown, rotting damaged roots. These clones will have severely slow weakened growth.
Note: Don’t panic – some cuttings may show signs of wilt but regain their health and rigidity within in a couple days. If it takes more than 6 or so days for your clone to regain it’s rigidity, that is to say if it is still wilted, then it probably will grow so slowly that it might never catch up with the others. It’s advised to either remove these from your garden or keep them in your cloning chamber so they can grow a stronger abundant root system and eventually flourish.
You can place your clones in their cubes inside a tray lined with perlite. This will create a nice moist environment. Dome top retains humidity within and around the plant. This is incredibly important for the first few days, humidity should be 95 – 100%. Touch the top of the surface and make sure it is evenly moist. Pay very very close attention.
Note: A b1 Vitamin helps stimulate root growth, you can dip your clones in this before planting.
WARNING: Remember to only clone plants that are in their vegetative state. (That means they are receiving 16-24 hours of light.)
Cloning in Perlite & Vermiculite
Perlite and vermiculite, combined at a 1:1 ratio, make an effective, cheap, and widely available cloning medium. Simply mix 50% perlite with 50% vermiculite, add enough water so it’s moist, and fill your small containers. Make sure you keep your medium moist. Wash/rinse any new perlite with ~pH 6.0 water to remove any dust residue before use when cloning.
Step-By-Step:
Step 1. Prepare your mother plants at least 6 hours in advance with a fresh drink of water so they are fully loaded before you cut.
Step 2. Using a screwdriver, toothpick, or alien probing device, make a small hole in the medium, approximately 3 cm deep at each clone site.
Step 3. Take the growing tips from the mother you wish to propagate with sharp scissors – they should be around 6 to 9 cm in length.
Step 4. Cut off all leaves except for the top 1 or 2, plus the small growing shoot.
Step 5. Recut the stem end with a sharp X-acto or scalpel, making it as angled as possible for large surface area contact and water uptake.
Step 6. Optionally dip the cut end into a rooting hormone containing fungicide.
Step 7. Carefully insert into the growing medium, gently patting the hole closed.
Step 8. Place containers in propagation tray and cover with humidity dome. Place prop tray on heating pad set to “low.”
Step 9. Keep under fluorescent lighting, misting them daily for the first few days if your climate requires. You might have to lightly water the medium once or twice before roots show in 7 to 14 days.
There are different “grades” or sizes of perlite and vermiculite. For cloning, the small to medium perlite and the medium to large vermiculite are best, but don’t worry if you can’t find the exact size you’re looking for. The 50/50 mix holds water rather well when there are no plant roots sucking it up, so don’t overwater your cuts.
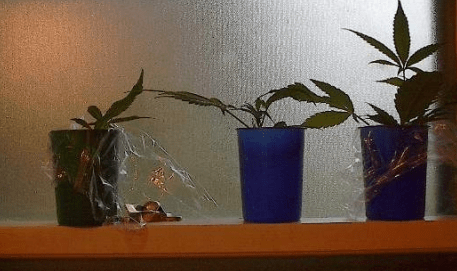
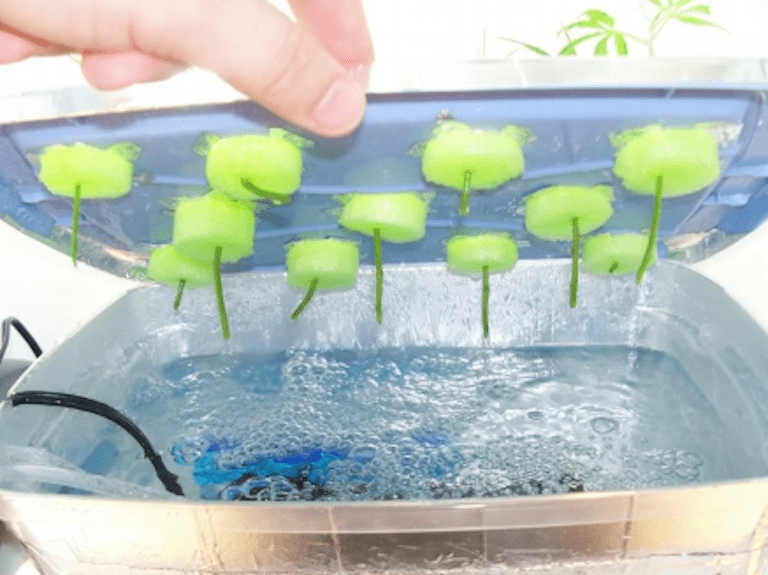
The Simplest Cloning Method Known to Man
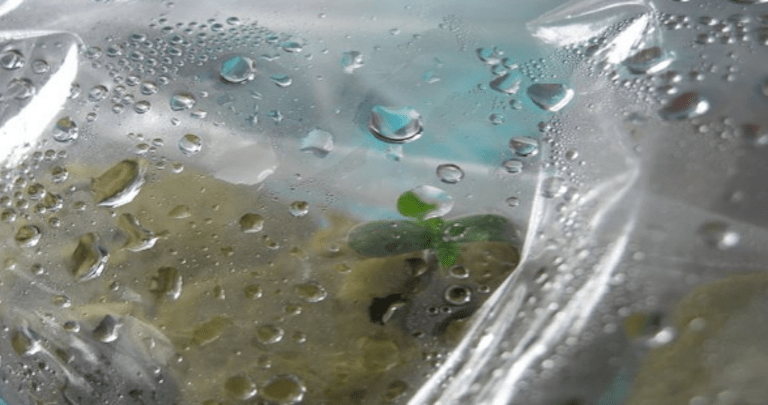
As easy as cloning is to the masses that use powder, liquid/gel rooting hormone, bubblers and soil, etc, there is an even less complex method of cloning that is so easy, it must have been around for decades, if not centuries. The only ingredients involved are water, light, and the cutting you would like to root. In the following example, you can see cuttings of three different sizes of clone.
The first with two leaves and a single growing tip (S). The next has four nodes, but still only a couple large leaves (M). The third is 6” tall, has seven nodes and several sets of good-sized leaves (L).
As with normal cloning, you immediately dip the cutting in the water for about 15 to 30 seconds, tweaking it to dislodge any air bubbles that may be present.
But the biggest difference is, you won’t be removing the cutting from the water until it has roots big enough to support the foliage above. Make sure the cup, which contains the cutting, is opaque. This prevents the light from shining directly on the roots.
The cool thing about this method is the lighting technique. Cloning using this method works 100% of the time simply by sitting cuttings on a windowsill that receives no direct sunlight. In fact, slightly shaded would be even better. In the evenings (short days), you can sit them on an end table over seven feet from a ceiling mounted 100-watt incandescent bulb. At bedtime, just turn off the lights like normal, and when you get up in the A.M. Place them back on the windowsill. During the longer daylight hours they can be left on the sill full time. But remember, no direct sunlight.
The picture shows three cuttings in their water cups. M & L have barely an inch of water to sit in. Any more and it would cover one of the leaf stems. The smaller one stayed in the plastic because the stem was too short to sit in water and stay upright in the cup. Do what’s necessary to keep at least ½” of the stem in the water.
Notice the glass that diffuses light, an extra measure against too much light exposure.
The clones grew roots at far different speeds. S showed in seven days, with a small ¼” long root and another small protrusion.
By the time (S)’s roots reached this level of development (nine days), (L) was just putting out the first nubs that would be roots. (M) has shown no inclination of rooting at all. It boils down too the thickness of the stem. Both (M) & (L) have the same size stem but (L) has far more foliage on top.
(S) is doing far better than the others (seen below) and (M) is finally starting to show.
(M) showed roots in 14 days and was planted on day 18. This picture would be taken just before transplant.
(L) showed roots on day 11 and was in soil at day 18. This picture would be taken just before transplant.
(S) showed roots at seven days and was in the soil at 15. This picture would be taken just before transplant.
Transplanting is as easy as it ever is. Using a pre-fertilized potting soil, mixed with ½ perlite, you can use clear cups so you can see how soon they can be removed from the humidity dome. Fill a 4 oz cup with soil mix and swirl a hole an inch deep in the top, insert the plants roots and cover.
WARNING: Do not water right away! Watering will actually delay the roots growth into the new medium. You want it almost dry below so they search for the moisture. Make whatever mix you use semi-moist before transplant.
The dome you see is a cheapo Styrofoam cooler available from any grocery store for $2-$3. Toss the lid and cover with saran wrap with a ½ dozen ¼” holes in it. What you see in the picture is a spare piece of plexi glass. It sits off centre to provide some venting. Simply set an open jar of water inside and close. The jar itself will keep the humidity at around 75%. If you don’t like this, just spray a couple times a day with water.
(L) showed itself almost overnight.

All were in the 320-watt veg area in roughly three weeks from cutting to final transplant.

That’s it, the easiest cloning method known to man there is. No spraying, no overheating, no drying out, no expensive hormones, just plant, light and water. Following these instructions, there was a 100% success rate. Simple. If you’re on a budget and this kind of method sounds good for you, go ahead and try it. Good luck!
Transplanting Clones
In approximately 3-5 weeks your cuttings will form a solid root structure. At that time it is time to transplant them to a larger container so that their root structure can expand out and grow even further. Make sure there is plenty of air in the growth medium, as this will greatly enhance healthy root growth.
Following this, in approximately 1-3 weeks, root structure should be developed enough so that the cuttings can be placed directly under an HID. You will then take your female clones and place them in a larger growing medium. Transplant only the strongest, vigorously-rooted clones. The lights will be located just a few inches above their tops. Keep them growing in vegetative (following the light cycle as recommended in the guide) and then flower them when ready.
For best results and to ensure a heavy, frosty harvest; do not transplant clones until they develop a dense solid root system. Signs that clones have rooted include yellow leaf tips, roots growing out of drain holes, and the vertical growth of your cuttings.
Note: When transplanting be very very careful with the delicate roots!
Transplanting is important as soon as plants outgrow their containers. This is because plants with cramped root systems will grow sickly, stunted plants.
Try to keep the grow mediums the same to prevent plant transplantation shock. If you are using rockwool to transplant into soil, you need to regulate moisture levels for optimal results. Let your rockwool cube dry out just enough whilst keeping the soil moist so that the roots will penetrate into the new growing medium in search of moisture and nutrients.
Note: For best results, water your clone with a half-strength bacterium vitamin B complex (such as trichoderma) approximately 2 days before you transplant.
Transplanting Clones – Step-by-Step
Step 1. The first step is to prepare your new container. Fill a 2.5/3 gallon container with quality potting soil. Fill it up leaving about ~2 inches between the soil and the top rim of the container.
Note: When cultivating a Bonsai Mother she will need a larger container, anywhere from 10-30 gallons is ideal if you plan to keep her for a year or longer.
Step 2. Fertilize your new grow medium by watering it with a quarter strength quality hydroponic fertilizer solution until your grow medium is adequately rich and saturated. Make sure the solution drains freely out of the bottom.
Step 3. Prepare a hole (use your best judgment depending on the original growing medium and root ball size) in your container.
Step 4. Very carefully pop the root ball out of it’s container. An easy way to do this is turn the container upside down placing your hand over the top with your fingers in between the stem, flip the container over and slide it off allowing the root ball to sit in the palm of your hand. Be very careful not to disturb the delicate roots!
Step 5. Gently set the root ball into the prepared hole inside the new and ready container.
Step 6. Pack around and fill soil around the root ball.
Step 7. Water. For best results, mix a half-strength fertilizer that ideally contains trichoderma bacteria or vitamins(B). You want your soil to be very wet, yet draining freely.
Step 8. Place your plants near a light source. At first an HID is too intense, to remedy this simply place your container at the periphery of your garden or under a screen. After a couple days of reduced-intensity light your plants should begin to look strong and healthy, they will then be ready to be moved under full light.
Rooting Hormone
Rooting hormones greatly speed up cellular-level plant processes. You see, when a stem is taken and needs to develop roots in order to continue the plant’s survival, it has to adapt and transform from producing green stem cells to manufacturing new root cells. Rooting hormones quicken this process tremendously. As soon as you make your first cut, clones begin to naturally create these hormones and send them to the wound. This takes about a week.
When you dip your cuttings into a rooting hormone it will fill in the need until natural hormones take over and greatly speed up growth. When dipping, give them a 5-10 second dip. Napthalenaecetic Acid (NAA), Indolebutyric Acid (IBA), and Dichlorophenoxyacetic Acid (DPA) are three substances that stimulate this process and greatly assist in root cell production. Look for a commercial rooting hormone that contains all three (if you can find it) of the above ingredients.
Note: When mixing and you need to find out the ppm (parts per million) of your rooting hormone, simply multiply the percentage listed on the product by 10,000. For example, if your product says it contains .8% DPA, it contains 8000 ppm DPA.
Another great ingredient available in many products today to assist in clone rooting is known as trichoderma bacteria. This bacteria when introduced to your clones will cause the roots to grow faster and the bacterium also assists them in absorbing nutrients better.
If using a spray, gel, or other form of rooting hormone make sure to follow the instructions carefully. When spraying be sure to use only enough, do not spray your clones so much that their leaves are dripping with rooting hormone.
Willow Tree Water
If you’re looking for a trick to produce incredible speedy vigorous root growth when cloning, you need to obtain natural Willow (tree) Water. There’s a substance inside of all willow trees that promotes incredible root growth. Imagine those huge gigantic trees with their massive deep root systems!
When willow water is used on your tiny little clone’s root systems and mixed with commercial growth hormone, it produces unbelievably awesome results! You will be shocked at how fast and how vigorous your clones roots develop.
To make your willow tree water compound is easy! Go to your nearest Willow Tree and locate branches that were grown this year. They should be approximately 1.5 inches in diameter. Remove any leaves and cut the stems into 1” lengths. Place as many of these little chopped willow stems as you can inside a glass or a quart jar. Soak them overnight for 24 hours in distilled water. After soaking, pour out the willow water to use it for an incredible rooting hormone.
For best results, simply soak your clones in the willow water rooting compound for 24 hours, then plant into your rooting medium. When using a commercial rooting hormone compound, substitute the willow water in place of regular water in the mix.
Variation: Willow Rooting Hormone Tea
Cut some willow branches (all willow species produce this natural rooting hormone), into 2″ or 4″ long pieces. You should cut enough pieces to fill a bowl.
Put the willow cuttings into a big kettle (or pot) on the stove, fill with water (all cuttings should be covered by water). Turn on minimum heat setting, cover with a lid, and leave on low (but do not boil) for 2 hours. Then turn off heat and leave kettle covered for 12 hours.
After the mixture has cooled for 12 hours, the willow water should be a dark brown. Strain out the willow water, and discard the branches. Pour the mixture into a container with a plastic top with holes pre-made, and just drop your cuttings in. Let the clones sit in the hormone for 12 to 24 hours (thus allowing the cuttings to fully absorb the rooting hormones), then plant into your medium.
Use as much rooting hormone as you require, then discard the used portion. The unused hormone can be stored in the ice box for years.
Cloning Devices
When you take cuttings and are ready to transplant you are going to need some sort of device to keep your fragile clones in optimal conditions until they grow strong roots. Obviously you will put them directly into a medium, but then what?
Here are a few devices used for this purpose:
Two Liter Bottle
This is probably the cheapest and easiest consistent method to root a small number of clones. Just cut the bottom 40% off a two liter soda bottle, put a clone in rockwool or a whole small jar with another medium inside the bottom. Cover with a plastic bag and hold the bag down with a rubber band. Before sealing give it a puff of exhaled air to fill it with CO2. This traps humidity inside – it is normal and desirable for moisture to condense on the container. You will need to exchange air every day until roots appear.
Humidity Dome
The most common tool used is the humidity dome. These can be purchased for ~$10-$15 U.S. Dollars at any hydroponic grow shop.
They consist of a plastic tray that is just the right size for a sheet of small rockwool cubes to fit inside of. There is then a clear plastic cover that fits on top of the tray to trap humidity. Depending on the number and size of clones you will need to exchange air between 1-3 times a day.
Micro-Bubbler
These can be purchased or constructed.
Essentially a bubbler consists of a tray with a cover. In the cover there will be numerous net pots and inside the tray will be water & aquarium air stone strips. The strips bubble air through the water causing the bursting bubbles to moisten and oxygenate the medium in the net pots. These can be used with or without a humidity dome cover. If a cover is used air exchange is required as per a simple
humidity dome.
Wick Cloner
These simple and prolific cloners are generally constructed rather than purchased. A system similar to the bubbler is used with a tray and cover. Instead of net pots the tray has half pint plastic containers suspended over the water. A wick, usually a 1½ ” piece of shoelace or strip of cloth, then goes from a hole in the middle of the bottom of the container down into the water. The containers are then filled with perlite. The wicks pull up moisture into the perlite. A dome cover is not used with this method.
After Cutting Care
After you take your cutting and safely pack it into its new growing medium home, the work isn’t done! This is the most delicate part of a clone’s life – this is the critical stage that determines the health and vigor overall of your little developing plant.
How Long Clones Take To Root
After about a week you can test to see if your plants have started to root. Remove the humidity dome and leave it off for between twenty minutes and two hours. Watch the clones for any signs of wilting while the dome is removed. If the plants have not wilted at all then they probably have enough root development to support themselves. If no wilt is noticed leave the dome off, if they are wilted, spray the cuttings and dome and replace the dome on the tray.
Once you have determined that the plants can support themselves, stop misting the cuttings and leave the humidity dome off.
WARNING: Once the plants have roots, constant misting can actually be harmful to the plants (and can cause mold!)
Lighting

You’re probably wondering what amount of light is necessary to ensure the clones maximum and fastest rooting time right? Well I will tell you! Clones root the quickest with 18-24 hours of Fluorescent light. As aforementioned, it has been often recommended by advanced growers that you shouldn’t use an HID light right away, but if you must (if you do not have access to fluorescent lighting), place the plants on the perimeter of your garden so they receive less intense light. You can also shade them with some sort of cloth or screen, this works equally well.
Your cuttings are very delicate at first. To ensure they wont wilt, keep them in an area that gets only a moderate amount of light. Let the clones stay in a 6/18 (6 hours of light on, 18 hours of darkness), in a micro-hothouse for the first two days of soft fluorescent light. The darkness stimulates the clone to grow roots instead of spending precious energy and resources on photosynthesis.
Place the fluorescent tube 6 inches above your clones for optimal light exposure and growth enhancement. Direct light will burn them because without roots the stem cannot supply the leaves with enough water to match the leave’s rate of transpiration.
Note: When using fluorescents, a combination of both cool white and warm white are most excellent for rooting.
Do not move clones below intense bright light until they have fully developed their root systems!
Fertilizers
When rooting, clones require minimum amounts of nitrogen, and high levels of phosphorus. This will greatly assist in promoting fast vigorous root growth. Precisely after 5 days your cuttings should be fertilized with a high phosphorus fertilizer. Dilute it to ¼ of normal strength, once per week.
The key to getting a 100% consistent clone survival rate is to practice your cloning technique until you get it absolutely perfect, down to the exact amount of fertilizer at the exact same time, including the same handling procedure and light exposure/moisture levels etc. It takes practice, but with time and following the tips outlined in this guide – you’ll get it sooner or later.
A common grower mistake is to think more is better. This is NOT the case with fertilizing! Over-feeding your clones will greatly hinder and slow down root growth. Following the recommendations above is plenty.
Note: you may want to use a root complex during the growing phase of your cuttings. A root stimulator is a perfect starter for the cuttings. It activates the plants to develop thick stems and a healthy root system.
Temperature
Cold cuttings may never root. If the temperature at clone root level is less than 65°F (18.3°C), you’ll want to use a heating mat. Temperatures of around 75-80°F (23.8-26.6°C) will promote the best growth.
ph Level
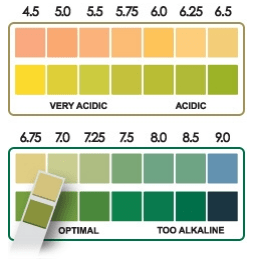
The optimal pH level to support the best possible vigorous root growth in clones is between 5 – 6.
Watering
Watering clones is easy! Just dip them in a very lightly fertilized (about 100- 200ppm) water, or make your own watering can! You can use a standard plastic waterbottle with holes poked into the cap.
Plant roots growth is greatly enhanced by oxygen. Aerate your water before use. You can do this easily by shaking it vigorously.
The cube should NOT sit in water. As long as humidity is high, you can spray with the 6.5 pH solution twice a day for the first 2 days, then once a day until it roots. But the humidity must be high; you should see condensation inside on the tray walls and maybe the leaves. I also spray the walls of the tray to keep it humid. Spray only the leaves not the cubes.
Keep in mind that the longer you have humid conditions the more likely it is to get mold or fungus; rooting quickly is one way to avoid lengthy humid conditions.
Water must be provided by plant’s leaves and the cut stem until roots can supply it. When watering your rooting medium make sure to keep the surface evenly moist, taking special care not to over-water and drown your poor plant’s newly-forming root system. Water as needed to keep the grow medium evenly moist and never let it get soggy!
WARNING: DO NOT over-water your precious clones! Keep the medium evenly moist. You don’t want it to get soggy or drown your
roots!
Check for roots around the eighth day by opening a cube in half very carefully. White roots should be exiting the node.
How do I know if the rockwool cube requires watering?
To get watering of rockwool cubes absolutely right, use scales. Weigh a dry cube. Then, saturate a cube and weigh it. Subtract the weight of the dry cube from the wet one. You now know how much water is in the cube when fully saturated(1g=1ml). Your cube needs water when weight drops to 20-40% of saturated weight. Once you have done this a few times, you will be able to estimate the weight and need for water by feel.
When using this approach with clones, you’ll have to guess the weight of the clone – perhaps 10-25g depending on the size of the cuts. When weighing a cube with a clone, subtract the estimated clone weight and dry cube weight from what is measured to closely estimate water available in the cube.
In most cases, especially when using a seedling warming mat, they will require water once every 24 hours. Cubes should never completely dry out.
Watering The Individual Cubes
Immerse the cube halfway into a bucket of pH adjusted (5.5-6.5) water for a few seconds. Gently shake out (but don’t squeeze) excess water.
Rooted clones (roots are showing from the cube) should get fully soaked for about 15 seconds, as they have the capacity to uptake water rapidly and will use that quantity in 24 hours. Unrooted clones should just get a little dip; 3-5 seconds at most. Key: Moist is better than saturated for encouraging root formation.
Do not allow cubes to stand in water. If excess water drains into the tray they sit in, empty it out.
Start high nitrogen nutrients when roots have emerged from the bottom of the cube – ¼ strength for first four to five days, ½ – ¾ the next four to five days, then full tilt thereafter.
This method should give 85-100% success, with roots showing in 5-7 days and profuse root development in 10 days.
Humidity
When cloning it is important to keep environmental factors at optimal levels to ensure as close to a 100% success rate as possible. One of the most influential components of clone success to regulate properly is the humidity, also known as moisture level in the air. Clones will root the fastest when humidity levels are at 95-100 percent for the first two days, and gradually decreased to 80-85 percent
during the following week. Air should be approximately 70°F (21.1°C).
If you want a successful harvest, it is strongly advised by many veteran growers to place your clones under a moisture dome (this will keep humidity in and help stimulate root growth greatly) to retain high humidity. Be sure to mist them frequently with a spray bottle filled with distilled water, and remove the dome several times daily to make sure that they receive fresh air. The reason you mist them frequently(yes, the tops included) is because these clones have no beginning root structure to supply water to the plant. When the plants are covered in moist water they will not dry out fast due to the humidity you are supplying them while they begin to establish their fragile little root structures.
Note: If you’re strapped for cash you can easily make your own humidity tent using hard plastic, plastic bags, or glass. It is best to buy one that properly seals and retains moisture though for maximum results.
Transpiration is the process in which water and nutrients travel up the stem from the roots to the leaves, where they are used in photosynthesis. Tiny hairs called stomata (tiny breathing pores located on the underside of the leaf) sweat out the moisture to allow the stream of nutrients to continue flowing. Wind aids in transpiration by blowing the moisture off the stomata, which is why the
humidity dome is so important.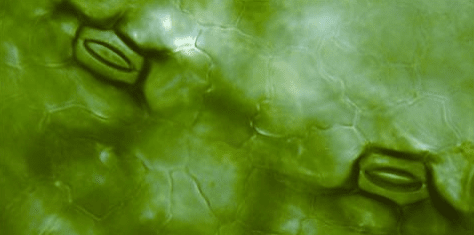
Another way to protect the stomata is to spray a light wax onto the cuttings. This slows transpiration to the point where you don’t even need a lid, and the waxy coating serves as a protection against pests. I suggest you just try using a humidity dome at first, as this wax method can be a bit tricky and an undesirable option for organic-intended growers.
Remove the lid once a day and fan the cuttings with it for a few seconds. Some growers like to cut small holes into the corners of the lid so that there is a little ventilation. Putting holes into the corners of the tray to also benefits by allowing for drainage if the plants become over-watered. The roots need oxygen to thrive and survive!
Leave the cube in a humidity dome at around 80-85°F (26.6-29.4°C), with about 30-40 Watts/sq ft of fluorescent lighting on for 24 hours a day.
Heating Clones
Clones root best when the grow medium is warmer than the ambient air temperature of the room. When the medium is a few degrees warmer it increases the chemical activity and hastens root formation. Growing medium should be 75-80°F (23.8-26.6°C), as this is best. Anything above 85°F (29.4°C) can be dangerous and harm the plants. Heating mats help dry out and warm the cubes.
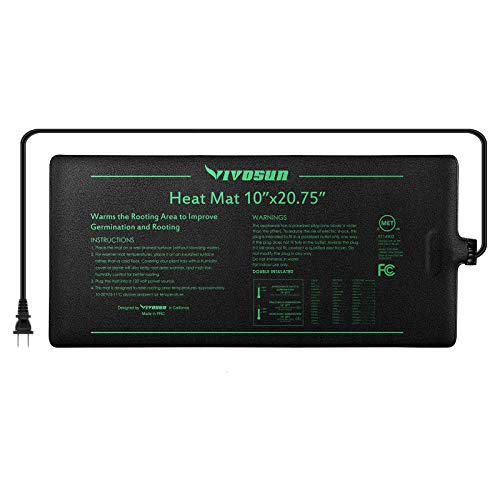
#5 Vivosun Durable Waterproof Seedling Heat Mat Review
Oftentimes here a heating pad, heating cables, or an incandescent light bulb placed below the rooting cuttings is used. You will want to keep the air temperature 5 to 10°F (-15 to -12.2°C) cooler than the medium. A warm growing medium combined with a cooler air temperature will slow diseases and conserve moisture levels.
Reduce Cutting Stress
By controlling light levels, humidity and temperature, your job is to keep the delicate cutting in a complete state of dormancy. Cuttings with out roots are very sensitive to stress. Every effort should be made to minimize evaporation from the cuttings and avoid extreme light and temperature levels. Keep humidity as close to 100 percent as possible and maintain water and substrate temperatures at between 70-84°F (21-29°C). Cooler water will slow root formation; warmer water will encourage disease. The lower the humidity level, the more water the plant will transpire, causing the cutting to use up stored food for things other than root production. It is important to hold the leaves as dormant as possible and permit the cutting to use more of it’s energy on root development.
Preserving Clones in the Fridge
You can keep clones stored for later use for a couple of months in a cold refrigerator – just soak them in cold water and then transfer to a zip lock bag. Open the bag every week or so to allow fresh air in. You can also place them inside a damp paper towel or cloth. Keep the temperature in your refrigerator above 40°F (4.4°C). Temperatures below this level might cause the plant cells to damage.
This can be useful for a number of reasons. It is possible for very small cultivators to grow without the use of mother plants. It is also possible to hold the males in reserve without wasting space or having to worry about dropped pollen. Holding clones in the fridge offers many new possibilities for testing many different males, holding strains while evaluating, changing the way you time your mothers, etc.
Clones that are stored in the fridge this way actually root faster than nonfridged clones once they are removed – up to a point of 2 or 3 weeks, when they will take longer to root and you may lose a few. When they are removed from the fridge to be replanted, be sure to recut the stem with a sharp clean sterilized razorblade, knife, or X-Acto knife.
Another method of preserving your clones is by purchasing a commercially available gel that will enable you to store your cut clones until needed.
Yellowing leaves on unrooted clones can be from too much light, or the stem may not be firmly touching the rooting medium. Turn off any CO2 until they root. Too much fertilizer can shrivel or wilt clones – plain tap water is fine.
Having Trouble Cloning?
Some strains are easier to clone than others. There are Sativas that will sprout roots so easy, you can (almost) stick them in the ground and forget about em’. But then there are some early Indicas that you can baby and they will just sit there and starve to death. Here are some things to focus on.
Help the roots grow: Figure out where the roots will grow on your cutting before you actually cut it. Keep this portion of the stem dark for a week or two by wrapping some tape around it. This is called “etiolation” and will encourage rooting. Make the cutting with a sharp anvil pruner or very sharp pair of scissors, and sterilize them after each cut. A dull pruner will crush the stem and it will be harder for the roots to form. A razor blade will make an even cleaner cut, which will also help rooting, but be careful not to cut yourself. Try to make the cut at an angle to increase the surface area it has to absorb water.
Air Bubbles: The plant needs air to help the roots form, but don’t let any get in the stem. This will cut off the capillary action and make the poor cutting work ten times harder. Immediately submerse the cut end in water or rooting solution to prevent this from happening. You could even take it over to the sink and make a second cut under running water if you’re really worried about it. Leave the cutting in the rooting solution for a day or so. If you just leave it in the water, you might get lucky and sprout some roots, but they really need some oxygen. You can actively provide O2 by aeration or passively aerate by using an airy medium.
Another thing that makes the cutting work harder is breathing itself. Make good use of your plastic dome or humidity tent to limit transpiration and keep the medium from drying out. Another way to limit transpiration is to cut about half off of each leaflet. You will still have the same number of leaves on the stem, but the surface area has decreased. This also helps control fungus by preventing the leaves from contacting the dome or the medium.
Lighting: The proper lighting is also important. Direct sunlight will heat the air in the dome too much, but they’re not going to root in the dark either. Fluorescents are ideal for this. An HID is OK if it’s not too close, or you could even give them a bit of indirect sun from a window if you can keep them warm.
You’ve kept an eye on the pH and the notes, and you see it’s starting to grow again, so its safe to assume that it has roots and you can remove the humidity dome. Occasionally a cutting may wilt a little at first, but give it a mist and it should perk up. If none of these tips help, either consider tissue culture or finding a different mother.
Wilting Clones
If your clones are wilting make sure they’re firmly seated in the medium. If they are “too firmly” seated, you may have bent or broken the stem and stopped water uptake. Make sure that the lights aren’t too bright, fluoros are all that’s needed. Next time, an anti- ranspiration spray will greatly reduce wilting – they form a waxy barrier that keeps water inside the cutting.
The cuttings may be too large with too much leaf mass. You can trim off the half of the fan leaves to reduce area or take smaller cuttings.
And remember to monitor closely the ambient air temperature as anything above 80°F (26.6°C) is starting to get too hot and this will serve to accelerate both transpiration and the drying out of your medium.
Next: Part 7. Hydroponics
Previous: Part 5. Growing With Soil
