Part 10: How to Train Cannabis Plants for Maximum Yield – Cultivation and Maintenance
Cannabis Plant Care
Growing marijuana isn’t as simple as plopping a seed into a grow medium and sitting back and smiling. Proper maintaining of your crop is required through training, pruning, topping and more…
To help you out, here are the best cannabis seeds that work in any country.
Plant Support
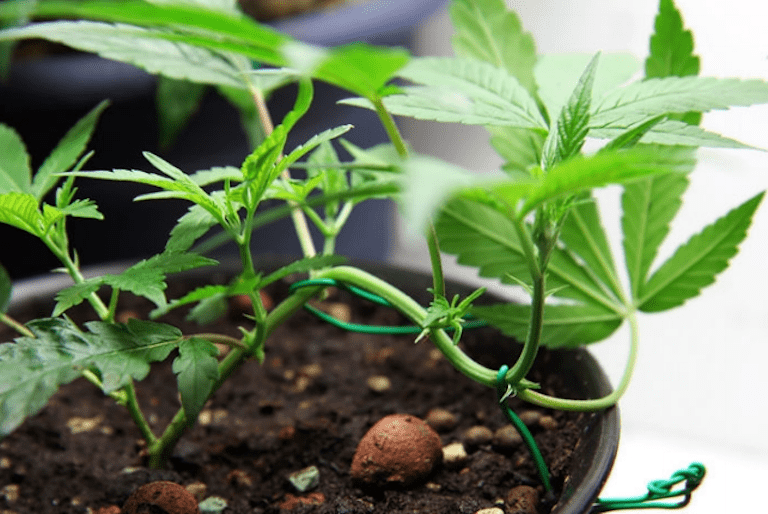
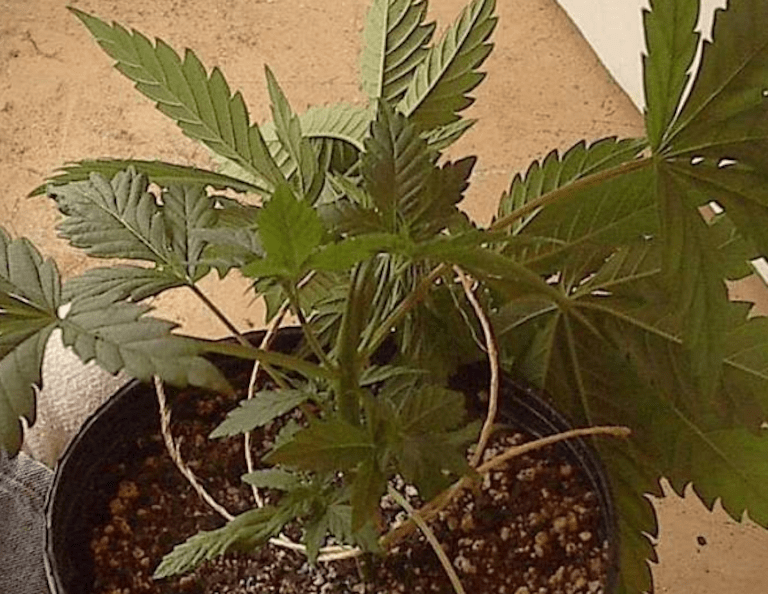
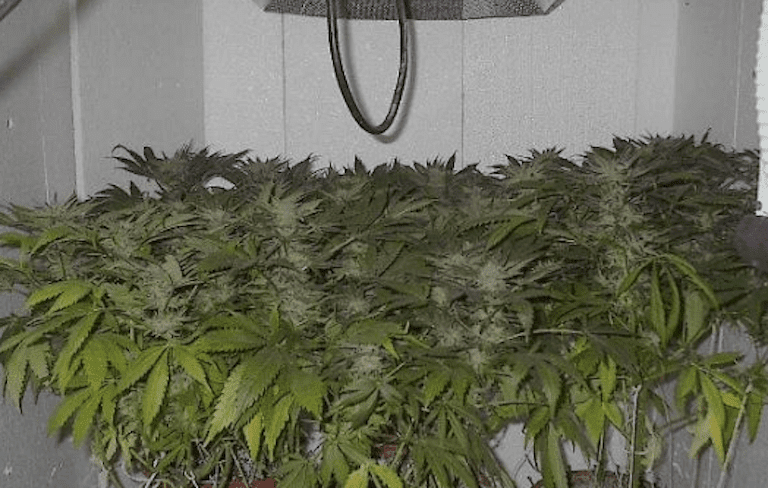
When your plants enter their flowering stage of growth, they will begin to get very top-heavy and may end up tipping over. Properly supporting them is important.
There are a couple things you can do. For one you can use bamboo support sticks. These are super cheap, durable, and do the job very effectively. Metal support sticks used for holding up large flowers work great too.
Get creative! Another method is PVC pipe:
Screen of Green(ScrOG) Works well in this regard as well. More on this technique later.
Plant Sickness, Stress, and Pests
(Please review the Emergency Marijuana Plant Guide for information on how to properly prevent, identify, and cure any problems you may encounter with your plants.)
Training Cannabis
See also:
Over the years, many different techniques have been developed for training cannabis plants. The goal of training a marijuana plant is to optimize yield with the available light and space. Outside a plant in the middle of a clearing with a full year of vegetation can probably be left to do what it wants and give great yields. Indoors the light is more precious and and many growers are using small cabinets. Indoor growers must train their plants to utilize the space they have. Before getting started training there are couple things that any grower should be aware of. The first thing is that cannabis leaves are a lot like solar panels. You might be twisting and directing the branches but the plant knows better than you when and where it needs leaves, so leave them alone. If a gentle pull on the leaf doesn’t cause it to give way immediately then it is healthy tissue.
Usually you will only want to removed browned leaves. With a thick canopy under indoor light the lower growth will yellow and die, this is because the plant isn’t getting much light there and steals the nutrients from these now uneeded “solar panel” leaves. This is Mother Nature at work and not always a sign of too much or too few nutrients, as many newbie growers tend to wrongly think.
Another thing that is important to know is that the tops of the plant produce the most potent and largest flowers. Most training techniques focus on maximizing the number of these “top flowers”. When removing smaller lower flowers the plant will direct all its energy to the larger tops. How much difference different training techniques make is debated but trimming lower growth that is far from the light is universally agreed to improve yield. Any time you bend a branch horizontally it will cause the plant to produce a hormone that encourages lateral growth.
When training plants you will occasionally snap a stem. It happens. Plants can usually recover from this. Just position the stem back together and tape it in place. Give the stem time to recover before applying more pressure to that spot. A small knot will develop at the break and in the end the plant stem will grow back healthier and stronger than before.
There are several cool techniques that one can use when growing cannabis…
Pruning

Why prune? When a cannabis plant is left to grow freely as it chooses, it usually has more branches than it has the energy to support. This means that a lot of energy is wasted on smaller branches, especially the lower ones. The energy need is so spread out that in extreme cases flowering takes a very long time as the plant tries to supply energy evenly to every location. By removing some of the less important and weaker branches, you can ensure that the larger branches produce a greater amount of high quality bud. The bud on the lower branches that receive less light usually end up as single “pop corn” buds that never truly mature, so it is best to remove them at an early stage.
Observe the growth and remove any branch that has long internodes (the space between the nodes) and any branch that stays significantly lower than the main shoots. These branches will get very little light and they will also have a hard time finding their way up to the well lit area. Many growers end up removing almost all the growth underneath the ScrOG net. They usually only leave the fan leaves intact until the plant drops them by itself after the energy has been recovered.
When it comes to removing leaves material opinions vary, some growers remove leaves and others, chose not to. There is no positive effect really from removing leaves. Keep in mind that fan leaves are the primary location for photosynthesis and that the plant also stores surplus energy in them. By removing the leaves you do double harm; you handicap the plants ability to produce vital energy and simultaneously you also remove the energy that has already been stored for future use. Furthermore, although it cannot be observed with the naked eye, light actually passes through the leaves and that is why some of the lower growth stay green throughout the entire grow. It is better to tuck or tie the leaves under the canopy so that light reaches more bud sites, or alternatively cut the leaves in half.
Another thing important thing you must understand is that there is a hormonal response in plants to being wounded. This includes a growth inhibitor called jasmonic acid. It tells the plant to favor defense over growth. The more you remove at any given time, the greater the response. It is therefore wise to trim the plants gradually all through flowering, instead of removing all the growth at once. This hormone also plays a part in regulating the formation of trichomes, and that is probably why a little bit of stress is thought to increase potency. There is however a difference between stress and torture, a healthy plant will always produce more bud than a plant that has been severely handicapped.
Since most of the photosynthetic activity takes place in the fan leaves, the buds themselves do not need light. In other words, bud sites are activated by light when it hits the node but the energy is produced and transported to the buds from the leaves. This is where a ScrOG net comes in handy; you can tie down the leaves without removing them and thereby allow more light to reach the buds while no energy is lost. Sometimes you do not have a choice and must remove some of the growth in order to ensure that you get a good harvest. It all depends, some plants respond well to rigorous pruning but in general I would advise that you keep it to a minimum (since there are optional methods to removing the leaves altogether). The rules of pruning are a bit different when it comes to SOG grows as you might have to remove some of the fan leaves because the plants are packed so close together.
The best advice is to watch your plants closely and adapt your technique and grow style according to the needs of the plant. Nothing is set in stone when it comes to growing. All grow rooms are different and so is each strain of cannabis. In fact every plant is different from the next so you will have to try out what works best for you and your plants.
In-Detail Pruning
So now that you have a general overview of pruning let’s jump right into the finer intricacies of a proper cannabis prune. Pruning is probably one of the easiest, most effective ways to improve the quality and size of your harvest yield. When you prune your marijuana plants they produce fewer, but much bigger buds. Depending upon the genetics of your plants and your goals for harvest you should determine the type and style of the trim. A lot of hard work goes into pruning and stalking plants, but it results in bigger, higher grade buds that require less manicuring.
Some growers argue that pruning will stunt the plants growth and may even produce more males do to the stress of removing branches. However, pruning has shown itself to be a helpful technique in increasing yield and keeping plants short and out of sight. If you choose to prune use sharp, clean scissors to snip the branch. Where you cut the branch two new branches will grow from that point. Never take off more than six inches when pruning. If you follow the guidelines below you will ensure a safe, healthy prune for your plants that ensures nothing but benefit for your cannabis.
Before we begin, a few tips. Always use clean sterilized cutting tools for pruning. A pair or pruners, a razor, or scissors are excellent choices. It is always better to use a tool to prune your plants, than to simply pluck off the growing tips by hand. Sanitize your instrument in between cuts by dipping them in rubbing alcohol. During your pruning, the open wounds on your plant are VERY susceptible to diseases and pest infestations. Wash your hands before and after you prune every time.
WARNING: Do not use any tools that have been used outside for pruning indoors. Pruning instruments used outdoors have everything ranging from spider mites to fungus spores.
Do not prune up to a month before you trigger flowering. Pruning diffuses hormones, which interferes with and hinders the flowering process. Peak maturation is greatly delayed. It takes about one full month for hormones to build up again to their original pre-pruned levels.
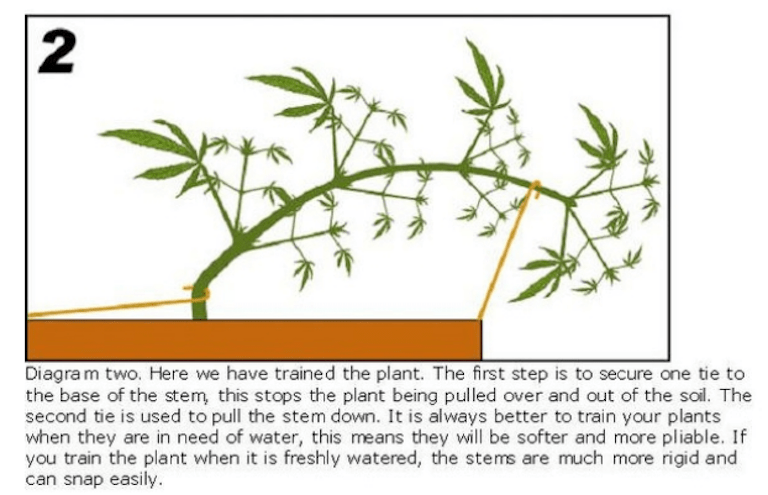
You will want to keep an even top garden profile to ensure maximum light absorption. The size and shape of your plants can be changed by pruning and training. Not only will this optimize light exposure but it also maximizes side growth. Pruning is the process of trimming the stems back to change the plants shape. Here the grower will pinch the plants between his fingers. Training is the practice of bending the stems and tying them with twine in order to change their shape and growth pattern.
Also please keep in mind pruning depends solely on your plant’s growth pattern and size. There are benefits to NOT pruning your plants. The hormones are allowed to concentrate in the tips of branches and leaves causing your buds to grow better. Most commercial growers do not prune at all when growing a short clone crop that at it’s maximum height only reaches about 2-3 feet tall (61- 91cm). The reason is because shorter clone crops don’t need pruning for increased light exposure to bottom leaves or better air circulation. So if you’re growing short crops, you most likely don’t have to prune and your crop will benefit.
The bottom fan leaves of the plant are used to absorb and soak up light for your plants optimal flourishing growth. NEVER CUT YOUR FAN LEAVES!!!! Removing large fan or shade leaves doesn’t make your plant more productive! They contain glucose and chlorophyll that is used in bud production. Cutting away fan leaves will greatly stress your plant and deplete it’s food stores thus severely stunting your growth and bud size.
Note: The only time it may be acceptable to cut away a fan leaf is if it is blocking light from reaching a bud mass on another plant, or if the leaf is dying or burnt. Always throw away your dead leaves, never leave them near your soil or plants as they can attract pests.
Remember; keeping your sterilized cutting tools clean while pruning is very important. To easily do this just take a sharp razor blade and scrape off all the resin and excess. You may need to do this several times during one pruning session. After you are done scraping all the resin, take some alcohol and pour it on a paper towel. Then wipe down the instrument. This ensures clean, sterile, healthy precise cuts.
Lower Growth: The first most commonly used pruning technique is to remove lower spindly branches and growth that do not receive light, including burnt dead or dying leaves. A great benefit of pruning the lower branches is that it concentrates auxins into the upper branches which forces growth rapidly upwards. Doing this your plant will direct its energy into buds, producing quite a rich dense harvest for you to enjoy.
Clip any small buds and branches under the canopy, along with any less developed branches. The best way to make cuts when pruning is at a 45-degree angle. This will reduce any moisture that wants to sit and accumulate on plant wounds. Cut the lower branches off as clean as you can so no stub is left. Stubs rot and attract disease & pests. Buds under the canopy that are small do not mature well and leech energy from the upper buds.
Inside Pruning: Some more basic pruning methods include removing the spindly branches and growth inside your plants. This will allow for much better air circulation and light exposure for the deeper parts of your plant. Another technique is completely cutting off the top of the plant below the first set or two of branches. This will drive hormones to the lower branches and flowers.
Pruning The Tips: Another is to prune off the tip of plants, this will redirect hormones and cause the lower branches to grow more. Each and every time a growing tip is clipped, the stem branches into two shoots, which begin to grow from the nearest leaf axils. Pruning a growing marijuana plant is an easy way of controlling uneven growth without seriously harming the plant. Don’t prune the growing tip of a young seedling until after the first five-bladed leaves have formed and the vegetative stage has begun.
Note: If you want to make your plant taller you can prune all the tips on all the branches.
Many growers prune the growing tips after four to five weeks growth to develop lower branches which will quickly fill all the horizontal space. The greatest potency of the growing plant is found in the growing tips, and by three months, they should make a high quality smoke. You can basically prune growing tips at any stage of the plant’s development, but just make sure you don’t overdo it. Severe pruning can harm the growth of the plant. It is always better to plan a pruning strategy for your developing plants rather than haphazardly clipping off growing tips on an irregular basis. Each time a growing tip is removed the plant takes a few days to recover before new growth resumes on that branch.
The amount of new growth formed with continued pruning is limited by the genetic structure of the seed and the environmental conditions. It is better to prune your plants at an early stage of their development, than towards the end of the vegetative stage or during flowering. It’s always much better to prune growing tips in the morning than in the evening, as it gives the plant a full day to recover and heal the wounds.
It is not recommended that you prune every new node in a developing plant. Rather prune every second or third node to allow the plant time to recover. Wait for the new node to start growing before clipping the young branch a few millimeters above the previous node’s newly formed leaves.
Do not prune any growing tips if you notice that your plant’s health is declining and it has started losing leaves. This is a bad idea!
Although you could always smoke the pruned growing tips, plants should be pruned to develop their growth rather than for smoking purposes. Pruning all the branches or removing more than 25% of the foliage in a short amount of time greatly stresses your plants and will hamper your harvest.
While it may be tempting to prune female buds during early flowering, your harvest will be severely hindered by doing so. Cannabis Indica is a genetically smaller and more bushy plant than Cannabis Sativa and usually requires less pruning. Never prune more than the single growing tip, or upper-most node, from any branch on the growing plant.
To grow seedless marijuana, you should remove all the male plants as soon as they are discovered, by pruning the main stem right above the ground if grown in soil, or removing the plant from a hydroponic garden. Although it may be better developed, a pruned marijuana plant does not always produce more buds than an unpruned plant. Another good reason for pruning is to take cuttings from a strong growing, favorite plant for further hydroponic development. Marijuana growers often prune their plants in an attempt to limit their height and prevent unwanted detection.
Pruning For Hormones: Pruning your plant will redirect growth hormones. A great way to trigger this beneficial hormone redirection process is to cut the meristem (top growth tip, aka the central stem) of a cannabis plant it will cause hormonal balances to shift by causing greater concentrations of auxins in the lower branch tips. To do this you would remove this central main stem just above the four lowest (main) branches. Since this is the plant’s main central growth leader, removing it will concentrate floral hormones into the four remaining branches exploding your growth there. When you have fewer branches on your cannabis crop, they become stronger, get plenty of light, and grow a larger quantity of dense heavy flower tops.
The upper-most growing tip of an unpruned marijuana plant will always be more potent that the top buds of a pruned plant grown in similar conditions. Pruning the tallest branches ensures that the lower branches grow upwards, forming a larger surface area for the light to cover. The clear fluid that often flows from the end of a newly pruned branch, contains substances which seal the wound and aid the healing process. Although it is recommended that you remove all dying leaves from the plant, you should resist the temptation to prune too many healthy leaves.
An alternative to pruning for developing growth, is to bend the tops of the branches over and tie the growing tips down with string or wire. Remember that by pruning a growing tip, you are removing the most potent part of the plant, thereby spoiling it’s chance of reaching full maturity. By pruning all the buds at harvest time, rather than cutting the stem off above the ground, you could easily harvest your plant a second time. By severely pruning your marijuana plants you are lowering their resistance to harmful natural enemies such as insects, fungus and frost. You can make a great cup of tea, by chopping up some pruned growing tips and soaking them in boiled water for a few minutes. Cannabis is a very hardy and adaptable plant, and will endure serious harm to it’s leaves, branches and stem before it dies.
If this is your first crop you’ll understand much better what you want once you’ve watched a plant through its entire life cycle. Also keep in mind many growers who have a large amount of grow space and proper lighting might not even have to prune.

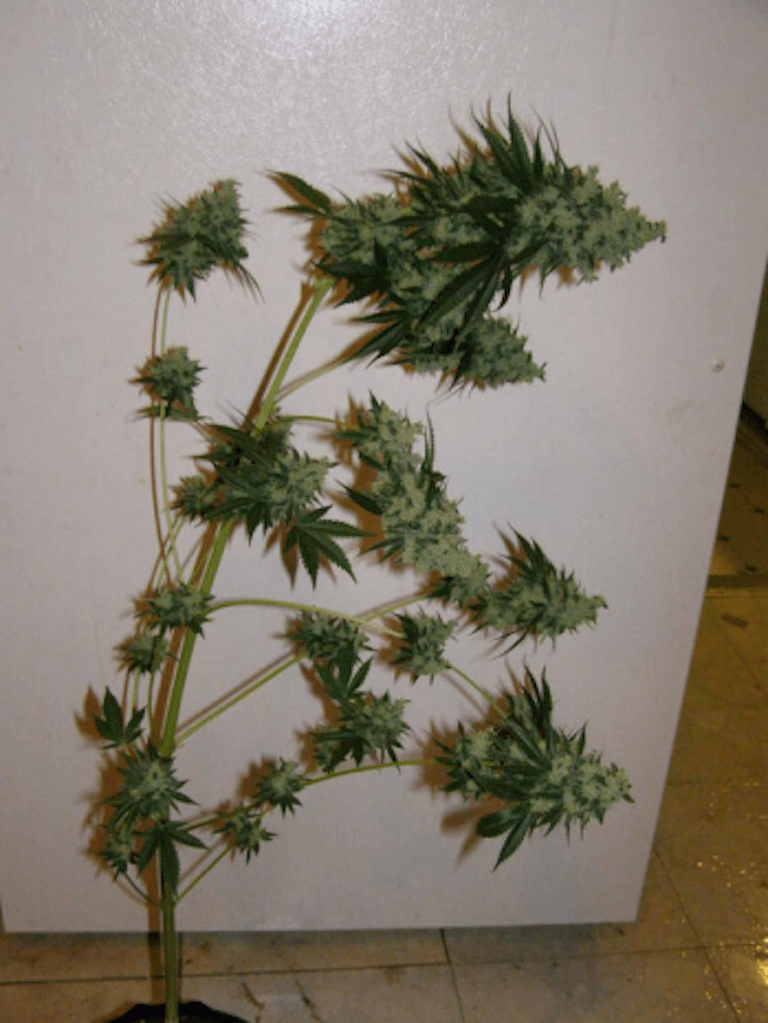
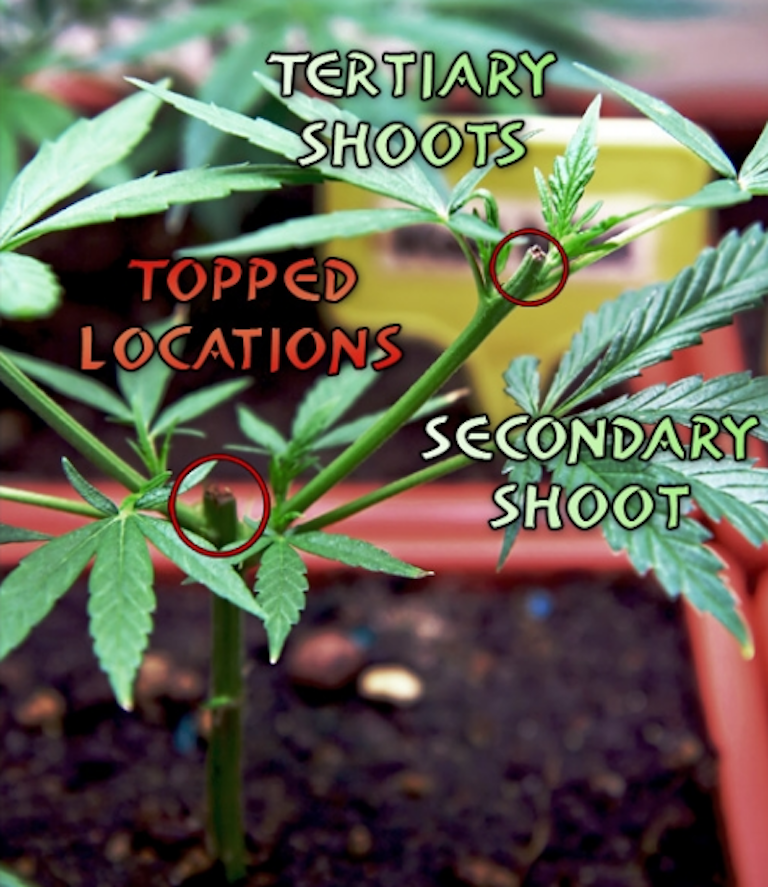
Topping
One week into flowering you can top your plants. Topping the plants allows you instead of getting one bud top cola, to get TWO big fat ones. This little trick is accomplished by pruning the main top cola in order to get it to split into two or more plants, but be warned, depending on your strain you may hit the jackpot and it’ll split off into two huge big bud rich top colas, or two tiny little itty-bitty ones.
By removing the main shoot located on the central stem you will encourage the plant to grow into a bush with a lot of shoots, instead of one big main shoot that you get on the untopped “Christmas tree”.
The reason why the plant behaves this way is because the centre of growth control is located in the apical meristem or main shoot. The main shoot sends suppressive hormones down to the lower or axillary shoots which stops them from growing. This is called apical dominance. This mechanism does not stop the lower branches from growing but as long as the main shoot is intact it will be largely favored. By removing the main shoot, the branches beneath it become free to grow at full rate in order to take its place.
The main shoot also has other functions. It communicates with photosensitive pigments, called phytochromes which are located in the leaves. Flowering in plants is triggered by two things; the first part of the system is called the Circadian rhythm which is basically an internal biological clock. This biological clock is basically an evolutionary response to light and darkness and is closely linked with hormonal functions in the plant.
The second part involves hormone signaling mechanisms; messenger molecules and specifically encoded proteins that tell the plant to start budding based on the information that it receives from the environment. The plant knows when to trigger flowering because the sensory pigments keep track of the photoperiod (or the hours of daylight) and relay this information to the centre of growth control which is located in the main shoot. The sensory pigments also inform the plant of how much sunlight a certain part of the plant receives. This enables it to relocate energy and growth hormones to exactly where they are needed.
There are several types of hormones that regulate growth. One of the most important growth hormones is called auxin. It originates in the main shoot and is part of a mechanism called the auxin transport system. This hormone plays a big part in the internal signaling and growth control mechanisms of a cannabis plant. Auxin also serves to regulate the formation and behavior of other growth hormones that are responsible for everything from root growth to the formation of flowers.
By removing the main shoot, the communication between the leaves and the main shoot ends, effectively canceling the apical dominance. The result is that the plant assigns the next shoots in line to the job. This means that the smaller shoots on the branches beneath the cut stars growing faster and gain size.
Since there is no more apical dominance, the plant will grow into a bush because the newly appointed main shoots all have equal priority. These shoots usually grow very slowly when the plant is left untopped so it is probably best to top the plant at night when most of the hormones have been sent to the roots which means that there is a smaller chance of the plant being stunted after the
main shoot has been removed.
There will be a short period of time when the plant is in something that could be called a state of confusion. It will stop all activity until it can figure out what is going on, so to speak. It will resume vegetative growth as soon as the hormonal functions are up and running again. It should take no more than a few days for this to happen, a week at the most.
Most of the time this transition is quite fast but some plants that respond poorly to topping might have stunted growth for a while. It is possible to top a plant many times, each time the number of main shoots will double. Give your plants some time to grow before you top them, if they are topped too early they might get stunted for a while. Many growers top them quite early. Go by your feeling, once the plants look strong enough you can start topping and training them.
This is a good way of training the plant if one wants to make the most out of the space available Topping is also a good way of slowing down plants that tend to stretch a lot, as each time the plant is topped it will redirect energy to a greater number of shoots. The new shoots will never grow as large as the untopped main shoot will but they will most likely produce a larger crop. There is also a technique called FIM topping (more on this below in it’s appropriate section). By leaving a small portion of the growth on the main shoot intact, the plant will assume that four shoots, instead of two, are the main shoots and they will grow evenly in height. The success of this method is usually up to the luck of the draw but in order to up your odds you should make the cut circular so that the remaining tissue forms a “cup”.
Note: The same result can however be achieved by topping the plant twice.
Topping is actually quite easy. Follow the main stem from the roots, all the way up to the top, and with a clean pair of scissors snip the top. No matter what you have heard topping is not clipping off bud tops. You’re only removing about 3/4 of the top growth tip. This will cause the plant top to split into two tops. This technique can be used to produce up to about 4 tops on a plant.
You will also want to cut away any leaves that are growing too close that block the lower fan leaves from getting adequate light. In addition, cut away the lower unnecessary leaves to make for long stems, this will ensure maximum air circulation (a much better exchange of CO2 and Oxygen).
Topping is essential when growing Sativa marijuana seeds strains in small closet or other limited indoor grow space.
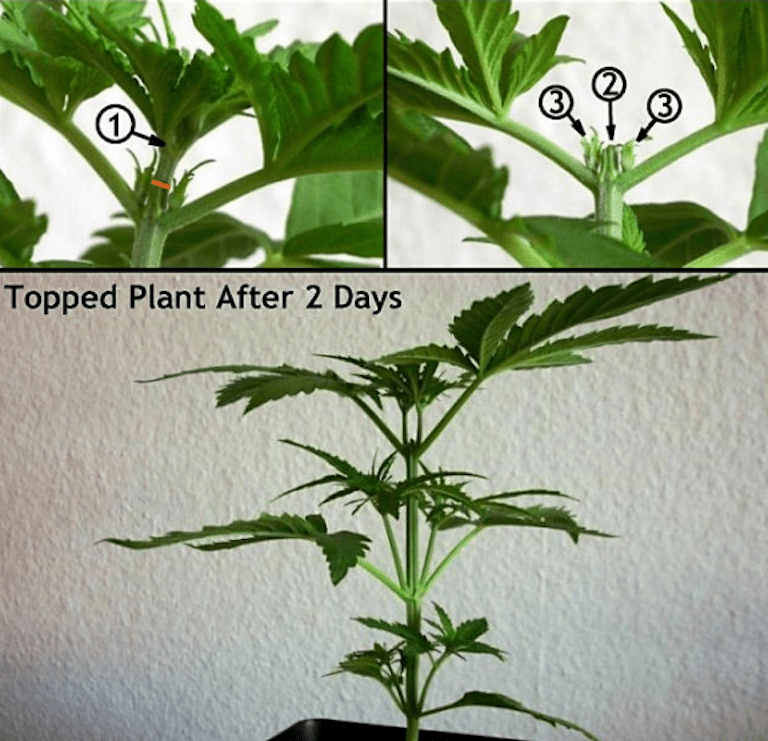
Topping Step-By-Step:
Please refer to the diagram on the next page for further clarity.
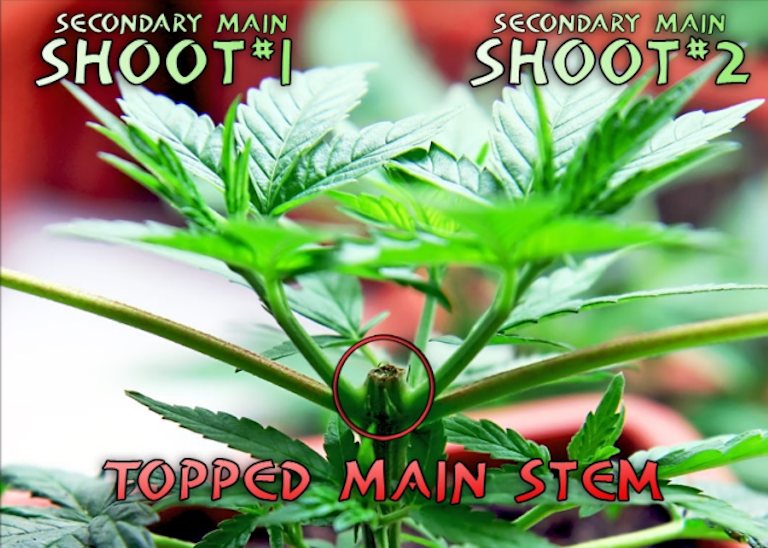
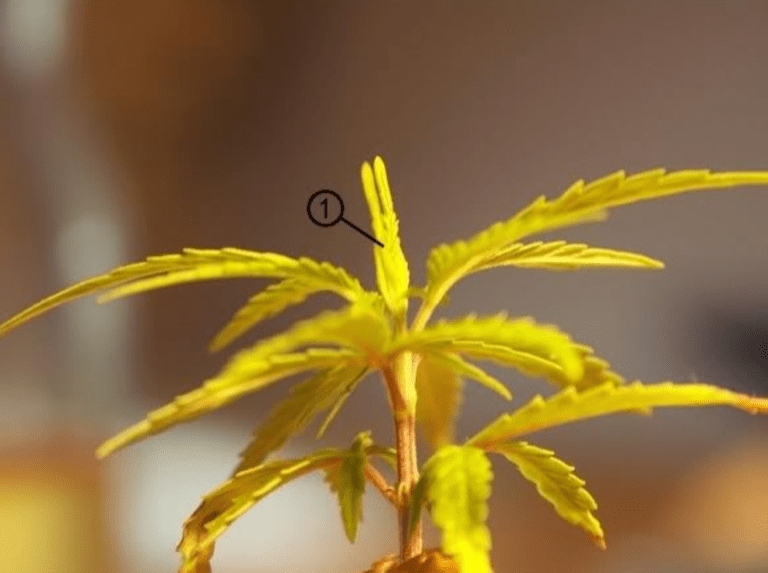
Step 1. Locate the very top of your plant and cut through the main stem just below the newest growth. This should be done after the 3rd or 4th leaf set but can be done at any time after the 3rd leaf set.
Step 2. Shows Plant Top cut off and where the 2 new Branches that will form a “Y” in the main stem will grow from.
Step 3. Shows the newly topped plant after 2 days of growth, notice the Y in the Stem Forming.
Training/Pruning For a Lower Profile
If you’re growing in a confined space most cannabis plants will overgrow the space within a few weeks. Here is a method to train and prune your cannabis for a lower profile.
Materials:
- A length of earthing wire.
- Side cutters or wire cutters.
- A number of self tapping screws.
- A Phillips screwdriver.
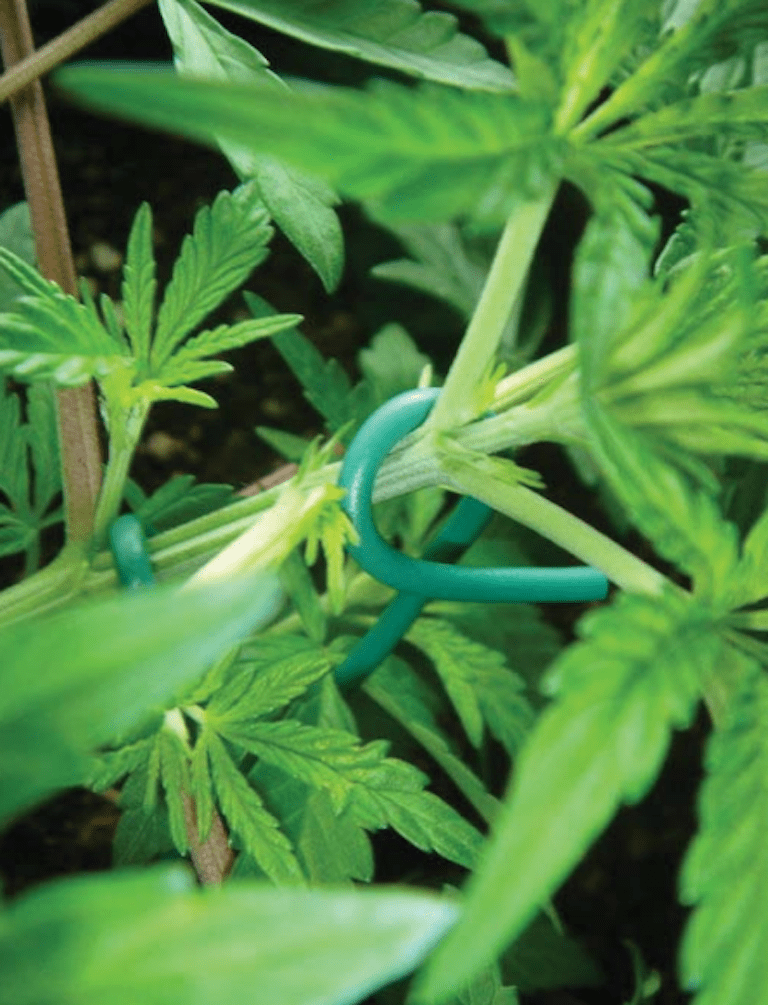
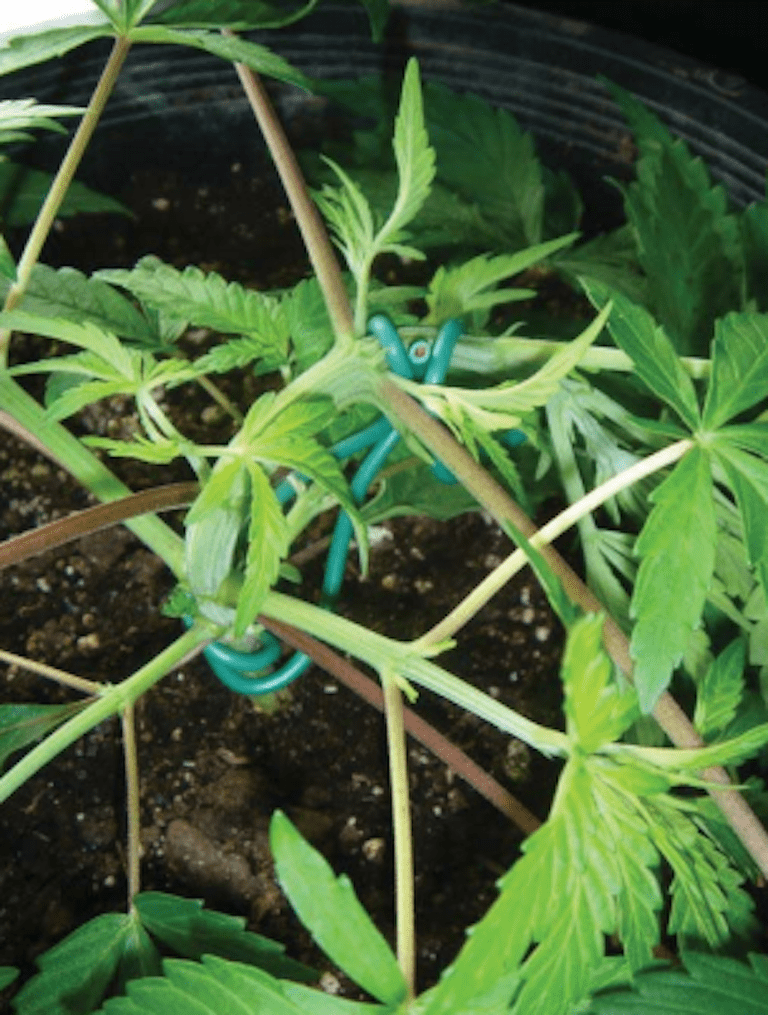
Earthing wire is available cheap at most electrical supply stores and hardware stores. This is thick copper wire used for earthing certain electrical devices. It has a soft rubber coating on the outside; the copper is malleable enough to be formed into whatever shape is required and doesn’t lose it’s shape very easily. The first step is to bend your wire to get it as close to the shape below as possible.
The stake can then be removed and repositioned to again train the main growth tip downwards. The lower branch growth accelerates and can also be trained using the stake method. This again reduces the overall profile of the plant. Training continues into flowering until the males have been identified and removed to leave the females to be trained into a screen.
The plants can then effectively be controlled using Scrog techniques to maximize light efficiency and yield.
Example:

This plant has been vegging for approximately 20 days and is approximately 9 inches in height, on its eighth node.
This next picture shows where this crook is placed:
It is positioned above the first or second node with the other end of the wire laying against the top of the plant’s pot. Where it touches the pot, a self tapper is screwed in as high as possible. This is to reduce the likelihood of a leak when watering. The wire can then be cut to length and wrapped around the self tapper.
This picture shows the trunk tie in place:
It’s wrapped off to the self tapper to a length where the tie is tight against the main stem to keep it vertical.
In this image you can see the gentle bending of the main growth tip over in the opposite direction to the main trunk tie:
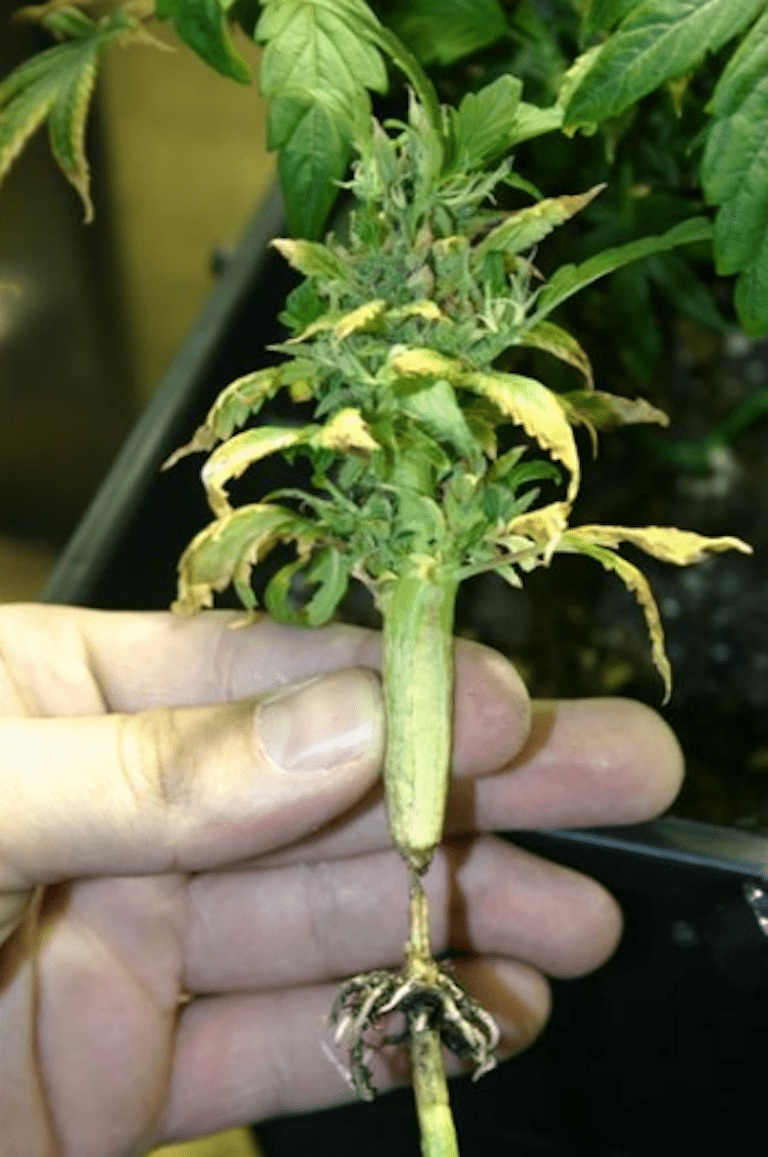
This must be done progressively to avoid snapping the main stem off. A small break in the stem isn’t a problem as the plant will recover.
Note: If it does break off completely, leave the plant! It takes a week to get over this shock but they then react as any topped plant would.
This image shows the second length of wire, again with a crook in one end:
This time it is used as a stake to pull and hold the main growth tip in place. The crook is placed under the fan leaf stems of the upper most node, with the other end of the stake being pushed into the soil about an inch or two.
There must be sufficient distance between the top of the growth tip and the stake crook. This is to stop the main growth tip from popping out from the crook of the stake. The distance the stake is pushed into the soil determines how low the growth tip is trained. It must be trained to below the next node or further for maximum increase in lower branch growth and reduction in profile.
This image shows the trained main growth tip with the trunk tie and stake to hold it in place:
This effectively reduces the vegging plant from an eight to a four inch profile. The final pic shows the plants after 12 hours of HPS light:
They have all shifted the top half of their profile towards the light and exposed all the lower growth shoots. This gives them maximum exposure to the light and therefore potential for growth.
The Paperclip Technique
This next low stress training technique offers many benefits for your cannabis…
Benefits of the Paperclip Technique:
- Effectively controls the height.
- Allows more light to reach the centre of the plant.
- Shoots grow vertically off the stems.
- Stimulates stem growth by bending the stems (stresses the inner herd, causing it to grow thicker and stronger).
- Greatly increases overall plant yield.
The process stars early in your marijuana plants life cycle. Only begin paperclip training when you have either FIM, pinched, or topped your plants.
The first step is to bend some paperclips straight out – they will be about 3” in length. Next, bend the first ½ inch into a hook so you have what resembles a candy cane (yummm). Bend the stems down parallel with the medium. Carefully snip offending leaf out of the way. It’s more important for the plant to spend energy growing new tips than larger leaves right now.
When the bent tip of the plant has made the turn and is growing vertically again, it’s time to move the clip further up the stem to keep the tip oriented horizontally. Train the stems parallel with the medium until you want to initiate flowering.
When you do finally decide to trigger flowering, all this training will pay off. What would have normally been your tiny and airy bottom buds will now turn into nice heavy thick THC rich colas.
FIM
FIM is performed in order to limit plant height and encourage lateral branching. This technique and others like it (SOG, ScrOG, LST, Topping), are especially beneficial, when growing under artificial lighting; which has very limited penetration/capability. It’s a good idea to keep your plant growth within the penetration area of your lamp for maximum potency and yields. For many modern growers, FIMMing is much more preferable to topping.
FIMMing isn’t hard, it’s simply pruning the growing tip of a plant(just like topping) but if you do it wrong, you’ll soon discover why the cannabis community coined this little technique.
For Clarification: Topping is the removal of the growing tip at or above the 2nd or 3rd visible node, whereas FIMMing is the removal of the uppermost growing tip above the uppermost visible node – this growing tip is only visible, and accessible, if you part the tender new fan leaves. Clean fingers, a knife point, or a pair tweezers works well for this.
Note: When doing plant surgery always start with clean hands, and sanitized equipment.
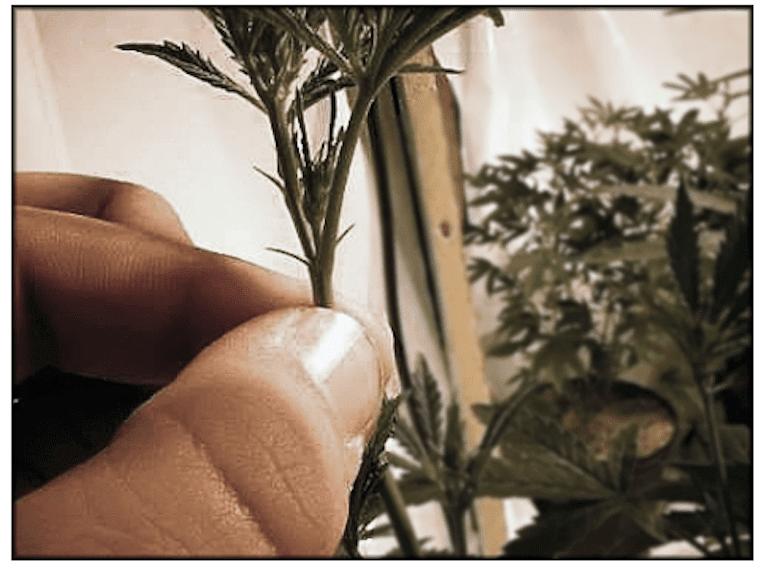
FIM pruning needs to be done during the plant’s vegetative cycle. FIM is a great way to prune the plant in order to get more branches. FIM is different than topping. When you top, you chop the whole node off cleanly hoping for the stalk to split in to two. When you FIM, you cut so that the vegetation that is left has cells that are rapidly dividing in many different directions. This can lead to as many as EIGHT tops from a single pruning. When you FIM you take away 90%, leaving 10% intact. Force vigorous plants (preferably Sativas) to do lateral branching earlier by reducing amount of leaves on the plant, before you FIM.
FIM Step-By-Step
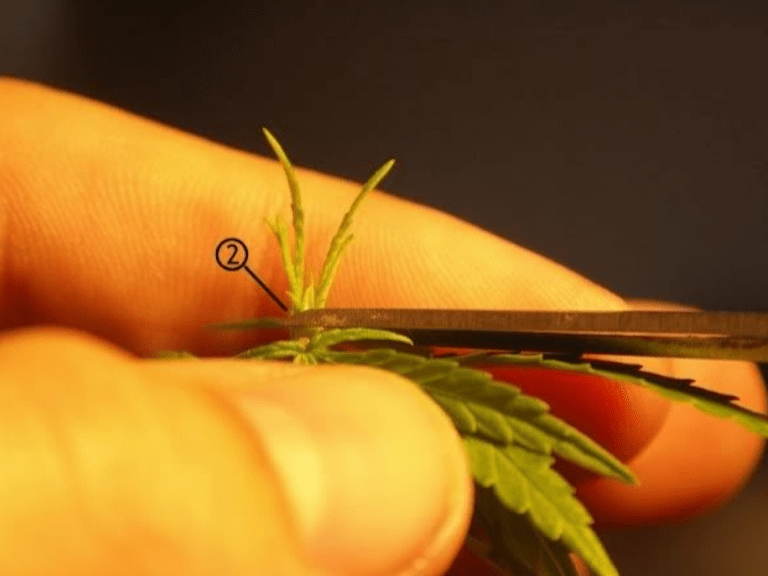
Step 1. Locate the very top of the new growth
Step 2. With a clean sterilized scissors, Fold the fan leaves over and cut approximately 80% of the new growth off the plant.
Step 3. View from the top showing the Cut.
Step 4. View of the Cut section after 2 days growth, showing the 4 new growth shoots (branches).
Thats it! You should be well on your way to Topping and Fimming of your plants.
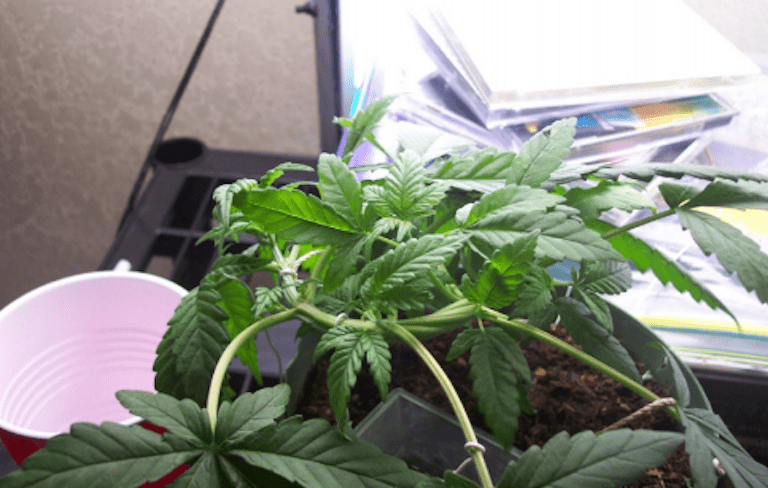
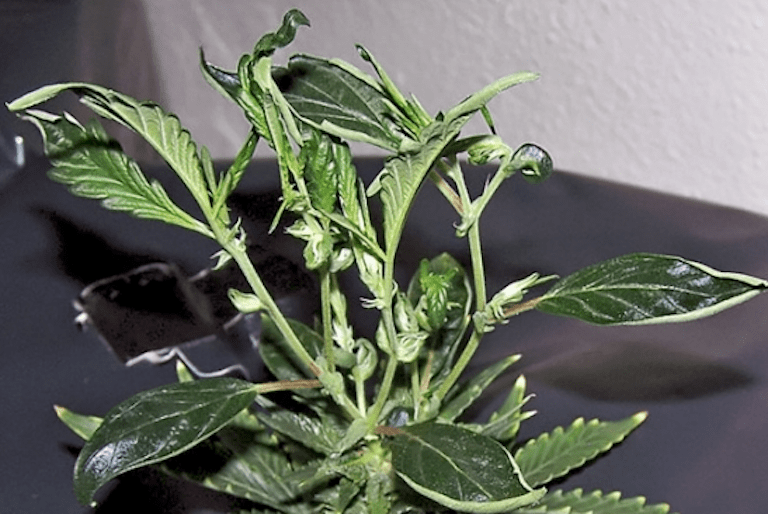
The following picture is an example of a plant that is properly FIMMEd and LSTed. As you can see this plant already has lots of branching, which will become the new tops. As you can see the tiny growing tip was removed, while leaving the precious fan leaves intact, and that’s what constitutes a proper FIMMing.

I’ve chosen to include this next diagram as a decent graphical image, but it is wrong. Where it says “FIMM cut location” is NOT where you want to cut! First you want to gently spread the tiny “new set of fan leaves” out of the way, find the actual growing tip, and then make then nip it out.
Only then can you be sure you are pruning out the growing tip, while at the same time preserving the surrounding growth.

Keys to A Successful FIM:
- Cleanliness
- Separate the new growth (fan leaves) using your fingers, knife tip, tweezers, or whatever works best for you.
- Locate the growing tip – that would be the main stalk ONLY where it says to cut, in the above pic.
- Using a very small knife, scissors, or clean finger nails, carefully remove the growing tip, while being careful not to clip the surrounding growth. Be especially
careful if attempting this with a razor blade, because they have a way of cutting through more than you intended. Remember, Just cutting through the uppermost growing tip is a terrible idea at best, and you’re liable to cut the new fan leaves, which isn’t good for your bud growth.
FIM isn’t much different than topping, but it’s less drastic (stress), and leaves more auxin’s, and more nodes. FIM gives you more natural growth, and stronger branching, and it doesn’t limit you to 2 tops as topping does. I also understand some people are getting 4 tops using the old topping technique, but to achieve that result, you need to top at a specific time, or node. There are no restrictions using FIM – to get multiple tops – other than the normal ones; never prune a seedling, or a plant in flower.
Bushing
Many growers like to keep their plants small and wide. It’s fairly easy to achieve this. During the 3rd week of vegetative growth prune half the plants branches and leave the other half. 50% is the amount you want to prune, any more or any less than that and you might end up stunting your plants growth. Prune all over, not just one side to get it to 50%. Next step is to wait until the 5th week of vegetative growth and then rune the remaining 50%. Only proceed to do this if your previous prune cuts have grown new leaves and branches. At around the 7 th week of vegetative growth you will begin to see your plant take a liking for growing outwards instead of upwards.
Bending
Another way of modifying your cannabis plant’s hormones in order to manipulate its harvest quality is by utilizing a technique known as “bending”. The effect bending has is that it neutralizes the effects of growth-inhibiting hormones. You can also limit the height of your plant (training) using bending. Bending, although very similar to pruning, and is much less stressful on plants. Limiting the height of your plants by using bending is an art form in and of itself. Here we have the art of tying down your plants main stem so it grows in an ‘S’ shape, preventing the plants from reaching their natural height without having to worry about pruning (you can still prune if you need to, don’t worry).
Simply put, bending is when you lean a branch in the desired direction and tie it into place. The process is fairly simple. Take a small string or thread and attach it to the stem, then bend the plant over. You then need to lock the string down to another part of your plant or to the grow room frame. You can really make this an art form. Some growers make corkscrews, circles, various ‘S’ shapes etc.
WARNING: DO NOT tie your string too tightly!!! If tied too tightly around your stem the liquids cannot flow and death or retarded growth may result.
Be creative! Branches are tough and can take a lot of bending stress before they break or fold over. Keep in mind younger branches are prime candidates for bending than older stiffer ones.
Note: Even though cannabis can take a lot of abuse (it really is a tough plant), you want to be very gentle when bending.
Here’s a cool tip: Many growers like to bend their branches to ensure maximum light exposure. A key example of this is bending the branches horizontally so that the buds grow vertically towards the light source. Because the buds all receive much more light, they will turn into a very generous top.
Low Stress Training (LST)
Low Stress Training is a technique where a plant is trained through the use of ties or ropes. The idea is that you use a support rope at the base of the plant pulled one direction and another tied to the top pulling it down in a different direction. Every couple of days the top will be pointing upward again while auxins (branching hormones) reach the other nodes. Each time the top pulls up above the other branches the top rope should be moved up and the top pulled down. Continue doing this until the top does not pull above the other branches.
 Bushes are ideal plants to grow for anyone who has a small HID flower light (under 400 watts) or uses fluorescents. Smaller lights and fluorescents emit the most intense light for only a short distance, so keeping as much vegetative growth in the lights sweet spot is a must to make your lights most efficient. ScrOG growers take maximum advantage of this by weaving tops through a screen so only tops are exposed to the light. Well, training attempts to achieve the same goals only with a less work intensive method that will make more use of your small lights limited effectiveness.
Note: Topping and Super Cropping are examples of High Stress Training.
Topping and LST training work quite well together but it’s not necessary to top the plant in order to start the LST training. Some people prefer to leave the plant untopped and tie down the main shoot at ground level instead. This will have the same effect as topping it because once again, the centre for growth control located in the main shoot will dictate how the plant grows. When the main shoot is tied down, all shoots above it will grow more rapidly as the plant now assumes that these are the main shoots.
When it comes to marijuana growing, LST refers to a particular type of low stress training. It appears on the outside(and to the untrained eye) that the training of a plant is simply teaching a plant to be short and grow lots of buds. It is much more important and involved than that.
Topping the plants is actually done for similar reasons that LST is done. Even though it is a completely different method. It, too, is a form of training (a high stress one).
Why LST Works
One of the crucial things you need to understand about LST is auxins. If you don’t understand how auxins affect your marijuana plant, then you are just putting strings on your plant so they look like other plants in pictures. Auxins are plant hormones that interact with other plant hormones to form the “plant nervous system”, so to speak. Auxins are used to help stimulate nearly all facets of plant growth.

Auxins are used to help promote new root growth and is often part of what is used in rooting compounds or rooting hormones that are so popular in marijuana horticulture. There has also been various scientific studies that indicate that levels of auxins also influence the sex of a marijuana plant. Some research has also indicated that levels of auxins also play a role in the ways flowers mature on a plant.
Most of all, auxins in marijuana plants are known for producing adventitious buds along the stem and in the roots. Adventitious is sort of like it sounds: it’s the “adventurous” part of the plant that sprouts when the plant is wounded or trained.
More auxins is good when it comes to marijuana right?! Well, no, not in this case. Auxins are most concentrated and synthesized at the apical bud (the tip) of the plant closest to the light. The rest of the plant has the ability to produce auxins, but the cells must be triggered to do so. Now, although auxins are hormones essential for many facets of growth, it is also an inhibiting hormone for the other buds further down the stem. This is to prevent the plant from producing buds which may compete with the apical bud.
In other words; The plant is very happy having one bud that it tries to stretch as close as possible to its source of energy. It will do what it can to inhibit other sprouts below it from becoming that bud as it would require the plant to push those sprouts up to that level again.
If you are still a bit confused, think of images of trees and picture the growth that they have in a cone-shaped fashion. They are working to push the apical bud up to the sky.
Now that you understand what auxins are and how they are important for growth in marijuana, you can begin to understand how LST works and how to utilize this cannabis cultivation technique effectively.
How LST Works
When you top a plant, you are removing the apical bud (the bud closest to the light) where most of the auxin is concentrated and synthesized. The plant stresses itself out (high stress training) and eventually produces new sprouts along the stem that will form new growth so that it can get a new apical bud and send it soaring towards the heavens.
LST is helping to stimulate that growth near the bottom but by tricking the plant instead of chopping it. In nature, if something happens to a plant and the bud that is closest to the light gets blocked, it will try to move around that something. If it can’t, then eventually new growth will form lower along the stem to try and send a new shoot out to head towards the light.
When you Low Stress Train your plant, the reason that you are tying the tip of the plant down is so that the plant gets confused. It is used to producing the auxins in the tip of the plant close to the light. However, because the tip of the plant is pulled down to such a degree, it is not receiving light at the very tip like it used to so it sends the auxins down the stem to produce new sprouts to become new apical buds (or so the plant hopes).
This is why some people continue training as the plant gets older, but like to start when the plant is new as auxin development stars with roots and continues through all stages of the plant. Continued training of the plant is helpful because, as you can imagine, each apical tip can be brought down to promote new growth further down the stem. Every time you bring the tip down, the plant will be fooled. As new tips of the plant are reaching towards the light, pulling them back down below 90 degrees (or close to it) will make those auxins start to flow again. This can continue on and on.
Now that you know how LST works, you just know that you need to trick the plant into thinking it’s highest tip is no longer its highest tip. It’s as simple as that, but it is also as complex as you want it to be.
Low Stress Training Conclusion:
- LST can be done for all strains of marijuana, with great success.
- LST is another way of altering/stimulating the auxin hormone to produce additional growth just like other training methods.
- LST is not just for training height.
- Understanding auxins will help you understand LST better.
Note: Using copper wiring instead of string when LST’ng is not only easier (there are no knots to tie), but it is very reusable because there are no knots to un-tie.
Low Stress Training Step-By-Step


Air Layering
Air layering is a way to make clones from strains of plants that are difficult to clone. Air layering is taking a clone from a plant – it is removing part of a plant, not adding too a plant, and not grafting onto a plant.
Air Layering Step-By-Step
Step 1. The first step is to select a branch you want to propagate from, come down 12 inches from the tip of the branch and make two parallel cuts 1½ inches apart with a sharp sterilized knife. Don’t cut through the branch, just cut deeply enough so the outside bark peels off (what you’re going for is an exposed wound).
Step 2. Next coat the exposed area with rooting hormone to speed up the rooting process. Next you wrap the wound with moist sphagnum moss (or potting soil), then cover it with plastic wrap to form an airtight pouch. (This is the hardest step – and it can be amusing just trying to keep the moss from falling off the limb while getting the plastic wrap securely around it. To make the task a bit easier place the moss or potting soil in the plastic wrap first, then wrap both around the wound at the same time.)
Step 3. Then put rubber bands around the ends of the plastic wrap. (So now you should have a ball of moss wrapped in plastic wrap around the wound.) You cannot allow sunlight to strike the newly forming roots so you will need to cover it with something. Black plastic cut from a trash bag will work but aluminum foil is a better option in that it will not only block light it will also reflect some light rays keeping the newly forming root-ball cooler.
Step 4. Then you wait (and wait). To determine if a cutting is fully rooted, periodically check it by removing the aluminum foil to see if roots have grown to the edge of the plastic. Once you know that the cutting is fully rooted, it’s time to clip and then plant your baby plant as you would with any rooted clone.
Here are some graphical examples that will hopefully help:

Above: The first step to air layering. Pick a branch that is at least 1/8″ thick if possible. Scrape away the outer layer of tissue, the phloem, below (or above and below) a node, which is where a leaf, branch and/or bud will grow. This exposes the inner xylem and a layer called the cambium, which is from where the roots will grow. Leaving the inner xylem allows the clone to continue to draw water and nutrients from the mother plant and root system. The clone will continue to grow foliage, while simultaneously growing roots.
 (Here is a shot of the roots developed on the clone, while still attached to the mother. The stem of the clone is thicker above the root site because of the phloem having been removed. The carbohydrates created by photosynthesis in the leaves normally travels down the plant to the roots via the phloem. Because this outer layer was removed, the carbs build up in the stem above the wound.)
(Here’s an attempt at air layering. As you can see the top twist is tied
too tightly, which is why the stem is so skinny.)
The wound site is wrapped in your choice of medium. Rockwool is used in this case. Soil can also be used; a small square of plastic wrap is taped around the wound and soil is packed inside, forming a ball of soil just like the rockwool pictured. If using rockwool, just cut the cube in half, put the two halves around the wound, and wrap twist ties or string around the cube to hold it in place. Make sure to soak the rockwool in 5.5 pH water before using. The plastic wrapper is left around the rockwool to help to retain moisture.
A better method of exposing the cambium, making only 3 cuts with a sterilized scalpel or razor blade. Make two concentric cuts around the stem, just deep enough to go through the outer layer of tissue. Connect the two cuts with one vertical cut, and if done correctly the outer phloem should simply peel away.
(The exposed xylem. You can see two alternating nodes are exposed.)
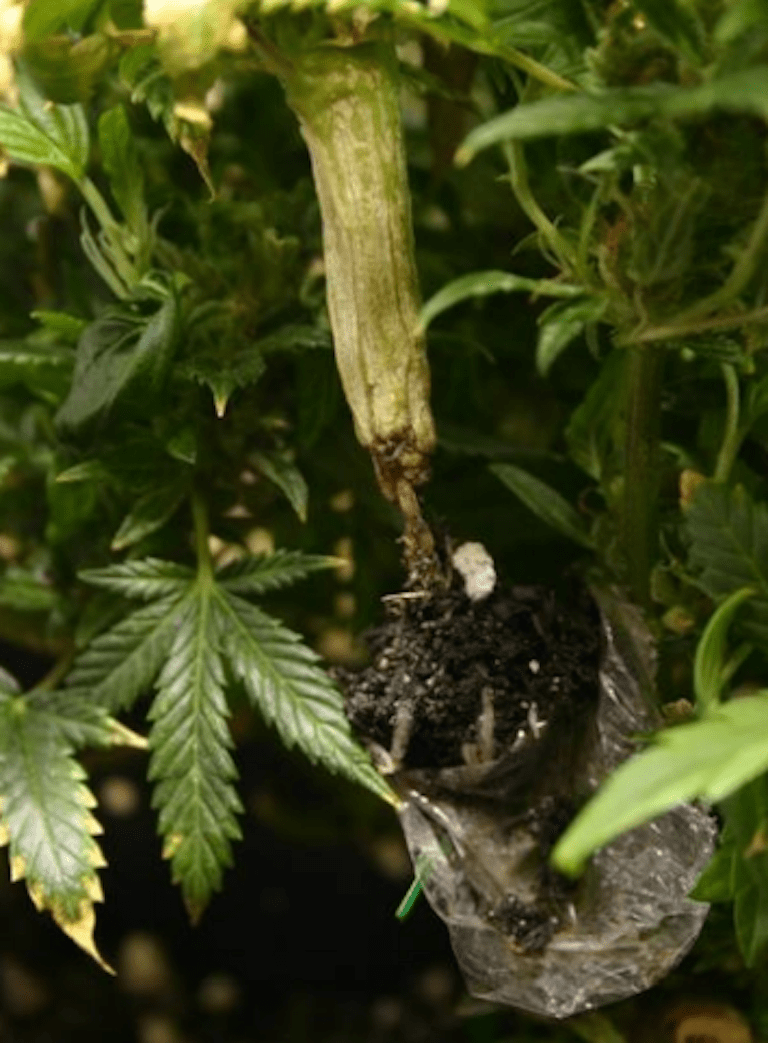
Super Cropping
Super cropping involves crushing of the soft inner tissue of the stem in order to gain some control over the plant;s growth patterns, but the primary reason grower’s super crop their cannabis is to drastically increase health, potency, and harvest yield. This soft inner tissue is made up of cellulose and forms a network of vascular tissue that can be divided into two groups, namely the xylem and phloem. These two are responsible for the transport of water and nutrients along the stem.

Breaking the plant’s inner walls will induce a need for the plant to rebuild. The plant will adapt to the stress by rebuilding the tissue stronger than before and this is exactly why this technique can increase harvest size. While rebuilding the tissue the plant expands on the network of cellulose, which is why the stem grows thicker than before at the point where it was crushed. Think of it this way; instead of having a two way street for water and nutrient transport, you now have a multi-laned super highway.
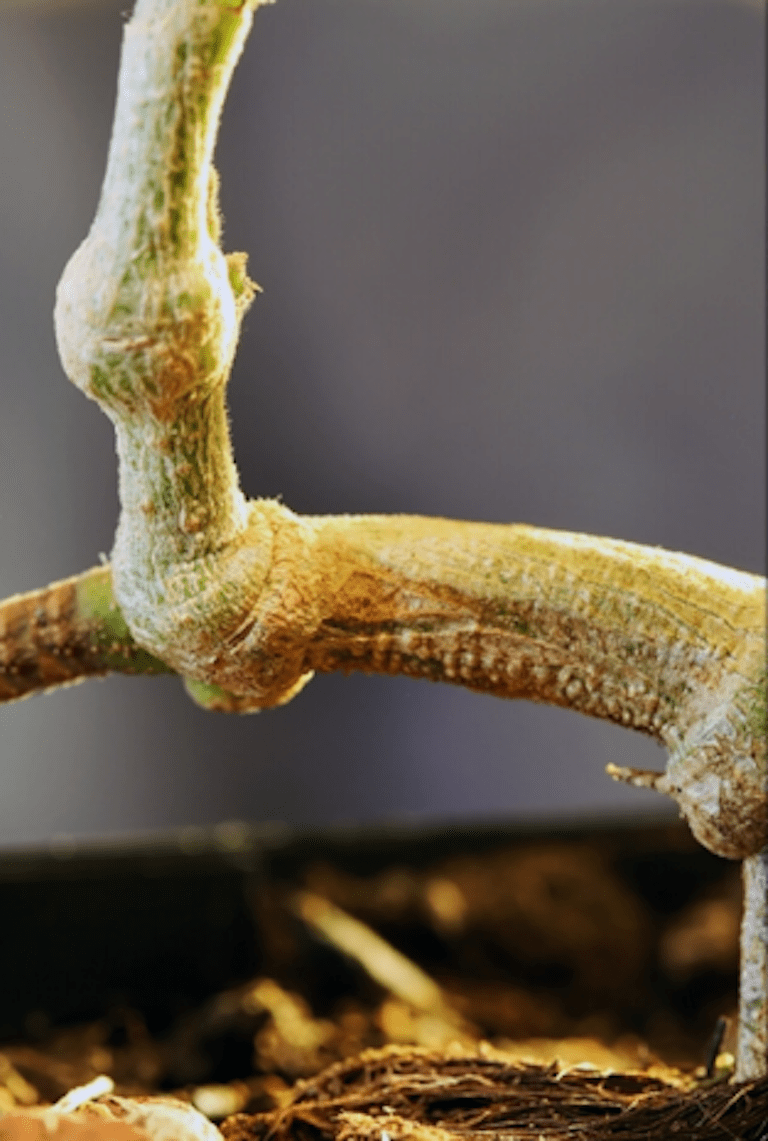
If you pinch the main stem it will grow very thick, which will benefit the entire plant. Pinching the side branches will allow you to have more control over how she takes shape. Thanks to the bend on the newly crushed branch you can now redirect it in any way that you see fit. This will also allow more light to reach the lower buds. Since the branch will grow stronger at the breaking point, it will also be able to support more weight. The branches that are closest to the breaking point will also grow stronger in order to compensate for the injury. In this photo you can clearly see how the stem has grown stronger where the vascular tissue was damaged and then repaired.
The idea here is to gain some control over the shape of the plant while simultaneously drastically improving health and increasing harvest yield. Pinched plants usually grow into very healthy bushes with thick stems. Super cropping is also a good way of getting several main colas – the pinched branches will eventually grow so thick that the plant will treat them as if they were main colas instead of secondary branches. The added stress that comes with super cropping also tends to increase potency.
Super cropping should be carried out during the second or third week of vegetative growth. Take a branch between your forefinger and thumb and proceed to pinch and twist at the same time until you feel the insides start to collapse under the pressure of your fingers. Slowly squeeze and bend the stem without snapping it. Just squeeze lightly until you feel the branch give, then let go. The branch might droop for a while but that’s OK as it will heal over time.
Supercropping is based on a pretty simple principle: strong plants will become & grow stronger and better if forced to endure certain types of stress. In this case, that type of stress is breaking or crushing the inner husk of the meristem (In ScrOG you would be breaking a number of branches, not just the meristem).
Once broken, the husk is given a week to recover in which time the stem becomes thicker, growth becomes more vigorous, nutrient uptake increases, and bud size as well. Technique and timing is crucial, but it’s really quite easy if you know how. Here is an example on how you would do it with a Screen Of Green grow:
After the clones have established themselves in the 4″ Rockwool cubes is the time to very carefully begin. The first treatment will occur on the meristem beneath the top grow shoot. To break the husk, you simply pinch the stem in between your thumb and forefinger and gently crush it while simultaneously moving/rubbing your fingers in opposite directions (it’s a good idea to gently bend the cutting over so that the injury becomes more pronounced and the clone wilts). Bamboo poles come in handy for supporting healing and growth.
Now the awesome part. You will surely begin to notice much more vigorous growth over the next few days, and the cuttings will really begin to take off. After the initial wound is healed, and several new leaf nodes have grown (best rule is when growth has doubled), you may resume the process. Now this time working larger areas between the nodes, and leaving about a 2″ space between each break. You can vary it a lot, making fairly large 3″ wounds, and then several smaller breaks.
WARNING: For best results it is CRITICAL that you allow adequate recovery time to allow your plants to heal properly.
Many growers ask if hey need to change the technique at all as the plant gets larger, and the answer to that is both yes and no. You will continue to pinch and twist the stem, but you also have to carefully listen for the sound of the husk breaking to make sure you’re doing adequate damage to your plant. Don’t worry, it’s really not that hard. After a few tries you will master this awesome little grower skill.
Keep in mind that sometimes you will have to keep the plant in a vegetative state a bit longer than usual as it takes the plant some time to repair the broken tissue and redirect energy. It is probably best to choose either topping/LST training or super cropping, as both techniques have the same purpose and applying all of them at the same time might put the plant under too much stress. Pruning super cropped plants might however become necessary at some point or the other in order to ensure that the plant is functioning at its full
potential.
If this technique is applied correctly and with patience, the outcome will most likely be a stronger, bushier plant and a greater harvest.
You’ll also find that even severe damage can be done to the stems without ffecting growth (as long as you are supporting it properly using the bamboo so that the plant is not strangling itself), and will in fact DRASTICALLY increase bud weight in the end. Some of the largest colas I’ve seen have had horrible-looking wounds all the way up the meristem. The key here is providing a proper environment for recovery by allowing and giving them adequate time, using proper support, and keeping food and environmental conditions at optimum levels. Also remember to re-break already broken areas once they have fully healed.
Once flowering is initiated and the clones begin to stretch, you should work about every several inches up the meristem focusing on making large and small wounds. Not all the breaks should be equally traumatic. Try to keep it to one or two severe breaks each treatment. You can probably up your food levels to 1800EC right after you go to 12/12 since they will be eating A LOT to recover.
The treatment is to be repeated and continued until 3 weeks into bloom. You will be pleased with the results. Also note that additional support may be necessary since the top colas of these supercropped plants become so large and heavy that the rockwool cubes cannot support their weight and they end up tipping and falling over creating a big mess. Packing Hydroton or rockwool between your cubes might help keep them supported. The black plastic also helps to keep the cubes in their place. If you are truly dedicated some reinforced chicken wire would be optimal. This would also help to keep your profile in check during the stretch.
Keep in mind supercropping will cause a slight delay in harvest. The delay can be anywhere from a few days to just over a week. Fortunately the delay is highly rewarding because the buds grow much larger than usual and have a longer time to produce more resin. This is just like some sativas which are so richly potent and can be such massive yielders under natural light primarily because they have such a long timeframe to flower and produce THC & bud. The extra time is definitely worth it!!!
But what if I hurt my plant?
Believe me, you cannot and will not ruin your plants with supercropping. It is not recommended for immature seedlings, but clones and mature plants can be done without worrying about a thing. It’s completely safe just as long as you have something to properly support the plants in case you go overboard and break the stem severely enough that the plant can no longer stand. This actually turns out to be a good thing. You see once you tie the plant up to stabilize it, it will immediately begin to heal, and a tough woody knob will replace what was once flimsy, green stem. The best place to supercrop for SOG is the very bottom of the plant, and just below your top cola. But of course you can pretty much do it anywhere.
Tie And Train Super Cropping Step-By-Step
There are a few different ways one can go about super cropping other than the basic method. An alternative name for this technique I’m going to describe would be Tie and Train, and I find it to be a lot like a ScrOG, but without the screen, and they are similar in the way they create a mostly flat even canopy of buds. This allows us to move the grow light closer to the top, obviously reducing the loss of lumens through distance. Also, this technique cuts in half the amount of plants needed to cover a given area.
Super cropping relies on far fewer lateral buds growing vertically and more on multiple colas in a small space. Yield on a supercropped plant will be gathered from the length of the stem, light size dependent.
There are several ways to achieve a room of multi-cola plants forming an even canopy. One way is to tie the plant’s tip to base for a week to induce lateral growth, and a second way is to simply tie the plant over 45°F(7.2°C) early in the vegetative stage of growth.
Once lateral growth is achieved, and the tieing method is the only way to nearly cease horizontal growth from the mainstem, the branches are observed over the course of a week or so to see which ones grow faster. These branches are gradually tied to the outside of the planter. Smaller growing shoots either get tied to the inside or made into clones or discarded. Obviously, we’re tieing the faster growers to the outside so the smaller shoots can keep up with them height wise.
12 plants from seed at 3 weeks:

I do employ the snapping of the hurd technique, but only to lessen the possibility of the stem folding or snapping when the tip is tied to base. So, pick your spot in the middle of the plant. Using the thumb and forefinger from each hand, slightly above and below the spot, counter-rotate your hands till you feel a light breaking inside the stem. It may or may not happen. If it doesn’t, don’t worry. Twist back and forth a few times to create a general loosening in rigidity of the plant. It should lean a bit.
Take your tying material, (a 10,000 foot roll of twine works good), and circle it loosely around the base and top of the plant. You want to pick a top node with some decent sized leaves (1″+) on it to prevent the plant from slipping its bond.
They do try hard to do this:
Slowly compress it down to the shape you see here and cinch the tie. A bit of pressure at the top of the circled stem will help prevent folding. If the stem does fold, don’t worry. It really doesn’t appear to make a difference in the plant, except for the ease of tying it later. The plant WILL recover as long as its not severed, sometimes even to spite you, it seems.
You can see she badly wants to turn that grow tip towards the light. The week in tie, through hormonal responses, forces the plant to stop primary growth from this tip and focus on growing out all the branches at the nodes just above and below the tie. Until it is released of course, when the meristem once again begins to receive a share, though not the main share anymore.
This is just before release:
It has already almost resumed its vertical stance. It’ll grow like this for a week and then we’ll begin the tying for training. See where the damage is and look at the growth from the nodes under it compared to the growth above it.
You can clearly see the goal with this one:
Start with the countertie down low. It should be opposite of the way the stem is leaning from the tie for training. Far enough over that it is leaning in the other direction. Put the next tie on the stem, above where the hurd was snapped. Pull the plant over like shown. These ties will remain in place for the duration of the grow, and may have to be adjusted if the plant grows too far off of one side of the planter. Several inches of movement in any direction from center is possible. These two ties will also have to be watched carefully to make sure they don’t constrict the plant as it thickens. I use the twine because it has a lot of friction against itself and a single 1/2 knot is all that’s needed for most branches.
The first two ties are pictured here:
Already adjusting to the new shape:
Its has some ties in place already, but when your done there will be a ton more. All the flower tops you see are at different heights before training.
This plant is several weeks older:
After:
All tops that have been pulled over will reorient themselves toward the light in a matter of hours. They’ll also be at the same height.


 Here is a side by side of a different picture. See the difference in the internode spacing? Some on the topped plants are 4″ apart! The tied ones clearly have nodes all the way down the stem only an inch apart. You can also clearly see where the topped plant was cut. If this grower allowed the branches to grow unfettered, they would easily be a foot or more taller than the tied ones. Keep in mind these all had their training technique performed at the same time.
They do grow up to be pretty similar even from seed:
The reason for doing all this:
An even canopy of buds just a week from harvest. That’s it, another viable alternative for small space and/or small light growers that want to maximize yield and focus all of their ladie’s productive energy into unbelievable big buds.
Monster Cropping
Monster Cropping or Flowering Clones is another method of growing cannabis. This method involves taking clones of flowering plants and then forcing them to root and re-vegetate, which eventually leads to very bushy plants with a great number of branches and nodes. This technique has been coined Monster Cropping within the community because that is exactly what you will get, real monster plants, but also because this method was introduced to the scene by a grower named greenmonster714. He in turn credits a grower named Feral for discovering this technique. There is a long legacy of these legendary growing techniques to produce awesome frosty big buds…
Taking clones from flowering plants goes against all that has been said about cloning cannabis and might therefore seem a bit confusing at first but the science behind the technique is sound, and the results really do speak for themselves.
You start by taking clones of a plant that is about 21 days into flowering. This seems to be the best time to do it but you can also takes clones at a later stage with the same results. The lower branches make better clones as they have not yet become rigid and will also root faster and more easily than say the top cola. Move the new cutting into a glass of water and let it sit for a while in order to make sure that no air gets into the vascular system during handling, as this can be fatal to your new plant. You should make the cut so that it runs along the stem as this will increase the surface area for water and possibly nutrient uptake, depending on what method of cloning you use. Many growers have found that using a small hydroponic setup is by far the best way to clone cannabis plants.
In the picture below, you can see how the clone from a flowering plant been has placed in a propagation bubbler for rooting and re-vegging. This also means that you will have to put the clone back under a veg light schedule of 18/6, 20/4 or even 24/0. Clones do not need strong light so a small CFL will do. You can remove some of the buds at this stage in order to encourage the plant to revert back into its vegetative cycle but leave the topmost flower alone.

It will take several weeks for the clone to root (some never do) so it is best that you take a large number of clones at the same time. This will ensure that at least one survives to make it on to the next stage. It is also a good idea to place the clones inside a humidity dome, which can be bought at gardening stores or custom built for your specific needs. The high humidity (moisture) inside the dome will make sure that the plants do not dry out and die. Ventilate the dome every day just to make sure that the plants don’t get attacked by mold.
Keep in mind that the most important thing when it comes to cloning is to provide the fresh cuttings with plenty of oxygen and that is why the propagation bubbler is so effective in this regard when compared to other methods.
The clones might be a depressing sight at first, but as soon as they root they will immediately revert back into the vegetative stage and start growing again. Once the clones have rooted properly and started flourishing again, they will put out single unserrated leaves at first (no worries – the normal leaves are soon to follow). It might be a good idea to apply some training at this stage, tying down some of the tops will encourage even more branching. You can also provide some heat underneath the clones as this will speed up the rooting process considerably.
When the plant stars growing again, the incredible branching power of the flowering clone becomes apparent.

As you can see, this plant has grown into a real monster (and all this without ever topping the plant!). That’s the beauty of this technique; you can forget all about topping and FIM’ing since the flowering clone will sprout all these new branches all by itself.
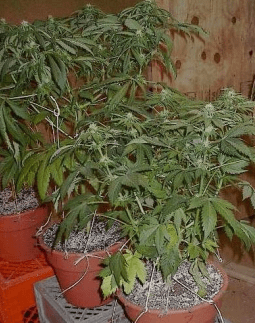
This plant is now perfectly suited for a ScrOG or perhaps even a SOG grow. This one plant can easily fill up an entire ScrOG net in no time. Several of these plants grown in SOG will definitely give you a grand harvest.
There are other benefits from using this technique; it also removes the need for keeping mother plants. When the newly re-vegged plant is flowered, it can also provide more clones for a perpetual harvest. Recycling at its best. This might be of interest to those who need to keep down their number of plants.
Needless to say, this method is highly effective thanks to the heavy branching that occurs after a flowering clone is re-vegged. With further training and some patience, you will get some real monster plants and thereby also an amazing monster of a harvest.
Common Growing Mistakes
Oftentimes people get extremely excited when they grow, and that’s perfectly natural. Watching your tiny little seeds grow into huge flourishing crops is a really fun process that stimulates a lot of positive emotions inside. But these emotions can also cause many growers to overlook critical aspects of growing and cause them to do some very stupid things that end up severely hurting their grow. Below I have listed the most common growing mistakes that people will make during their first grow (and other more “advanced” growers oftentimes make these mistakes too!).
This section will save you loads of wasted time money, and effort. These mistakes are made by first time growers and the more experienced marijuana aficionados as well. By reading through this section you will have a through understanding of what to do and what not to do in order to ensure a completely successful, quality, satisfying grow.
The Top 11 Most Common Growing Mistakes
- Talking About Their Grow: Weed growing can be extremely exciting, but new growers must force themselves not to tell anyone that they are growing. Word can easily spread like wildfire and their newfound hobby may accidentally fall upon the wrong ears.
- Spending Too Much Money: Newer growers frequently commit themselves to unrealistic and expensive first grow setups even before they have mastered the basics of cannabis cultivation. It is much more effective to learn to grow properly on a basic setup and then invest in higher end equipment and advanced growing techniques when you have no idea what the hell you are
doing. An experienced kid with a <$100 setup in his closet could grow better pot than a newbie with an $850 Aeroponic setup.
Key: Master the basics. - Over Analyzing: The first time grower will be like a mother with their first born child. New growers commonly will watch every single little move their newborn “child” makes, and then freak out when something unexpected happens. It is important to pay attention to your plants, but do not excessively over-analyze them. Growers tend to worry and stress out at the first sign something might be going wrong. It is important to pay close attention to what happens during your grows, but do not try and find a remedy for every yellow leaf or crooked stem. The remedy of flushing your medium causes more problems than it solves. Be responsive and intelligent when things go wrong, but be conservative with your remedies. You don’t want to end up doing more harm than good. Remember it is technically a weed and is one of the easiest plants to keep alive.
- Touching/killing Germinating Seeds: Newer growers tend to grow extremely impatient during germination. As you read in the Germination section, it can take up to 10 days for a seed to sprout. It is important to be delicate with your seeds and follow the proper germinating instructions outlined in this guide.
- Growing Seeds From Sketchy Sources: Newer growers tend to purchase flashy extravagant seed strains from underground questionable internet sites or from various other risky sources. Unless you are prepared for possible disappointments don’t use “unknown” seeds. This is why so many people recommend growers need to buy seeds from reputable seedbanks.
- Over-fertilizing: Oh man. If there were two spots for number one then this one might just take the cake. So many gardens are ruined from this mistake. A general safety rule is to fertilize after first 2 spiked leaves appear. It is also advisable to begin with ~25% of the recommended label strengths and work your way up. If the leaves suddenly twist or fold under, Leach and Spray with purified, distilled, or R.O. treated water for several days! Don’t fertilize your plants every time you water(soil)! A common watering schedule is to fertilize at full strength, then water at half or quarter strength. This prevents excess salt buildup, leaf and root burn. In addition, don’t water at full strength if the medium is too dry – root burn can occur. As a precaution, leach the plants with lots of pure water approximately every 2-4 weeks.An all-too-common mistake for newbie growers when they reach the flowering stage is to start hitting the plants with a high Phosphorus fertilizers like 10-60- 10, continuing to use this blend exclusively, and when their plants start experiencing a deficit of Nitrogen or micros as reflected by the dropping of lower leaves and chlorosis, they wonder why. Plants flower as a response to long nights, not because of fertilizer blends high in Phosphorus. A ratio of 10- 60-10 is WAY too high in Phosphorus. The plant will only take what it needs and compete for other elements that may be more important to it at the time.You may have heard that too much Nitrogen can inhibit flowering. No question about it, exclusive use of a plant food that is rich in Nitrogen such as blood meal, a 5-1-1 blend, or ammonium nitrate may inhibit flowering (especially if the phosphorous level is low), but most balanced blends have sufficient amount of Phosphorus to do the job. Manufacturers/horticulturists will give you element analysis and what effect the elements have on plant growth, but it is important to remember that this does not necessarily mean you will get better yields. Using a high Phosphorus fertilizer exclusively during flowering can actually work against you. It’s an abundant amount of healthy leaves going into 12/12 that produce a lot of bud, not high Phosphorus fertilizers.Rotate fertilizer blends as the plant “requires” them, not because it is “the thing to do.” For example, when your plants are going thru the stretch phase during early flowering, they may need more Nitrogen, especially if you’re getting some yellowing in the lower/mid leaves. Give up the cannabis paradigms, and give them what they need. Go back to mild high Phosphorus fertilizer when the stretch ends, maintaining the foliage in a healthy state of growth until harvest for maximum yields. A 1-3-2 blend such as 10-30-20, is one of the best flowering blends on the market because of several factors – it is higher in nitrate Nitrogen and Magnesium.
- Under-fertilizing: This occurs much less than over-fertilizing, but still a VERY common issue. This is common when growers become afraid to overfertilize their plants. If you are one of the overly concerned and prefer to give the plant “just enough nutrients”, then you can use an organic soil mixture with blood meal and bone meal or some slow release fertilizer with micro nutrients.
- Providing A Bad Growth Environment: Too many growers neglect the basics of keeping a healthy grow environment to ensure flourishing cannabis growth. Always provide air circulation and fresh air even during the night cycle. As a general rule of thumb all the air indoors should be replaced every 5-10 minutes to ensure optimal growth quality. Remember that even seedlings need a gentle fan to strengthen the stems. Do check for pests and fungus or any other plant diseases/abnormalities daily and handle accordingly. When doing this many newbie growers never check underneath their leaves surface, and this is CRITICAL.
- Harvesting Too Early: This is such a common mistake it’s not even funny. Did you know that 25% of the weight will form in the last 2 weeks? When flushing begin with 100% pH balanced water when the pistils are 25% brown. Harvest when the plants have COMPLETELY STOPPED GROWING and the white pistils are at least 50-75% brown.
- Over-watering: Rarely do first time growers under-do ANYTHING, it’s not their fault, they are just being too eager. Over-watering commonly kills many poor unsuspecting marijuana plants. When you first put soil in your plant lift it up to see how heavy it is, now remember how light it was and this will gauge you for the rest of the grow. Once the seed is in place water the plant and lift it again. As a general rule water only once the top few inches of the soil dries out. As soon as you pot your plant, judge its weight dry by lifting. Then, water the plant thoroughly until the water runs through the drain holes. Lift it again. When your pot feels as nearly as light as it did dry, it is time to water again. Hydroponics systems are harder to over-water than soil, mainly due to the abundance of water roots. When Rockwool is in combination with a hydroponic system; it has such excellent drainage properties. As long as the rockwool cubes are not sitting in liquid it is virtually impossible to over water a hydroponic setup. A hydroponic setup could either be watered constantly as the drip method, or once to three times a day as in the flood and drain method.
- Starting Too Early: This is bad for several reasons! If you are starting outdoors June 1st is perfect. But if I start earlier you will get bigger buds right? Wrong! It’s strange but usually true. Plants started in early spring will get big but they will take ignificantly longer to start flowering. This is because at the peak vegetative period they sense the light cycles getting longer and longer, until June 21. But they don’t realize that its time to flower yet. Finally in the middle of August the plant realizes it is time to flower so it produces buds in August and September or later. They will be tall as trees but thinner buds due to the fact that the sun is not as strong in September. Start at the appropriate times.
