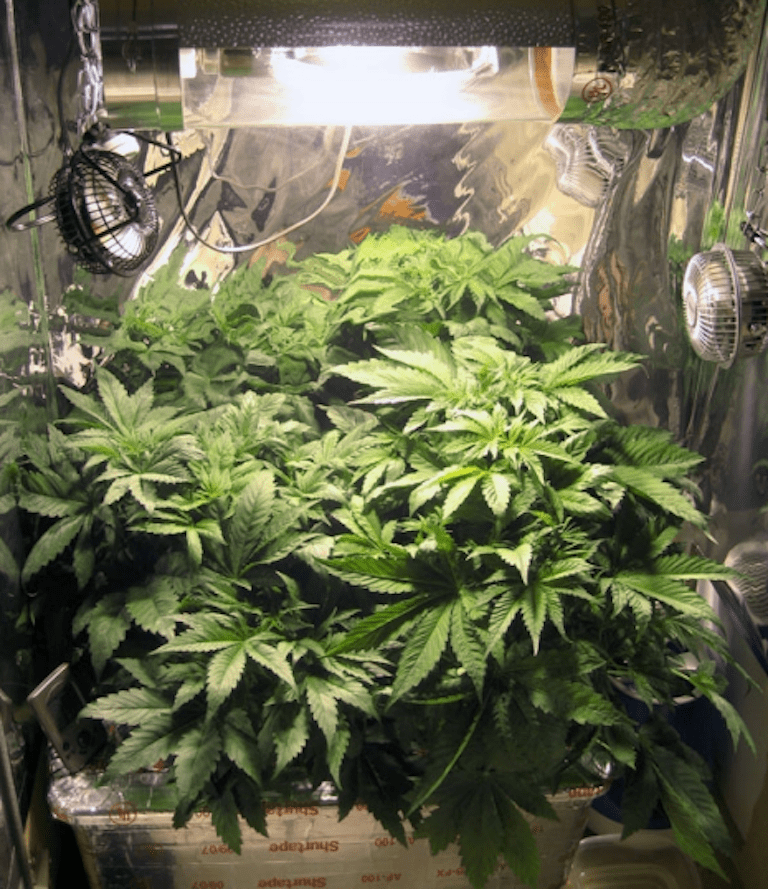
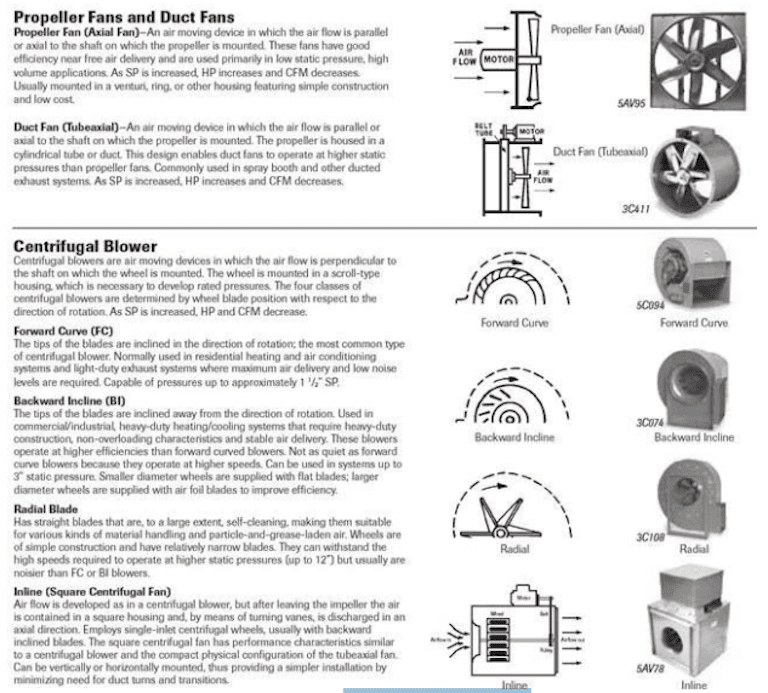
Part 8: How to Set Up A Grow Room – Best Grow Room Setup 2023
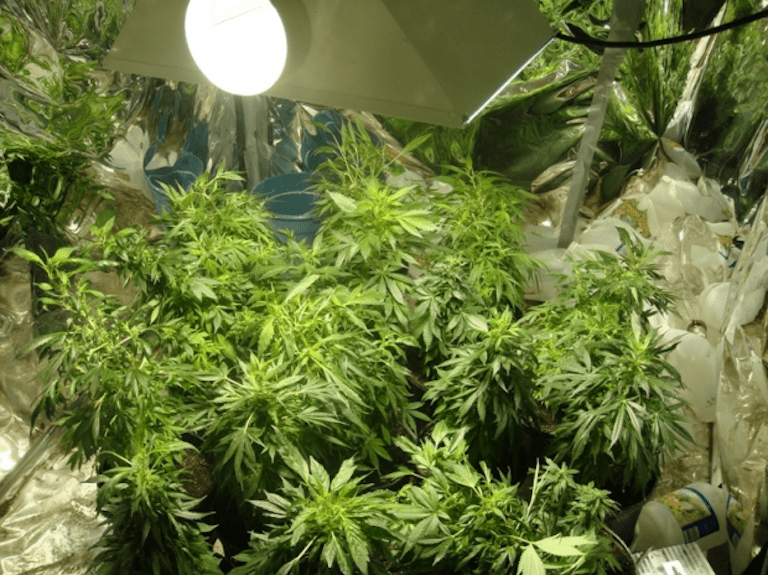
Setting up an optimal growth environment for your cannabis is crucial for reaping a big potent harvest. Your plant’s healthy productive growth cycle is a direct result of the quality and care put into setting up your grow area, so take your time! Hydroponic gardens and soil gardens can both be set up outdoors, but for the purposes of this section we are (obviously) focusing primarily on indoor growing. So where is an ideal location to grow indoors?
To help you out, here are the marijuana seed bank that work in any country.
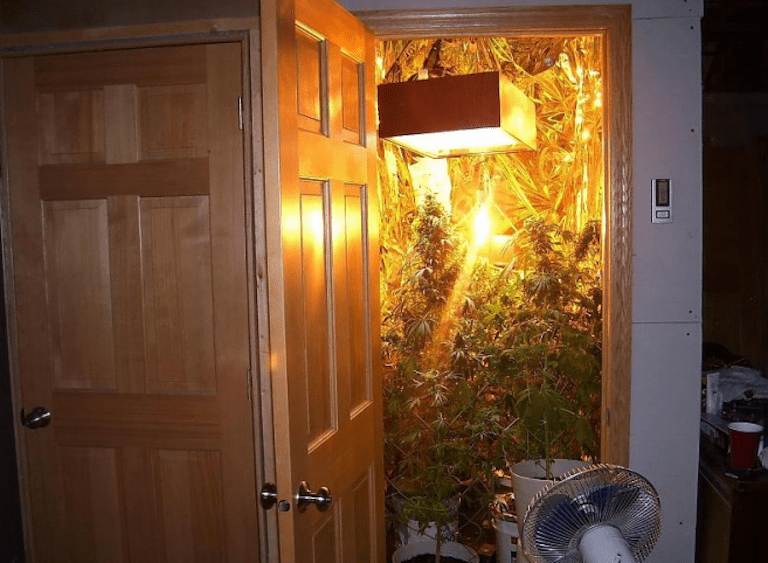
An attic, closet, or similar grow area will suffice but a spare room dedicated to growing is preferred and will reap you the most reward. An attic is great not only because of its stealthy qualities, but it is also extremely insulated so controlling temperature year-round becomes easy. The downside to this is due to most locations attics are in, heat buildup is a concern if not ventilated properly.
Your Grow Room
WARNING: Any separate unit from your house such as a garage, barn, or shed; are highly risky areas to grow cannabis. Refer to the Marijuana Security Blackbook for more information.
Ideally a section of a basement or large room with with surrounding walls makes a very good grow area to set up in. Most growers use a spare bedroom or a closet. Also, you will want the entry point to have a lock on it. Some growers conceal the entrance with a custom-fitted bookshelf door, large painting, or mirror.
Before you make a final decision on your grow area’s location be sure to consider that it MUST contain these elements to guarantee potent plant growth and maximum yields;
- Electricity – Enough power to run everything and safe and properly wired so no fires are started!
- Air – Fresh, and clean with carbon filter, co2 regulator, inline fan for grow room.
- Water – Easy access to water.
- Hidden – Minimizes the chance of theft or unwanted discovery.
- Ventilation – Has to be good
- Temperature – Cool area that stays above at least 60°F (15°C).
- Surrounding Walls – For reflecting and focusing “lost” light properly.


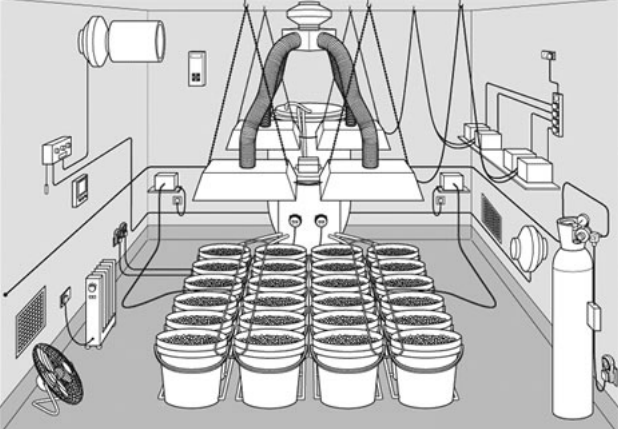
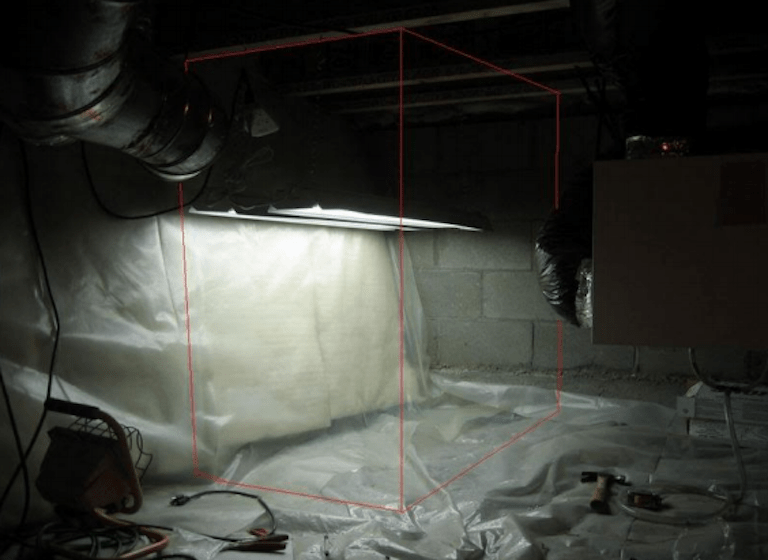
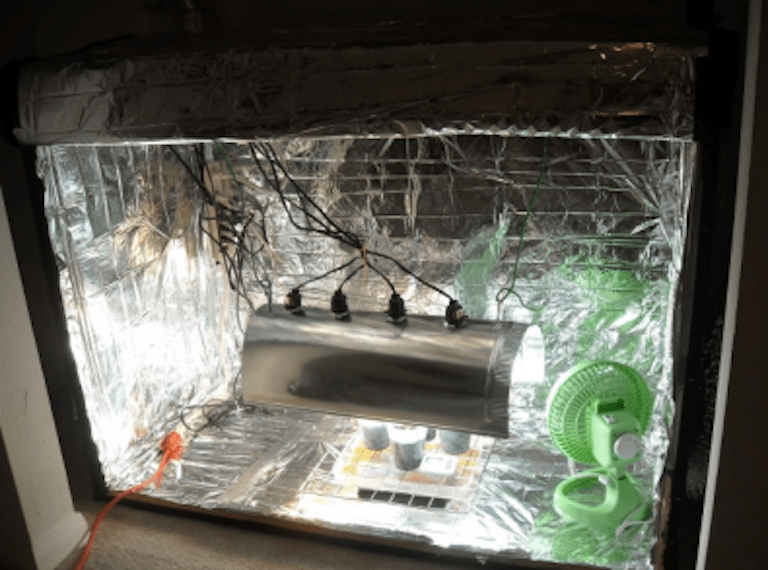
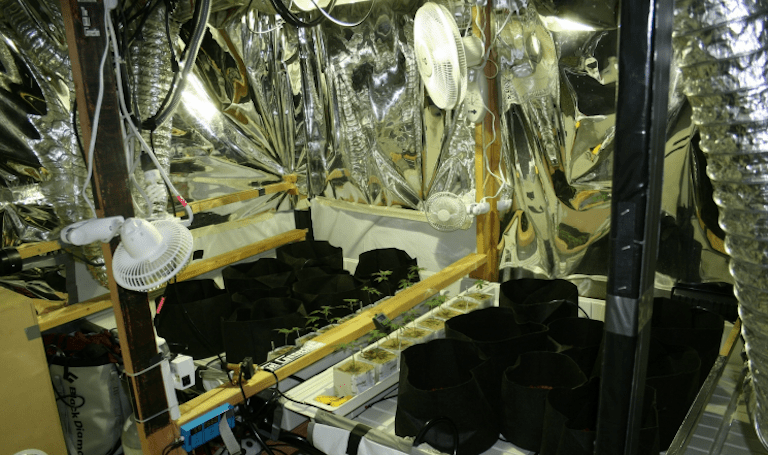
If you’re opting for farming marijuana aka needing MASSIVE indoor yields, your expert light proof grow room would probably consist of a 14ft x 24ft x 9ft grow area (L x W x H) containing several lights suspended from the ceiling. All the walls, flooring, and roof would be covered in reflective material such as Flat white or Mylar. Your ballasts would be attached to the wall. Your plants would be placed on the ground in large container buckets spread between the lights.
As far as ventilation goes, multiple air ducts and extraction fans would cycle in fresh air and suck out hot air. In order to eliminate the strong smell you would have an Ozone Generator as well. You would also have all the extra goodies like a CO2 Generator, Humidity controller unit, and a Light Rail. A Light Rail is a light mover that is suspended from the ceiling, your lights hang down from it, and it rotates the lights in a circular pattern over your plants. This allows fewer lights to be used in covering a large grow area such as this.
Note: If you plan on using a light mover it is strongly recommended that you use either 1000W or 600W lights. A 400W or 250W will under-light the environment when the light is tracking back and forth over a distance of 6 feet. A 1000W light is best when using a light mover.
Or maybe you are content with a small cabinet in your room, or desire starting off in a closet. Either way, I don’t want to limit you so now you see what is possible.
Your grow room is your room of possibilities. As you further refine your favorite hobby, you will learn to make the best of your grow space. Perpetual grow cycling is born. This is when you keep most of the room flowering at all times. This can be accomplished by having an equal number of plants flowering and in the vegetative grow stage. As you begin to learn more and more about plant genetics you can start to develop your own breed and stock. Soon you can find yourself entering competitions and producing fine quality seeds. Seeds sell for around $30 – $150 per 15 seeds. Your favorite hobby can realistically become a great source of a rich income for you (be sure to check your area for regulations and laws regarding the possession or selling of cannabis seeds!) The possibilities are endless! The sky is the limit!!!
Two Grow Rooms
Productive growers have two grow rooms/sections! One for vegetative growth/cloning and the other dedicated for flowering. This alternative to growing under a HPS or MH during vegetation is to set up a dedicated vegetative area, and a dedicated flowering area.
The vegetative area would use a cloning hardware or something similar that would allow seeds or clones to grow and two standard 48 inch fluorescent tubes, turned on 24 hours a day.
The flowering area would use a standard hydroponic garden set up with HPS and/or MH fixtures turned on for 12 hours a day.
The cool thing about this method is that while the flowering plants are going through their growth cycle [inside the hydroponic set up], the germinated seeds or clones will have a few months to develop inside the clone setup. Then after the flowering plants have been harvested, the plants in the vegetative area are ready to move to the flowering area. New seedlings or clones can then be started in the clone hardware (such as a cloner or something similar).
If electricity costs are a concern than you will probably want to go with this dual-room set up as electricity use will be about 25% to 35% less because the MH or HPS light is only on 12 hours a day. Since the flowering plants need absolute darkness during the dark phase, the light from the vegetative area can’t reach the flowering plants. So they need to be isolated, either by using curtains, a thick lightproof black cloth (or something similar), or by being
located far away from each other.
Note: The longer a plant has been growing in the vegetative phase, the faster it will flower.
The only problem with this grow room setup is the extra space needed for two different grow areas…
Opting for two grow areas, one for vegging and one for flowering (this can also be accomplished by placing a light barrier dividing your room in half), results in quick heavy potent yields. Black plastic works very well for a light barrier, just make sure you staple it and seal it properly. It cannot be stressed enough that when utilizing this grow setup to make sure the light from the vegetative room does not disturb the sleep from the plants in the flowering room!!!
Note: When stapling any type of plastic to flooring, walls, or ceiling, we recommend that you use a little piece of square cardboard between the plastic and the staples so that the plastic doesn’t rip.
Setting Up Your Grow Room
Now that you have decided upon your ideal growing spot, it is important to take care of it and keep it as clean as you possibly can. Design your indoor garden with care and planning. Decide beforehand how many plants you will have, how big you will grow them, the dimensions of your room, and how you will position the lights.
You’re going to need easy access to each plant, so leave yourself room to work. Also remember you will be using lots of water. And it is imperative that you keep any light leaks from the outside out. Cover up interior windows, cracks, or anything else that will show light from the outside. Having light leak is like inviting people to come into your grow room. Light leaks are unacceptable and greatly reduce security.
Cleaning
Plants a VERY susceptible to infestation and disease. Indoor gardens should contain only items that are absolutely essential for growing. Properly cleaning your grow area before beginning growing is a critical step to ensure long-term success. Do not overlook this section.
The first step is to clean your grow area before use. If you don’t clean your grow room, bugs and germs will invade it and sabotage your plants. This means you’ll need to scrub the walls, vacuum, clean all the equipment, and wash the floors etc etc etc. It is advisable to remove the carpets if you can. Remove ANY residue or debris that might include any form of insects, parasites or disease.
It is absolutely CRITICAL that you clean everything in the growing area then sterilize it with something like Lysol, bleach, or some other strong germ killer to prevent the marijuana plants from being harmed by germs, bacteria, molds, etc. Any dust or mildew is UNACCEPTABLE. Any carpets, drapes, or other fabrics can harbor dust, germs, and mildew so they must be removed.
Begin by cleaning the walls and floors with bleach and water very thoroughly. Scrub them until they are sanitary and clean. Pay specific attention to corners and any holes. You want your grow area to be like a factory where they manufacture microchips; a completely sterile clean germ-free environment.
Now this step is optional, but depending on where you live and where your grow room is (especially if it is an old attic) you may want to bomb the room with a pesticide smoke bomb depending if you have a pest or insect problem. These are available at most hardware stores. Follow the instructions very carefully on your product’s label and bomb the room accordingly. This will wipe out all pests, bugs, larvae, algae, eggs etc and any other nasty critters that will threaten your precious marijuana plants. After bombing clean the walls, floor, and ceiling once more to ensure a clean healthy environment for your plants to grow in. Air quality is a crucial factor in growing marijuana, you want to make sure no residue from the pesticide has been left on your walls, floor, or ceiling.
Never to bring anything that has been sitting outside into your clean grow room as you can bring in pests. Be sure to properly clean it with bleach first. Anything that enters your garden should be considered a potential threat to your plants. Fungus, bacteria, and bugs can come in on tools, equipment, clothing, and pets. Always wear clean clothes when entering your garden. Washing the walls with bleach weekly will help the prevention of fungus and bugs.
WARNING: Never enter your garden when being in contact with houseplants; as this the perfect, most common way to introduce the deadly parasite, “spider-mites” right into your garden.
Flooring
Next step after properly & thoroughly cleaning your grow room is to lay down plastic drop sheets (the ones used for painting, available at most hardware stores) on the floor. This will protect your floor from water. Watering your plants will create lots of spills. Cover up the bottoms of your plants with trays to catch excessive runoff water. Mop the floor frequently. Also if growing using soil, in order to keep the plants from touching the cold cement floor you can use cinderblocks/bricks with wood for raising up a stable surface to place the plant containers on.
Note: You may wish to cover your floors with a white plastic or similar material for maximum light reflection, this is discussed in detail in the following section.
It’s time to set up the surrounding walls, ceilings, and floors for light reflecting.
This will ensure your plants get as much direct light as possible, fueling their maximum possible growth. All areas of the grow room should be set up with reflective material. This is accomplished by painting a ‘flat white’ or setting up reflecting material such as Mylar. Mylar can be found in most hardware stores. The more reflective the walls, ceiling and floor are the better. Non-reflective surfaces will waste your light by turning it into heat. Mylar works the best for reflecting light!
WARNING: Do not use mirrors, as they absorb light!
Don’t use tin foil either. A good quality reflector will ensure all your precious light is being directed right at your plants for optimal absorption producing the highest quality potent big yields as possible. And remember, if you are going to paint the walls be sure to use FLAT white, as this is the most reflective. Regular white will NOT reflect as much light as flat white will, resulting in lower yields due to lack of sufficient concentrated light exposure.
Also to make sure light isn’t visible from the outside seal the inside of the windows with fire board and glue. Seal any cracks or unnecessary light leaks to keep the room as airtight as possible and to avoid any mold, fungus, or pests from getting in.
Choosing A Reflective Surface
Choosing the right surface for the walls of your grow room is very important, as up to 40% of your total yield comes from the edge – the right wall surface can increase the amount of light those plants receive by up to 30%! Artificial lighting diminishes exponentially with distance, so it is important to “contain” as much of this light as possible and direct it correctly. Reflective surfaces also help illuminate the lower portions of the garden, providing lower buds with light. This means big tasty yields as all your plants surfaces are getting concentrated light exposure.
To get the best results with your light and walls, it is important to get the walls as close as possible to your garden to ensure the least amount of light is wasted. The percentages provided are only useful as a general guideline, as they present the range of reflectivity of the particular surfaces. The high percentage presents the best possible circumstances for that material (for example a 99% reflectivity rating for mylar sheeting would be under ideal conditions – no creases, completely flat, no discoloration, etc).
The absolute best way to determine how well your grow room walls reflect light would be to purchase a light meter and measure your light directly; then take an opaque board and hold it a few inches off one of your walls with the light meter below the board in such a fashion that the light reflects off the wall and onto the light meter. You can then compare the difference between the two and determine a percentage from those numbers. The closer the two numbers are, the better your wall reflects light. It is important that in both measurements, your light meter is the same distance from the light, otherwise your results will be skewed.
Here are some of the most commonly used materials used for grow room walls:
Foylon:
A great solution for growers who are interested in long term use, and though it may be slightly more expensive than mylar, its durability will more than make up for its cost. It has the ability to reflect about 95% of the light (and approximately 85% of the heat energy, so a good ventilation system should be used in combination).
Foylon is a much more durable version of mylar, made of spun polyester fabric and reinforced with foil laminate. Foylon is resistant to most solutions, won’t tear or fade, and can be wiped or washed clean.
A recommended method to attach Foylon to the walls would be using Velcro, as it makes taking it down for cleaning much easier and reduces the risk of tearing, creasing or bending it. If this is used for your walls, making sure you get it flush with the wall with no pockets of air between it and the wall to prevent hotspots.
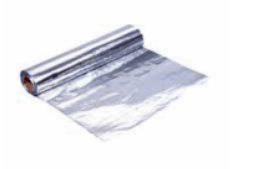
Mylar:
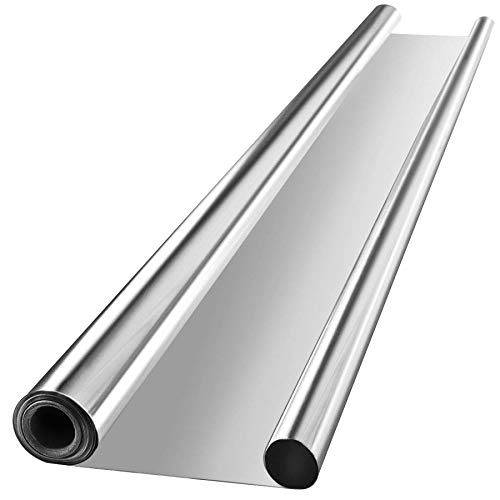
Mylar is a highly reflective polyester film- it is one of the best materials on the market for light proofing. It acts as a moisture barrier as well as a light reflector. It comes in varying thickness, the most common being 1 and 2 mm thick. The 2mm thick mylar while not quite as durable as the foylon, is still pretty rugged. The 1mm thick mylar tears fairly easily, so taking it down for cleaning is quite difficult without accidentally damaging it in the process. Both types of mylar are able to reflect approximately 92-97% reflective, giving it the potential to be more reflective than foylon. Foylon is more easily cleaned as well as it being harder to crease, foylon usually ends up being slightly more reflective.
Mylar reflects radiant heat energy just as well as foylon(around 85%), so proper ventilation is also necessary if mylar is used in your grow room. Attaching this to walls can be done in a similar fashion as foylon, and the same caution should be used to avoid creating hotspots in your room. The 1mm thick mylar stands a fair chance of being creased or ripped in the process unfortunately, even if Velcro is used to attach to the walls.
Mylar comes in several different types; White, Black, Metalized, Aluminized, Dimpled Metalized, and Threaded Aluminized (reinforced).
When choosing a lighting surface a grower is interested in the obvious, he/she wants to wrap their grow space, large or small, with the best reflective material available. Aluminized or Metalized Mylar is an ideal choice. Mylar can withstand temperatures of up to 392°F (200°C), Mylar is also electrical resistant and fire retardant.
Unlike foil, mylar lays flat without the crinkles and creases if handled with care. Mylar will not create concentrated hot spots.
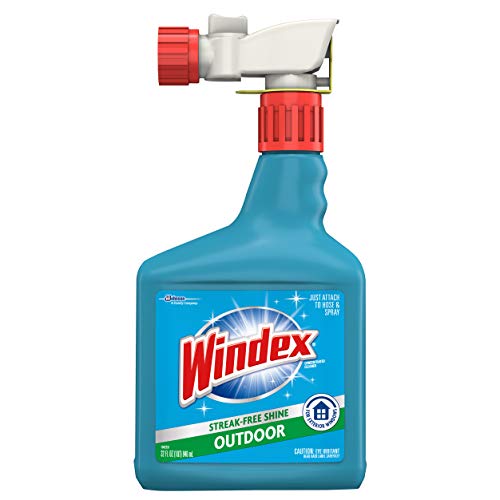
Mylar comes in many material Gauges. Most Hydroponic shops only carry 001″ and 002″ mil(which is all you need if your using as a grow room reflector). Mylar can be cleaned with Windex, alcohol or any other mild household leaner. An antibacterial hand soap with warm water is perfect.
C3 Anti-Detection Film:
A specialized type of mylar that exhibits the same properties as the 2mm thick mylar, but in addition to reflecting approximately 92-97% of the light, it also is 90% infrared proof, making your grow room all but invisible to IR scanning. This can also be attached in the same manner as foylon or mylar, and the same caution should be used to avoid creating hotspots in your room.
Flat White Paint:
As aforementioned, flat white is a great option for large grow rooms or for people who are interested in a low maintenance reflective wall surface. FLAT white paint has the ability to reflect between 75-85% of the light, and does not create hotspots.
Note: Adding a fungicide is recommended when painting in your garden.
Glossy, plain, and eggshell whites will not reflect light as efficiently as flat white. Semi-gloss paint for example, only has the ability to reflect between 55-60% of the light. Also important to remember when using paint is that any smears or blemishes on the surface take away from how reflective the wall is – extreme care should be taken to avoid marking or staining the walls. Titanium white paint is very reflective; however it is usually only used on reflectors due to its high cost.
Elastomere Paint:
A rubberized roofing paint with 90% reflection. Good for growboxes. Mildew resistant. Highly reflective.
“Poly” White/Black Plastic:
Poly plastic is useful if you are setting up a temporary grow room or don’t want to damage the walls. Plastic is easily cleaned. Black & white poly (6mil) is very tough, reflective(the white side reflects 90% of all light) and can be handled on a daily basis without damage or tearing. It is also a good choice for partitioning off spaces ensuring maximum efficiency of your lighting. The purpose of the black side is to not allow any light to pass through the plastic, which ensures your dark cycle remains dark. The white side is 75-90% reflective. Choose a 6 mil thickness of poly for maximum light blockage and durability.
WARNING: If plastic is put too close to the light it will melt!
Poly can be attached to the walls by using carpenter’s nails or using tape glue or any other similar means. This can be used as a cheap alternative to mylar or if painting your grow room is out of the question.
Styrofoam:
This is excellent for harsh environment growrooms such as an attic, provided you have a good ventilation system and a way to keep the temperatures from rising too high (an A/C unit or similar) as it is an excellent insulator.
It is also a great material for use in a temporary setup or for use as a “traveling reflector” on a light mover, where weight is a concern. It is approximately 75- 85% light reflective so it is comparable to using a flat white paint. Foam will not create hot spots. Rigid foam can be purchased in sheets, and can be used as a free standing wall or can be taped, glued or nailed to the wall, the last generally being the most successful method.
Emergency Blankets:
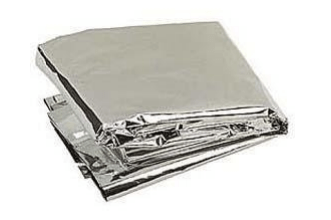
Emergency “Space Blankets” are ultra thin polyester blankets that are sold in most camping stores and are constructed of a single layer of polyester film that is covered with a layer of vapor deposited aluminum.
It is not very effective at reflecting light because it is so thin. Holding it between you and a light source, many small holes are noticed at the intersections of creases and the entire blanket is translucent to begin with, this coupled with the many creases that are in it when you purchase it takes away a significant amount of it reflectivity. It is very easily creased which detracts from its ability to reflect light. And while it reflects nearly 90% of radiant heat energy, it is only able to reflect around 70% of the light.
So why use it? The largest advantage of using this type of material is that it is very cheap and therefore easily replaced. But, emergency blankets can create hotspots if not attached flush to the wall so it is important that no air gaps exist between it and your supporting wall. The easiest way to attach this is to use tape (aluminum or metal tape is the best), as it tears very easily once it is cut or punctured.
Aluminum Foil:
Aluminum foil is no more than 55% reflective when it is flat. When it becomes creased its reflectivity is even lower (around 35%.) It is also very dangerous to use because it creates hotspots easily, is electrically conductive, and is a fire hazard when it is in close contact with HID lighting. This should only be used as a last resort.
….DO NOT USE FOIL UNLESS YOU ABSOLUTELY HAVE TO!
Watering Unit
An optimal method for watering is to place a 150 liter water barrel in the corner of your grow room. Fill it about 1/3 full of fresh water. You will want to add a water pump inside the barrel connected to a hose with a spray nozzle for watering your plants. Next add a circulation pump that you will provide a good mix of water and nutrients. This will plug into your garden hose and on the other end of it attach a water wand. Add also a breaker head to the end of your water wand, this will add air to your water mix, oxygenating the water just before it is supplied to your plants.
You may also want to add a heating device that will keep the water at a constant approximate 73.4°F (23°C). Make sure the barrel has a LID on it, as this will prevent any water from evaporating unnecessarily increasing the humidity of your room. This will also ensure that no unwanted debris falls in your water supply.
The concentration of calcium and magnesium indicate the “hardness” of you water supply. Water containing 100-150 mg of calcium per liter is fine. Reverse osmosis machines are the easiest most efficient machines available to clean raw water. This machine allows pure water to pass through it, and in effect it will filter out the dissolved solids from your tap water. This is the ideal water for your plants.
Note: Most of these materials are available at any hydroponic shop or local hardware store.
Setting up a Closet Grow Space Step-By-Step
Setting up a closet is a little bit different than setting up a large grow room, but, similar principles still apply:
Step 1. To start you need a small space – a closet roughly 2x5x6 (LxWxH) feet. Clean and empty it out as mentioned above.
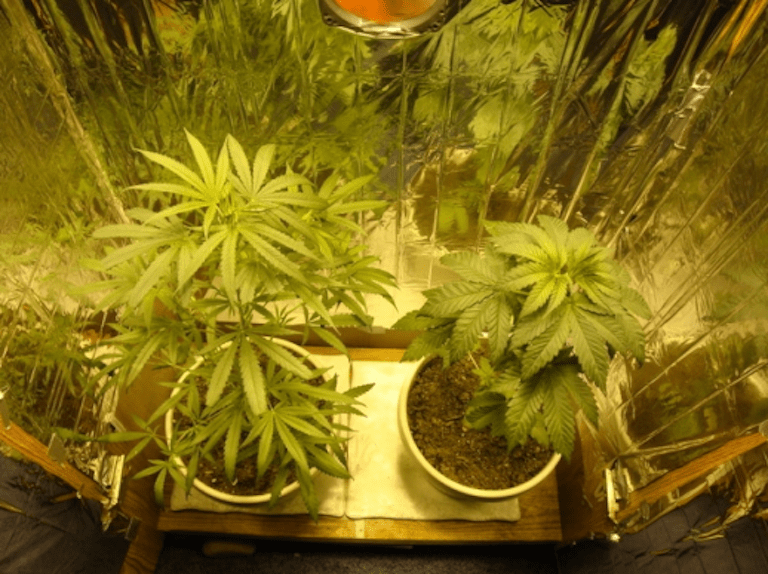
Step 2. Cover the walls, ceiling and doors with aluminized mylar, shiny side out. This saves light for the plants, ideally, the only light absorber in the room will be the plants.
Step 3. Next step is to put your lights in the room. Fluorescents are the cheapest and most readily available. This is the real advantage of fluorescents for the closet grower. For the professional, expensive metal halide and highpressure sodium lights give more light for less electricity. But these lights are overkill, and too damn hot for the amateur closet grower.
Step 4. Put either your hydroponic system in, or set up your containers (if growing using soil). Keep good air circulation using a ventilation system (check below).
That’s all there is too it!
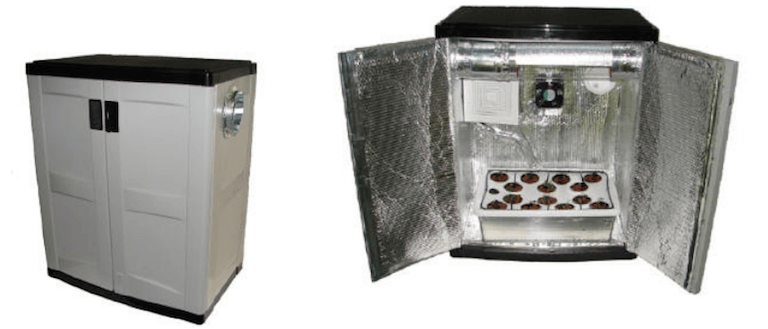
Cabinet Growing Step-By-Step
Cabinet growing is a great method, the goal being to keep a cycle of plants growing at all times. You can use anything ranging from a small closet, a hot press, and old refrigerator, a box, a press, or simply a cupboard or cabinet. Typically your grow area will be small accommodating 1 to 5 plants at a time.
Step 1. To get started you will want to get ahold of the cabinet, a light, and an air vent with a fan. Set up your light to be adjustable, you can use chains or some other type of non-flammable cord. Make a large hole in the unit to allow air to enter the unit, and another hole is created to allow air to escape. Place your fan in one of the holes that will serve it’s purpose of extracting the hot air generated by your bulb. It’s good to put the vent and fan at the top of the cabinet near the light. This is due to hot air rising and collecting at the top. You can also place a fan on the intake hole as well. Set your intake fan speed higher than your hot air removal fan so that constant fresh air is being pumped into the unit and stays longer.
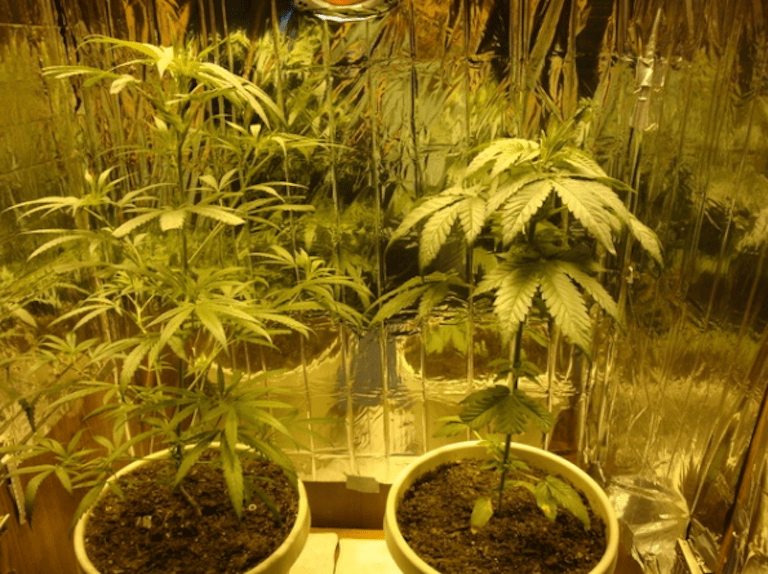
Step 2. As described in the reflective surfaces section, paint the walls a Flat White or use Mylar for reflective maximum plant light absorption purposes.
Step 3. Your plants (in separate pots) are placed inside the cabinet and will go through their entire life grow cycle inside the cabinet growing environment. Clones can be taken and placed on a second shelf inside the cabinet. Some people like to create a small compartment inside their cabinet for clones and germination. This compartment must be kept small, you only need enough room to keep the clones alive. Unless you are using a very big setup then you will not need an intake fan for the clones. All you’ll need is a hole in the side to allow the clones to breathe.
After harvest, place the clones in the grow room and repeat the process. This puts you up in a perpetual growing cycle. If using the right strains you are able to harvest 4 ounces of bud every 30 days. It really depends on how big you want to create your grow room.
We have seen 5ft x 5ft setups that have yielded 40 ounces of marijuana every 2 months. This can easily be achieved with careful maintenance and optimal grow environment conditions (mentioned throughout this guide).
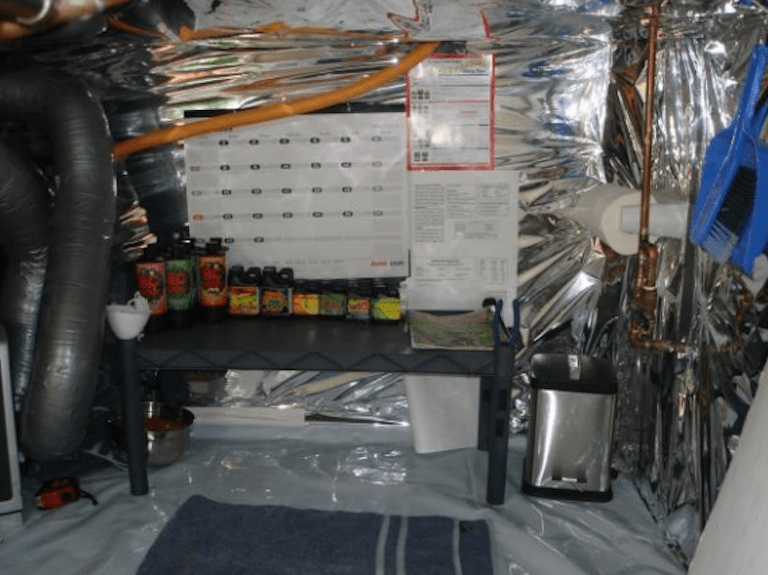
Stealth Growing
Many modern growers find it difficult to grow in large closets or huge grow rooms. But they still want to experience the incredible benefits of growing their own delicious supply of potent healing herb. So what do they do?
The answer is to grow in a stealth setup of course!
There are two options growers face, they can either spend lots of money, time, and effort and build their own homemade stealthy drawers / cabinets / whatever, or, they can purchase a pre-made professionally designed stealth growing box. There’s only a few companies who make good one’s right now.
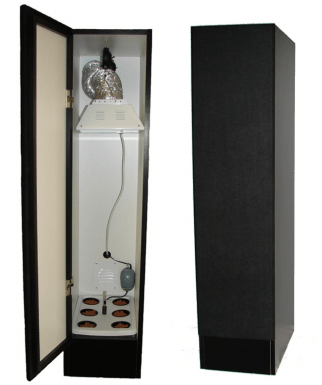
This turn-key PC Planter prototype is one of the most awesome stealth grow setups available to the 420 community today. This box utilizes Sea of Green so you can grow TWO plants in it from start to finish! It’s incredibly easy to operate, light-proof, and super discrete. This particular setup includes its own HID & odor eliminator!
PC Planter Benefits:
- Light Proof and completely discrete.
- Dimensions: 8.1″ x 20.6″ x 18.6″ (WxHxD)
- Secure turn-key locking system means only you get access to your plants.
- Custom made interiors have a 99% reflective surface for maximum light absorption by the plants.
- Includes ventilation system (100+ CFM of air cooling).
- Includes reservoir with 2 plant capacity.
- Grows over 1lb. of plant matter annually.
It may seem difficult, but it’s quite easy to build your own, you can create one from an old used computer case.
Some growers utilize garage, shed, and similar units too.

Finally, options for those growers who feel that lack of privacy is the only thing keeping them from harvesting pounds of their favorite greens.
Finally, options for those growers who feel that lack of privacy is the only thing keeping them from harvesting pounds of their favorite greens.
Making Your Own Effective Carbon Filter

A Carbon filter is great for reducing odors. They are attached to your ventilation system. Here is how anyone can make a carbon filter to remove odors for cheap. This is a very simple and effective unit that will work just as well as a commercial unit that costs $400+ USD dollars.
Supplies:
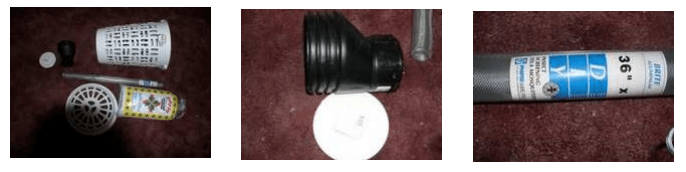
- 6″ pvc clean out cap available at any hardware store.
- 4″ to 6″ adapter (available at any hardware store) – you could substitute this with a 4″ to 6″ pvc adapter.
- A roll of aluminum screen (aluminum is better, not fiberglass; you need the strength of the metal to make it retain it’s shape).
- A roll of duct tape.
- A clothing hamper (you can probably find other suitable containers of varying sizes).
- roll of high loft quilt batting.
- A length of 4″ dryer vent hose.
Virgin Activated Carbon:
You can get carbon at most aquarium supply web sites – the bulk containers are best here. Kent marine or Esv brand is pretty good. Pelletized activated carbon in the 5 gallon bucket – 5 gallons should do at least a couple fills, which should last for years. You can use lignite-based carbon, but be sure to find “activated” and “pelletized” – it is much more effective than the crushed carbon.
Pelletized activated carbon has been crushed and formed into pellets, then washed in an acid solution to create millions of charged pores in the pellets. As air passes through the pellets, it attracts odor ions and particles. The carbon becomes “exhausted” when all the pores are clogged. Pelletized carbon has more available surface area than the crushed stuff, and becomes exhausted much more slowly. It can be found and most online aquarium supple outlets.
Construction:
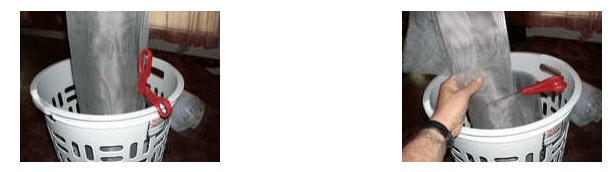
Wrap open the roll of screen around the PVC cap, then duck tape the cap in place. This serves to hold the screen open to the appropriate size for use.
Trim the screen roll down to the appropriate length for the size hamper you are using. Just eyeball it to be even with the top of the hamper rim – just be within and inch or two.
The next step is to insert the 4″ to 6″ adapter and tape it in place.
Now we need to wrap the tube we just built in some of the quilt batting. Unroll the roll of batting and double it over until it is the same length as the tube we have built.
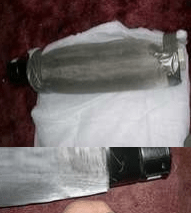
Here I show and the appropriate batting length for the hamper we are using – this means unfolding the batting one time after unrolling it; it is then conveniently cut to the right length.
Now tape the end to the screen roll the tube around till the batting overlaps just a bit and trim her off, then tape the batting up nice and clean.
Ok, now we need to line the inside of the hamper with the batting – the same fold size will work here also. Just wrap the inside and then tape it to the top rim so that it wont move around or drop down into the hamper during filling.
Now we can insert the tube we have just finished building inside the battinglined hamper basket. Hold the inner tube as you pour in the carbon between the two layers of batting. You can change the amount of carbon by simply wrapping the tube with more rounds of batting. This filter would probably use 7 pounds or so.
Note: a 26mm thick layer of carbon is considered an optimum thickness for smell removal and blower backpressure.
All we need to do is add a roll of batting to the top to close things off nicely.
Now we can cut out the top so that we can get the lid over the tube end. Stick the lid on and maybe tape it down if you need to.
Now we can attach out 4″ dryer vent hose and tape it in place. Attach the other end to a suitable air blower, and wha-la! – a clean fresh smelling room! Here is an example of taping a dryer hose to the output on a blower, but you can get blowers with flanges at most grow shops.
There you have it. Commercial-grade effective homemade carbon filter for eliminating ALL exiting odors in your grow room.
Environmental Conditions For Explosive Growth
Your plant should live in a stable temperature and optimal growth environment all day and night, in order to ensure highest possible quality smoke.
Oxygen
During your marijuana plant’s vegetative and flowering stages plenty of oxygenrich fresh air is required for vigorous growth. Always keep a window open to refresh the air quality in your grow room each day. Between watering (dry periods) your plant’s roots need to breathe. If you’re growing in winter time the cold air can inhibit growth, so keep the air recycling exposure time to an absolute minimum.
If your grow area is enclosed then you will need to get some sort of fan / ventilation system to suck out the old stale air and pump in fresh air. Fresh air surrounding your plants also tricks them into thinking they are in an outside grow environment, so consequently your buds will grow bigger and faster.
Air Ventilation
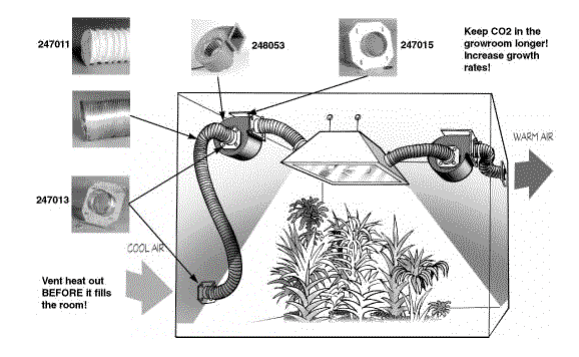
No indoor garden can be without a ventilation system. Heat is the biggest problem for the indoor grower; that is, maintaining the proper temperature for the plants. In order for plants to thrive they need a constant supply of fresh air. Each average 1000w light increases the room temperature by 10-15°F (-12.2 to -9.4°C). Proper ventilation is essential for healthy thriving plants. Make sure your vent fan is strong enough to produce a pronounced suction effect in your grow chamber. A room with an exhaust fan on the ceiling is a good choice (if that is available to you). The exhaust fan on the ceiling will help keep the temperature cool, and if needed, you can upgrade to a stronger fan to remove a larger volume of hot air created by the grow-lights. This will keep your room nice and cool – the ideal growth environment for growing dank buds.
You can install a thermostat and a ventilator system so as soon as the grow room gets too hot, the thermostat will switch on the ventilator to cycle out the hot air. A constant flow of fresh air must be available to the plants. All hot, stale air should be ejected to outside the grow area and not be immediately recycled (hint: vent it outdoors, preferably high up!) Make sure your fan is up, over the plants to collect the hot air that rises. If using an air intake, it should be positioned low to the ground to pump cool air into the chamber.
Note: It is advisable to place filters on your ventilation system, as this will block out any unwanted odors from escaping. Carbon coal filters are very good.
 You can also position an oscillating (rotating) fan so that it is blowing directly over the tops of your plants, cooling the area between them and your light. You may also want to have an additional fan blowing air below the buds. Both fans should be positioned so that they receive incoming air from outside the chamber and blow towards the ventilation fan. The oscillating fan will also assist in thebuds developing thicker stalks and stems when a constant gentle breeze is applied.
The reason fresh air and good ventilation is a MUST, other than heating removal reasons, is it is required to replace the oxygen supply to the plants due to their constant carbon dioxide expulsion. Cycling clean air into the grow area is an absolute necessity if you want to ensure maximum yields. Every grow room will need some sort of exhaust fan to move hot stale carbon dioxide-saturated air out.
Intake areas should be clean and dust free. Air intake and outtake areas should be as far away from each other as possible to promote maximum air circulation. Place intakes as low as possible and outtakes as high as possible. This is the best way to cycle air and remove the heat buildup caused by lights. (A squirrel cage fan attached to a dryer hose makes for a good cheap ventilation system.)
Note: If grow lights heat is a major concern, you might want to consider checking out Cooltubes.
How Much Ventilation Is Needed In a Grow Room
Each fan has a rating that tells you how many cubic feet of air per minute (CFM) it will move. When dealing with average temperatures you will want your fan to exchange the grow room air 3-5 times in one minute, so for a room that is 40 cubic feet, a fan that is capable of moving 120-200 cfm (cubic feet per minute) is recommended. If you only want to replace depleted levels of CO2 and are growing in a closet using fluorescents, one room change per five minutes (divide room size by 5) will be adequate.
To calculate your room size, multiply Width by Length by Height, this will give you the CFM rating required for one room change per minute.
Air that’s exhausted will be replaced by fresh air, which is drawn from Passive Intakes – located opposite the exhaust at the floor of your grow room(recommended for closet grows) or forced in using another blower (recommended for larger grow rooms). For internal circulation oscillating fans are the most efficient devices for circulating air in a room. The gentle back and forth sway of the fan is very beneficial for the developing plants. These fans keep mold down. Home improvement centers carry a large array of various types and styles of air-moving fans, there are wall-mounted styles available and most are relatively inexpensive.
So make sure that you have a highly effective exhaust system. You will want to make sure your exhaust fan is rated for high CFM under pressure. All fans will have a CFM rating, this rating is how many cubic feet of atmosphere the fan moves per minute. Your exhaust fan should be capable of evacuating your grow room at least once every five minutes. Multiply the width, height, and depth of your room to determine the total cubic feet, divide this number by five and you will have the minimum CFM fan rating needed. Of course this assumes the fan maintains its CFM under pressure and actually performs to specifications. In practice this doesn’t happen.
It is best to overshoot this rating as much as your budget will allow. Even if your fan does perform to specifications pulling more air through will help keep the temperature of the room down and exhaust the heat from powerful fans. Generally squirrel cage and duct fans are used for exhaust systems. These fans can be connected to 4 inch and 6 inch flexible ducting that can be used to route the air where you want it and to pull air through a carbon filter. In addition to your exhaust system you will need an air intake. For many systems a passive intake is used, simply providing a channel for fresh air to enter the grow room to replace the air being exhausted. For a larger area or longer intake line you may need an active intake. Providing an active intake relieves pressure to allow the exhaust and intake to share the workload of air exchange. Otherwise the exhaust fan must provide the force required to pull air into the room as well as the force required to exhaust.
To convert CFM to CMH use the following formula CFM X 0.03 X 60 = CMH.
In a small closet where there are only a few plants you can probably create enough air circulation just by opening the door to look at them. Although it is possible to grow healthy looking plants in poorly ventilated rooms, they would be larger and healthier if they had a fresh supply of air coming in. If you spend a lot of time in your growing room, your plants will grow better because they will be using the carbon dioxide that you are exhaling around them. It is sometimes quite difficult to get a fresh supply of air in to your growing room because your room is usually hidden away in a secret corner of your house, possibly in the attic or basement. In this case, a fan will create some movement of air. It will also stimulate your plants into growing a healthier and sturdier stalk. Often times in an indoor environment, the stems of plants fail to become rigid because they don’t have to cope with elements of wind and rain. To a degree, though, this is an advantage because the plant puts most of its energy into producing leaves and resin instead of stems.
Temperature
 Correct temperature is extremely important. Carelessness when monitoring and maintaining temperature levels can cost you ounces of bud. Ideally place a thermometer near your plants (on the containers) and one on the wall of your grow room. Night temperatures should be kept properly to prevent stress. It is preferable during flowering to have a night temperature drop to stimulate flowering hormones and reduce stem elongation. Remember that you always measure the temperature in the shade, and not in direct light.
Temperatures should be between 70-80°F (21-26.6°C) when the light is on. When the light is off the temperature can drop to the low 60’s°F (15°C) and have no negative effect on the plant. The temperature should never go below 60°F (15°C) or above 90°F (32.2°C) (even for short periods) or growth will slow down. If these extremes are exceeded the plant may be permanently damaged or killed. Your goal is to try and keep your grow area temperature around 70-80°F (21- 26.6°C), as this is the ideal growing temperature that marijuana plants thrive in.
Either too hot or too cold and your plant’s growth will be stunted. If it is too cold then crank up the heating, if it is too hot then open a window and use the above mentioned methods such as fans/ventilation systems to cycle in fresh new air.
Keep daytime temps below 85°F (29.4°C), ideally about 75°F (23.8°C). Nighttime temperature should drop a little to about 68-72°F (20-22.2°C). If larger temperature drops are a problem, run your vent fan all night or intermittently throughout the night to expel moist air. If you don’t have to run your vent fan all night, don’t allow it to come on until about ½ hour after the light so that the plants can absorb all the CO2 they released at night. This will accelerate growth a bit.
In some situations, a heater or air conditioner may be required to keep temperature levels in check.
Raising temperatures will cause faster photosynthetic processes(to a point). However, temps above 72°F (22.2°C) will also cause the unwanted stretch, which significantly lowers productivity later down the track. If you are growing a seedling for the purpose of checking the sex, it will however be a good thing to keep the temperature up a bit. But make sure you do not burn the plants in the process (and you probably will if you go over 82°F (28°C)). It is preferable during flowering to have a night temperature drop of 10-20°F (-12.2 to -6.6°C) to stimulate flowering hormones and reduce stem elongation.
Humidity
Low humidity causes stress on plants. Keep humidity levels at 50-60% humidity until the final 2 weeks of flowering. At this point, the humidity should be lowered as much as possible to encourage the plant to seal and protect itself with additional resin (some growers are able to get the humidity to go as low as 32%). Utilizing this method you can be sure to frost your buds up considerably this way. The higher humidity levels prior to final ripening reduce salt levels within the plant tissue and encourage healthy, more lush growth.
If the temperature in your grow room raises too much, the humidity will increase and the plants are susceptible to mold. The lower the temperature the less moisture the air can hold. When temperature drops, humidity rises. It really is that simple. Low humidity cause stress on plants. Low humidity causes stress on plants. Humidity should be between 40-60 percent relative humidity(rH). Humidity is simply the amount of water in the air. This is the range that marijuana grows best in. Use a hygrometer to measure humidity if you think your grow area is out of range. A humidifier can increase humidity and a dehumidifier can be used to lower humidity. You can also use fresh air to regulate humidity levels as well. To measure humidity you will want to use a Hygrometer (an extremely important essential instrument for your grow room). This will save you plenty of money and frustration from fungi destroying your plants. Some hygrometers have built in thermometers to measure the temperature.
Ideally you will want rH (relative humidity) to be kept at ~50% during flowering and at approximately 60-65% during vegetative growth.
Increasing Humidity: To increase the humidity in the air, simply spray the air with a spray bottle, or you can let a bucket of water evaporate in the room (place it near your lights). One of the survival adaptations the cannabis plant has when grown in a dry climate is that it will actually increase the resin all over the plant in order to keep it from drying out. This is why it is important to maintain proper atmospheric humidity levels in your grow room to ensure potent bud.
Decreasing Humidity: Humidity can be reduced in three ways:
- Dehumidifier/AC: this is the best option as it’s completely controllable. The downside is that dehumidifer’s create heat, use lots of electricity, and take up space.
- Desiccants: these are hygroscopic substances that absorb water. For your purposes, a desiccant will be absorbing the humidity in the air. Desiccants are a poor choice because they need to be replaced often and the rate of absorption is only a function of exposed surface area of the desiccant rendering the use of desiccants in the growroom largely uncontrollable. While desiccants are cheap initially, repeated usage and purchases will eventually become expensive. Silica gel, calcium sulfate, and montmorillonite clay are commonly used desiccants.
- Air Movement/Ventilation: Air movement is a great choice to reduce humidity especially if the relative humidity outside your grow room is low. If this is the case, adding active intake and exhaust (if you do not already have this) will reduce your humidity relatively cheaply and effectively. In addition, most growers must use ventilation irregardless of RH issues to control temperatures. The only downside to ventilation occurs in sealed environments where direct ventilation is not feasible because of the use of CO2 enrichment.
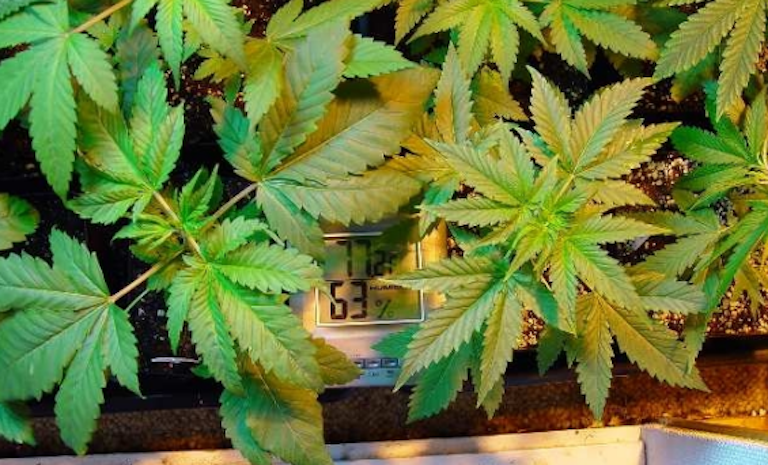
Measuring Humidity
To measure these levels, be sure to keep a hygrometer and a thermometer in the the drying area very close to the plants. A hygrometer allows you to keep tabs on the relative humidity level in the room and a thermometer will display the temperature. Some hygrometers have built in thermometers so you can measure both temperature and humidity at the same time.
Depending on the time of year and your current location, a heater or an air conditioner might be necessary to adjust the temperature. To control the humidity levels a dehumidifier can lower the humidity and a humidifier can be used to raise it. There are two types of humidifiers – warm mist and cool mist. A warm mist humidifier raised the temperature while a cool mist humidifier doesn’t affect the temperature at all. There are also humidifiers that allow you to switch between a warm or cool mist. If you’re going to purchase a humidifier, be sure to take your climate into consideration and then go ahead and buy an appropriate humidifier to suit your individual needs.
Warm mist actually heats up the water and releases warm humidity. Cool mist water isn’t cooled, it just means that water is not heated. In most cases a cool mist works best. If you’re not sure and want to be safe then go ahead and grab a humidifier that lets you switch between warm and cool mist.
Your Grow Room Checklists
Be sure to print the following checklists out (and follow them) to ensure a successful, abundant, healthy harvest!
Daily Grow Room Checklist
Light
- Check all your lights, timers, and power. Make sure everything is working properly and safely.
- Make sure your bulbs are burning bright and do not need to be changed out (every 4-6 months is best). Check to see if your bulbs and hoods are clean and clean them accordingly.
- Check your light’s distance from your plants so they are getting proper amounts of light but not getting burned.
- Make sure all electrical cords are all plugged in completely.
Water
- Check your hydroponic system (if using) to ensure the pumps are working and your plants are being fed. Check timers and powerheads.
- Check the H2O levels in the reservoirs. H2O evaporates, not the nutrients. To maintain a consistent mix add only H2O.
- Completely change out water and nutrients every 2 weeks!
pH levels
- Check pH levels in the reservoir/nutrient solution, making sure it is as close to 6.0 as possible.
- Monitor the EC (or ppm in North America), aka the strength of your nutrient solution to make sure it is correct.
Temperature
- Keep daytime temps at 75°F (23.8°C). Nighttime temperature should stay between about 68-72°F (20-22.2°C). Too cold or too hot can severely stunt growth, or even kill your plants! Keep these ranges will ensure your fastest, most abundant growth with the least problems. At night your temperature can ideally drop by 15°F (-15°C), and even up to 10°F (-12.2°C). BUT NO MORE THAN 10°F (-12.2°C), EVER! This will slow your growth greatly. So daytime keep the temperature 70-75°F (21-23.8°C), and at night 60-70°F (15.5-29°C).
Air
- Airflow. Make sure all fans are working correctly and air is being pulled properly.
- CO2/other. Make sure your system is running properly at the proper environmental levels, regulate if needed.
- Check any air fresheners/odor elimination systems.
Humidity
- Too much humidity causes moldy bud rot! Keep it at 40-50%
Circulation
- Make sure the plants are moving a little bit and getting a nice oscillating breeze.
Other
- If growing in soil, rotate (turn) your plants each day. This will ensure they get maximum light exposure. Also check for dry pockets and water accordingly.
- Check for pests and fungus or any other plant diseases/abnormalities and handle accordingly. Check the the leaves surface as well! Especially check for spider mites under your leaves. These will make little webs.
- Cleanup your grow area! Remember, act as if you were manufacturing microchips in there.
- Make sure everything is working.
Your Weekly Grow Room Checklist
(Including everything you should be doing daily)
- Make a supplies list so you never run out of important supplies.
- Fill your reservoirs (filling may need to be done more than once a week).
- Air Ventilation/Circulation.
- Check soil for dry pockets, water as needed.
- Rotate (turn) plants.
- Check pH.
- Check for fungi, nutrient deficiencies, and other plant problems (especially spider mites under leaves).
- Check grow area for mold.
- Clean!
Your Monthly Grow Room Checklist
(Once a month schedule a thorough cleaning. This is the time when you should clean up and sterilize your equipment and grow room.)
- Vacuum
- Organize and clean your room, pick up any loose tools or anything else
- Clean your trays, pots, etc to avoid nutrient buildup
- Change reservoir formula
- Flush your moms with a gallon of plain water
- Dust light covers
Advanced Grow Setups
So now that you have a good handle on the critical foundational elements required when growing marijuana I would now like to show some “advanced” grow setups I have discovered for improving your plant’s yield and quality.
In order to achieve this, our primary objective is to implement advanced growing methods that allow us to grow really really big top colas (a cola is a group of buds). The basis of this theory is that the bottom branches of an indoor cannabis plant do not absorb much light from the HID, & they’re also a crappy smoke primarily due to them being fan leaves. So with the methods below this allows us to focus on maximizing the growth of the top part of the plant. The top cola is the part of the plant that produces the most bud, so here we are going to use the following methods to get that part of the plant to grow really big.
How far you take the below methods are completely up to you. We have seen some growers fill entire grow rooms with these advanced growing methods outlined below. Build your own garden to satisfy your heart’s desire and to accomplish all your marijuana growing goals and dreams.
Sea of Green (SOG)
Sea of Green (SOG), originally developed in Holland, is the method of harvesting lots of small plants, matured early to get the fastest production of buds available. It is a technique whereby you grow a far greater number of smaller plants rather than a small number of large plants. Usually clones are used for uniform growth characteristics and each plant is trimmed so that only the main stalk grows. The sea of green method was developed to maximize the speed of cannabis growing in limited height situations. In a typical sea of green setup of this type, clones are planted at densities as high as 9 per sq. ft. Instead of growing a few plants for a longer period of time in the same space, many smaller plants are grown that mature faster and in less time. Thus, less time is required between crops.
One crop can be started while another is maturing, and a continuous harvest year round can be maintained. 4 plants per square foot will be a good start for seedlings. 1 plant per square foot will allow plenty of room for each plant to grow a large top cola, but will not allow for much bottom branching. This is OK since indoors these bottom branches are always shaded anyway, and will not grow very well unless given additional light and space. The indoor grower quickly realizes that plants that are too tall do not produce enough at the bottom to make the extra growing time used worthwhile. An exception to this rule would be if it is intended the plants are to go outside at some point, and it is expected that the light or shading issue will not be a factor at that point.
The plants, if started at the same time, should create what is called a “green canopy” that traps most of the light at the top level of the plants. Little light will penetrate below this level, since the plants are so close together. The gardener is attempting to concentrate on the top of the plant, and use the light and space to the best advantage in as little time as possible. Use of nylon poultry fence or similar trellising laid out over the green canopy will support the plants as they start to droop under the weight of heavy fruiting tops. Stakes can be used too, but are not as easy to install for plants in the middle and back of the room, where reach is more difficult. It’s easy to want big plants, since they will produce more yield per plant, but it’s usually better with limited space to grow smaller plants that mature faster and pack into much more smaller spaces.
Instead of fitting 4 large plants in that small room, you can fit 12 small ones on a shelf above 12 other small plants. These plants take only ~3 months to mature from germination to ripe buds, and harvesting takes place constantly, since there is both a vegetative and flowering area devoted to each, with harvests every 45-60 days. It’s not the size of the plant, but the maturity and quality of the product that counts. Twice as many plants grown half as big will fill the grow space twice as fast, so harvests take place almost twice as often.
You’ll need to get good at picking early flowering plants, and propagate only those that are of the best quality. 6″ square containers will allow for 4 plants per square foot. You may also gauge by the size of your growing tray (for passive hydroponics).
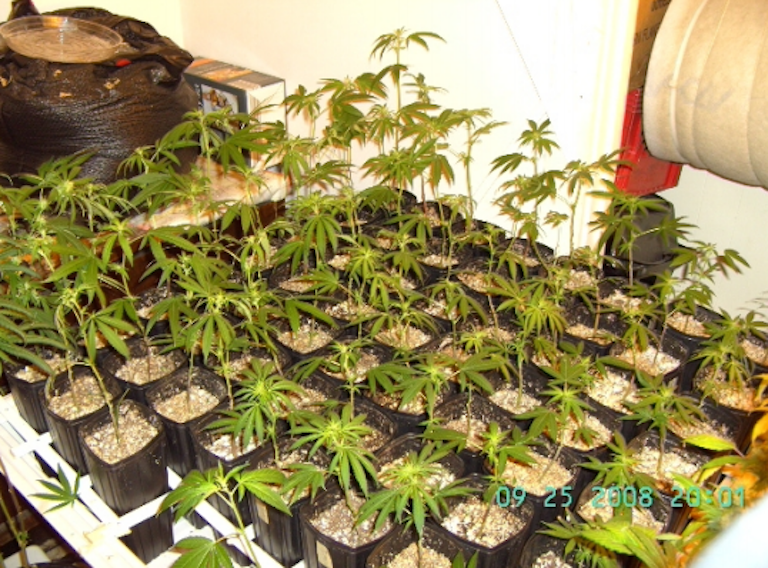
Planted 4 per square foot, (for vegetative seedlings) a 12 sq. ft. closet will hold 48 seedlings on one shelf. For example you can use 4″ rockwool cubes that fit into catboxes @ 12 cubes per box. You can get 5 boxes onto a 12 sq. ft. closet upper shelf, so that is 60 seedlings on one small shelf!
For flowering indoors, 1 plant per sq. ft. is a good rule of thumb for SOG. If less plants are grown in this size space, it will take them longer to fill the space, thus more electricity and time will be used to create the same amount of product. If more than one plant per square foot is attempted, the grower will soon find that plants crowded tend to be more stem than bud, and the total harvest may be reduced, so be cautious.
Also, “training” plants with twist-ties is a great way to get them to bush out a bit. Just take any type of plastic or paper twist tie and wrap it around the top of the plant, then pull it over until the top is bent over 90-180 degrees and then attach this to the main stem lower on the plant. Do this for one week and then release the plant from it’s bond. The plant can be trained in this fashion to take less vertical space and to grow bushier, to fill the grow space and force lower limbs to grow upward and join the green canopy. This technique takes advantage of the fact that if the top is pulled over, it creates a hormonal condition in the plant that makes it bush out at all lower internodes. Sea of Green entails growing to harvest the main cola (top) of the plant. Bottom branches are trimmed to increase air flow under the “blanket” of growing tops. Use these cuttings for clones, as they are the easiest part of the plant to root.
It’s also the fastest part of the plant to regenerate after flowering has occurred.
What happens to the planted clone?
The clone could just sit there, stretch a bit under the light regime, and flower, producing a tiny little bud with a couple of seeds. But that rarely, if ever, happens. Instead the clone takes off in a rush of growth, forming a woody main stem and branches. If the plant is suitable for sea of green growing, it will stop short of the lights and flower. Most indica dominated plants stop short enough to be grown using this method. That process is at the heart of the sea of green method, as it results in the smallest possible plant flowering in the quickest possible time.
Note: SOG plants are really just “an apple on a stick,” that is, the main cola, and perhaps a side bud or two, are cultivated.
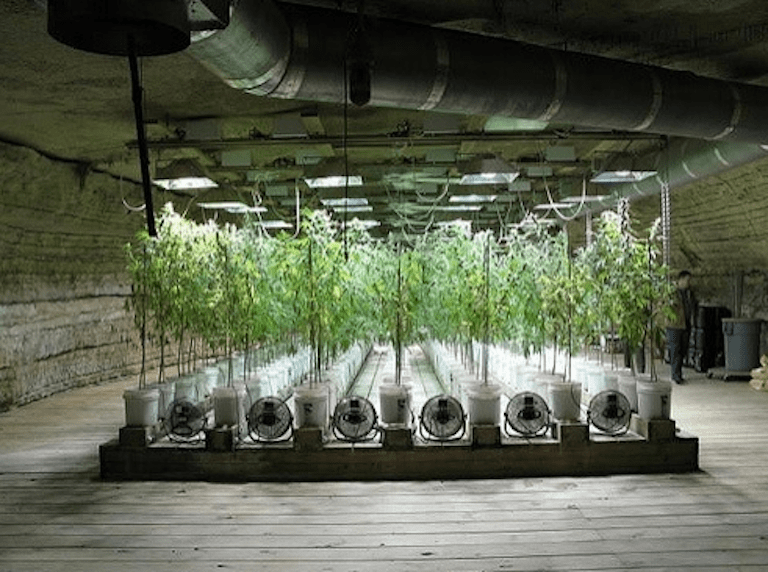
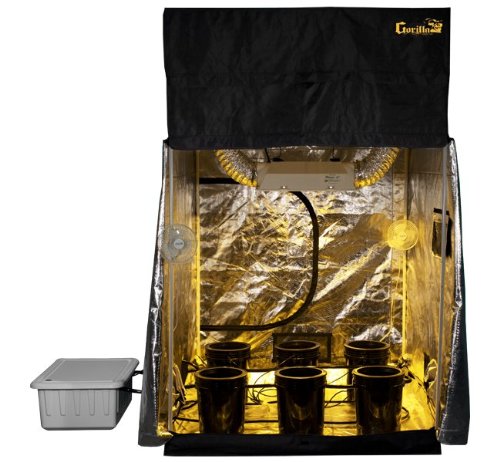
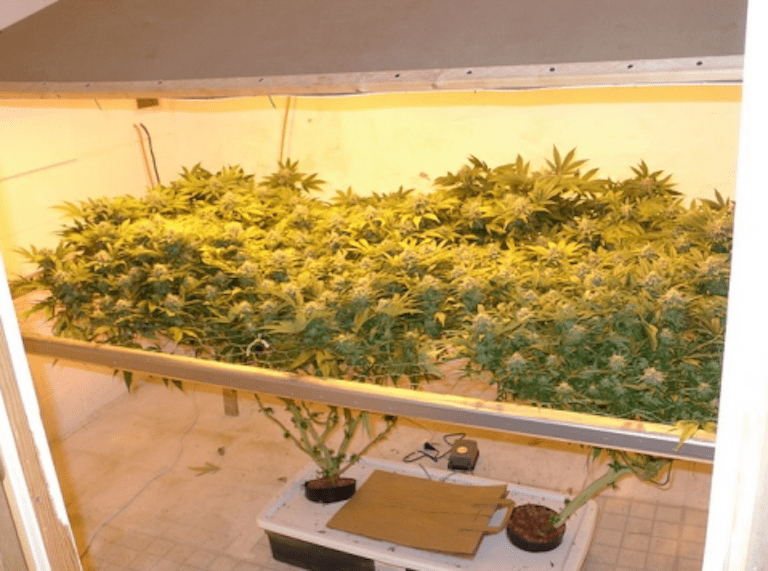
This image is of a standard SOG grow:
Conclusion: The Sea of Green method was developed to maximize the speed of cannabis growing in limited height situations. You won’t get that much marijuana out of each plant. The SOG grow is one which presupposes mother selection, and is not suited for seed grows since height variations, and variation in general will be detrimental to yields. Ideal strains for SOG setups are topcola-dominant strains that do not have heavy side branching and tend to dedicate most of their energy to a top shoot. Heavy branching will end up interfering with the neighboring plant, and ultimately, will effect and reduce your yield amount. In order to avoid this, you must use clones from a mother plant that has proven to produce uniform cuttings and whose growth pattern is optimal for a SOG environment. In other words, a SOG setup is not something you can pull off on your first time around with seeds. Select a mother carefully, and your SOG will do VERY WELL this way.
Screen of Green (SCROG)
ScrOG is like a SOG grow except that fewer plants are used in conjunction with a screen to fill the grow area with heavy top colas, hence its name; ScrOG or Screen of Green. The screen is simply a large wire mesh placed between your light and the plants. Again, clones from a female plant are used, but we allow at least one square foot per flowering plant in the ScrOG method. The plants aren’t flowered until they have covered the entire mesh with green. As the plants grow up through the wire mesh they’re trained and worked around the netting to form a very even canopy. The top colas and side branches are all trained under the screen.
You can use 2” chicken wire or 2” nylon poultry fencing for the screen. Placement of the screen depends on the size of the light you are using. The height placement can range from 8” to 24”. The light needs to be hung by chains so it is adjustable.
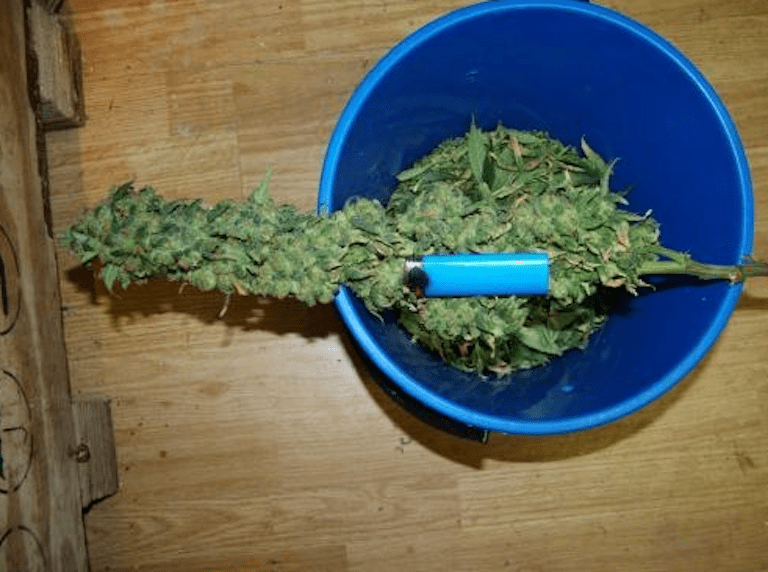
The plants then are not flowered until they have covered the entire mesh with green. As the plants grow up through the wire mesh from their tray they are trained and strategically worked around the netting to form a very even canopy until they are 2 weeks into the Flowering cycle. The top colas and side branches are all trained below the mesh. This setup using HID lighting seriously pushes your buds to the limit. I have seen other growers grow top colas the size of large 1 Liter soda bottles!
After 2 weeks into the Flowering cycle, allow the tops to grow vertically through the mesh screen. As the tops grow vertically, make sure to push away the fan leaves down under the mesh. This allows light to reach the developing bud sites. If your leaf growth is dense, cut the finger in half making a shorter leaf and allowing light to reach the bud site. DO NOT FULLY CUT THE LEAVES, leaving half the leaf on the plant allows it to still absorb light and make energy for the plant to grow and flower at it’s maximum potential. If you remove an entire fan leaf right away you can severely stunt your plant’s growth. Now you should be at the exciting stage of growth when the flowers are forming and growing vertically, creating a canopy of bud above the screen, or in other words, a Screen of Green.
Now it’s time for some maintenance. Head below the screen and remove all the lateral branches (hopefully not many!) and stray bud sites. The canopy should be so thick at this point that it blocks most, if not all, the light from reaching the lower growth. The lower growth is only leeching your plant’s precious energy from the buds growing above (getting lots of light). The goal here is to get all the plant’s grow energy concentrated on developing the flowers above the canopy for MASSIVE yields and MAXIMUM THC CONTENT.
There are other variations of Screen of Green and Sea of Green, but the above is the most commonly used, and is generally the backbone to all other variations.
A good Screen of Green grow will produce 2 ounces of bud per square foot of screen, possibly more! It takes the right kind of strain and environment to do this in though so don’t be discouraged if your yields aren’t close to this, if you have been following this guide you will be able to grow this much in no time! The #1 strain I recommend you use for Screen of Green is C99. There are other great ones too. Aim for a pure Indica or Indica dominant cross, this will grant you the most yield in a Sea of Green.
When a length of poultry netting is stretched over the grow area, it eliminates the need for conventional training. Tying, bending, and crimping are replaced by using the netting as anchors to keep shoots in position. It can also be perfectly shaped to make best use of the light. The netting is known as the screen, hence the name Screen Of Green.
Plants are topped to promote branching, as the plants grow into the screen and their shoot tips start to grow through the holes in the screen, they are pulled back under the screen and guided to the next hole to continue their horizontal growth. All the time maintaining the profile of the screen to maximize light use. Growth is very robust. While now getting the same light intensity as the primary shoot tips, secondary growth seems to blossom, and from the secondary growth comes tertiary growth, etc. All at the top of the canopy, and all receiving maximum light intensity. How many plants are used depends on how much time the grower wants to take to fill the screen to a point where it will be full with buds at harvest. This will largely depend on the growth traits of the variety he uses, but one can fill a canopy with only one plant if desired.
When flowered, only the slow growing buds are allowed to grow through the holes in the ScrOG. The resulting harvest profile is indeed a Sea Of Green but with much fewer plants and the increased yields gained from making use of the void spaces found in a conventionally trained, non-SOG canopy.
There are many variations of the above method, yet they all utilize the same principles. SOGs and ScrOGs were originally developed to get the most out of poor quality fluorescent lights. The grower would line the roof of the shelf or box with fluorescent tubes to try and get the most out of their grow. Today’s growers, using good HID bulbs, have taken these setups to a new level: pushing their buds to the limit. Some people even grow top colas that are the size of large corncobs or soda bottles!
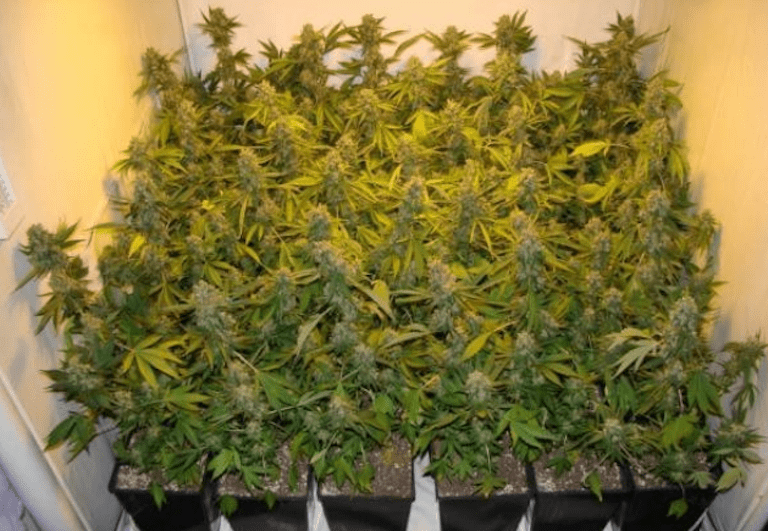
Here is an example setup; it is like a SOG growing, but a screen is used to train the plant to grow horizontally, creating a canopy of buds beneath the light. The screen is simply made from chicken wire or nylon poultry fencing, or you can use hooks and 20 lb. fishing line to make the net.
This picture shows another ScrOG variation:
The screen is installed at a fixed height above the plant medium. For Indica strains the screen does not need to be much more than 8 inches above the pots. Indica Saliva hybrids need about 12 inches white Sativa plants tend to have longer internodes so you may have to use a screen that is about 18 inches above the pots. If your strain is a pure Sativa variety, like Haze or Thai, you may have to raise your screen to around 24 inches. This space allows the base of the plant a certain amount of vertical growth before branching occurs on the clone. The clone should start to branch just under the screen but if it does not do not worry because you are going to be training them anyway. The light should be suspended by adjustable chains so that it can be raised if necessary.
ScrOG growing doesn’t require as many plants as SOG (allow at least one square foot per flowering plant), but takes anywhere from one to three weeks longer per grow because we will be in the vegetative growth stage longer than a SOG grow to allow the plants to fill out. The plants are trained to grow horizontally under the screen until they’re two weeks into the flowering cycle, at which point you let the tops grow vertically through the screen. You should always train the main growing tops from the outside of the screen moving
inwards so that the colas are focused as closely as possible on the light dispersed from the bulb. You will not be able to get all of them centered under the light, but you should aim for this shape. As the tops grow vertically, push the large fan leaves down under the screen, allowing the light to get to all the developing bud sites.
If leaf growth is excessive, you can first cut fan leaves in half making a shorter leaf and allowing light to get to the bud site. Leaving half the leaf on the plant still allows it to make energy for the plant to grow. Taking a whole fan leaf away in one go can stunt growth. In about a week, you can take off the rest of the leaf. Some people don’t remove the leaf at all, but I do it to help with air movement, reduce the chance of mold or fungus and to allow more light to penetrate the bud sites. Just remember to remove a little at a time if you do remove leaf mass.
At this point flowers are forming and growing vertically, creating a carpet of bud above the screen. Now we go below the screen and remove all the lateral branches and stray bud sites. The canopy has thickened enough that light is blocked from reaching this lower growth. It’s only diverting your plants’ energy away from the buds. You can remove all branches that haven’t made it to the screen and the stray bud sites but you may experience stunting. Although you want the plant to concentrate all of it’s grow energy on the developing flowers above the canopy, removing too much leaf mass and branching can prevent additional flowering.
The three main differences between a SOG and ScrOG grow are the number of plants grown, the use of a screen and the slightly longer grow cycle of the ScrOG. Both methods can be done under the same light and in soil or with hydroponics. There are many variations of the ScrOG grow including V-ScrOG, Stadium ScrOG, Flat ScrOG and Cylinder ScrOG but they are all based on the same principles. They work essentially the same way but use different shapes.
One of the best strains available for your ScrOG garden is C99. You will find that a pure Indica or Indica dominant cross will produce the best in a ScrOG grow. A good ScrOG grow will average two ounces of bud per square foot of screen, but you can’t expect this the first few grows, because it takes proper timing and the correct strain to accomplish this.
ScrOG was originally designed for grow areas limited in height and lit by fluorescents. Today’s growers are using HID lights for rowing ScrOG. They’ve taken it to the next level with these lights and are generating far greater results. Today’s grower is always trying something new to improve the production of their favorite plant. With experience, practice and experimentation, you too can create your own customized grow.
Notes on SOG and ScrOG Growing
Now that you have a firm grasp on what Sea of Green is and how to get a started, let’s go into more final details…
Spacing: Spacing is the most controversial subject when it comes to SOG. It is also one of the most important factors in determining yield amount. It’s quite tricky and there isn’t one single rule to follow. Your SOG’s spacing is ultimately determined by the clones you have selected for your grow. Specifically their growth pattern. If your clones grow straight up when flowering is initiated, concentrating all of their energy on a top cola, you can position your cuttings between 4 per sq. foot and 3 per sq. foot, and veg for between 4 days and 7 days. On the other hand if your clones happen to branch out a bit, or they demonstrate having an uneven growth pattern, then you should probably stick to a SCROG grow, but otherwise space your cuttings further apart, and veg for longer. But keep in mind this defeats the purpose of a SOG grow entirely.
Due to the plants being spaced so closely together, any heavy branching and large shade-producing leaves will interfere with the other plants light. Weak cuttings which do not grow as vigorously as others cause this by lagging below the canopy when the others take off after you switch the light back to 12/12. In order to prevent this all too common problem, you should take a few more cuttings than you need, and be sure to only use the most healthy, fastest rooting clones in your grow chamber.
Also any cuttings that are growing too fast should also be removed from the garden. This is because they will outgrow the others and cause the same exact problem. Once plants become blocked from the light, their growth will be stunted indefinitely.
Keep in mind choosing uniformly healthy clones is not the only factor. Some mother plants will produce clones that just don’t grow uniformly. This has been reported before with c99 which is also a heavy brancher and thus not an ideal SOG plant at all (and not to mention the fact that her tops aren’t as heavy as others).
Only a couple simple tricks to avoid overcrowding exist and they are not that effective at all. The only real way to prevent overcrowding is to grow a batch of clones you at medium density of 2 – 3 per square foot to judge how they perform(that is if you are not already experienced with cuttings from the same mother plant). That is why it is a good idea to keep more than one seed parent as a mother until you know which one has the superior cuttings. Sometimes seedlings that seem perfect for one type of setup go quite wrong in the cutting stage.
If overcrowding does occur, here are some helpful tips and tricks:
- Keep lower branching well trimmed from day 1 of vegetative growth until 3 weeks 12/12. It is important that you don’t trim every day, rather every 5-7 days. This will allow the plant to fully recuperate. You can refrain from trimming any branches which are not interfering with a neighbour and are getting good light coverage. The top cola and the few short branches below it are all that should remain. This is approximately 1/2- 1/3 of the plant.
- Tuck and trim shade leaves that are obstructing neighbors and those juicy bud sites. Try not to go bananas on the trimming! If anything, try trimming only a few blades, or half of each blade. The leaves will still photosynthesize. Still, do not overdo it!
- Install enforced chickenwire like in a SCROG to keep plants from leaning on their neighbors. Bamboo poles work decently, but chicken wire will be much more effective. It will also allow for greater overall control of your garden’s profile. You can start with bamboo poles until your plant’s finish stretching, then apply the chicken wire accordingly.
- Install enforced chickenwire like in a SCROG to keep plants from leaning on their neighbors. Bamboo poles work decently, but chicken wire will be much more effective. It will also allow for greater overall control of your garden’s profile. You can start with bamboo poles until your plant’s finish stretching, then apply the chicken wire accordingly.
- Don’t grow sativas in a SOG.
- If you insist on using seedlings for your SOG, keep your spacing to 1 psf.
Lighting: Even though MH and HPS lights can be used in conjunction with ScrOG and SOG grows, most ScrOG and SOG growers will use HPS because of the short vegetative period before flowering. Sometimes growers use smaller wattage HPS lights like the 250W and 400W series to keep the cost of electricity down and bud production within an acceptable range. In fact, ScrOG grows are so dense that smaller lights are sometimes more cost-effective than lights in the 600 to 1000W range, but again this depends on your strain and level of experience. If you get it right you can effectively direct 95% of available light onto your bud. The end result is like a canopy of pure bud with the light belting down on top of it all for 12 hours a day.
SCROG Advantages for Larger Lights:
- More even canopy.
- Can be trained into an bowl or V-shape to match the light falloff.
- More consistent bud size across your crop.
Disadvantages:
- Lots of work training a large screen every day.
- Need access to all corners of the garden.
- Must time the flowering switch correctly so that the screen is full and you have enough height above the screen to make full use of your light penetration.
Screen Control: Some ScrOG growers like to tie the center of the screen down to avoid it being pushed up by the center of the bud production, which should be the most vigorous since it is directly under the light. If the plants were to push the screen up it would affect the overall results because the light would not be able to reach all the bud areas. The pushing effect could also cause stems and branches to break.
Branch Development: You should not leave your plants growing in vegetative growth for too long because this causes more leaf matter to develop than bud which will make our SOG or ScrOG grow less effective. Also watch out that you do not crush or pinch the stems as this will cause branches to develop at those areas or close to them. Branch development means that plant energy is being used in leaf and branch promotion rather than bud production.
Weight: It is totally possible to reach around 2 oz. per ft. with a suitable plant and enough light density. 400 watt growers have reported up to 2.4 ounces per foot in a flat scrog. In a compressed grow, using shielded lights in a box of screen, I’ve read about growers who have gotten nearly 2.6 ounces per foot, measured by canopy area. I suspect that 75 watts per sq. ft. is about the minimum to reach that kind of production, but I don’t know for sure.
Understand, that the HID scrog method has not been around very long, and results are sketchy. Your results may vary, but certainly you will do better using scrog than small-scale sea of green at any light density.
Shape: You can experiment with different shapes of ScrOG to see how it affects your overall yield. Some ScrOG growers even advocate a dome shaped screen to match the curvature of light dispersal patterns, however, the differences between shapes in the final yields is not always significant and the overall effect is more exciting looking than anything else.
Plant Height: The worst thing you can do is to allow the plants to grow too long. You would think that excess growth could be cut out or moved to vertical screens, but in practice you’ll find it’s difficult to recover from a badly overgrown screen. Plants that grow into and fill the screen seem to put on better bud weight than overgrown plants that are tied down and whacked back to fit.
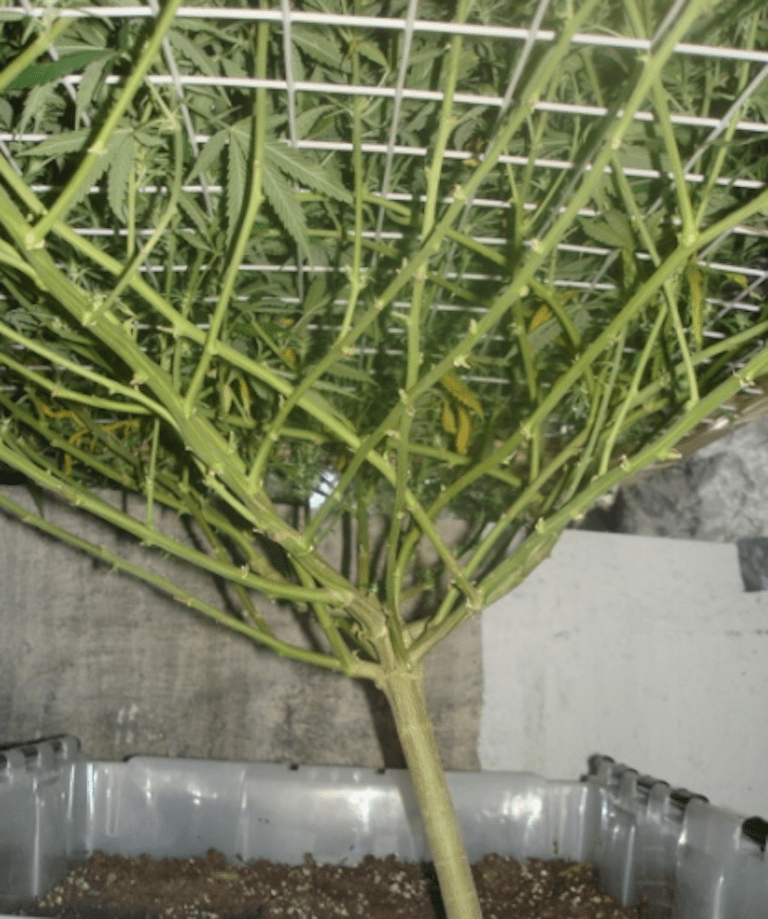
Pre-training for ScrOG
So you’ve decided to grow ScrOG? Well, get used to training your plant, you will spend a lot of time shaping and positioning for better light distribution. One of the main advantages of ScrOG, is when the main growth tip is redirected horizontally 90 degrees to the screen, it opens the main stock to more light, which generates growth tips, and increases vigour.
You can give your plant a head start by pre-training the main stock horizontally. This has two real benefits, the main stock is not affected by the installation of the screen (training your plant horizontally to 90 degrees, really helps when you have a real fat stock), and the growth tips start growing/stretching upwards so they are very close to, or are penetrating the screen when the screen is installed (normally the growth tips wouldn’t start to stretch up until the initial main growth tip was trained horizontal to the screen, this causes you to veg more time under the screen to allow for the growth tips to penetrate).
All you need is a twisty tie, a container, a sharp pointy object, and some string. First take the string and at one end make a loop, leave the other end alone for now. Next, take your container and pop a hole at the top of the container, then slip the loop through the hole (So the loop would go through the hole towards the centre of the pot.) Next, at one end of the twisty tie, secure your stock where you want it to bend horizontally, at the other end twisty tie around the loop. Carefully take the string hanging out of the hole you made and pull on it, the plant should start to bend where you have it secured at the main stock. Pull the string till you have your desired angle then tie a knot that won’t fit through the hole you poked in the container, and let go of the string.
Veg like this for 3-5 days; you should now have a pre-trained plant, ready to be installed into the screen with ease.
Note: Your plant may not be able to bend horizontally on the first train, so to prevent snapping the stem; train progressively.
SCROGGING in Soil or Hydroponics?
A successful ScrOG can be done using plants in pots as well as with more exotic hydroponic systems. But there are a few elements of ScrOG growing that tend to favor an active hydroponic setup.
Once you get past a small, flat scrog grow, it becomes very difficult to train a more complex grow by reaching into the cabinet space. Never design a ScrOG system without the capability of rolling or sliding out the plant container and screens as a single unit. Obviously that means that the screen should be connected to the plant container, or possibly to a common substrate, like a plywood base. The screen does not need to be sturdy, it’s just a guide, so there are many ways this could be done. But obviously it is much easier to slide out an empty container than one full of water (as in DWC) or soil.
Active hydroponic systems allow freshly rooted clones to have direct access to very high levels of nutrients immediately. That may mean that active hydroponic ScrOGs will evolve quicker than soil or DWC grows.
Hydroponic Sea of Green Setup
An important thing to understand about creating a Seed Germination Kit is that it can be any size, it’s only the shape that must remain a constant. The highest yielding, easiest to maintain SOG garden is a simple slated Ebb&Flo tray.
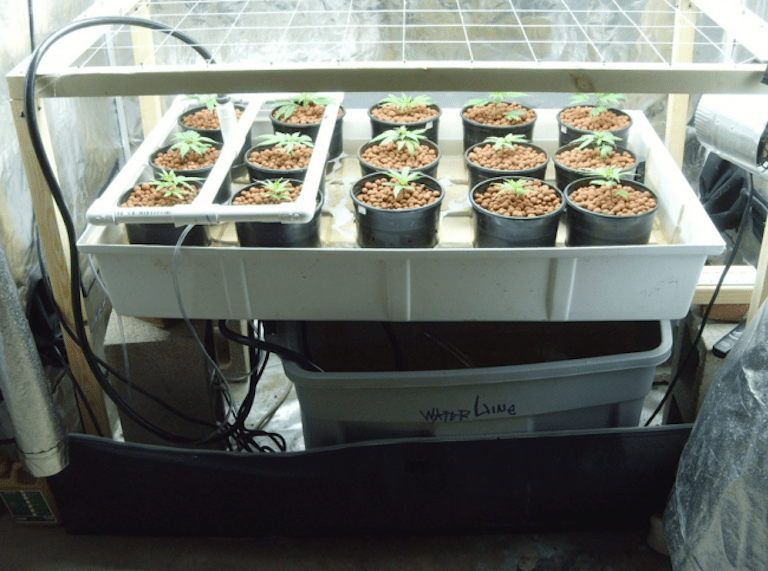
The tray is simply a 4″ deep plastic tray of varying sizes with 1″ deep grooves on the bottom for root growth. There is also two holes on the far end which hold the tube from the water pump (which administers the nutrient solution from the reservoir), and the siphon valve which drains the water back into the reservoir once the water level reaches a certain mark during flood time.
Next, 4″ rockwool cubes are placed on this tray, and a sheet of opaque plastic (you can find these at a hydroponics shop, it is black on one side and white on the other) is draped over top of the tray, so the cubes sit in total darkness.
When the cuttings have rooted in 1″ cubes, they are transplanted into the 4″ cubes by making X shaped cuts in the plastic You do this so that minimal light reaches the root area below the plastic, and roots can grow freely after they have outgrown the cubes. Remember that roots need moisture AND darkness to thrive and grow! Without the plastic covering, the roots are exposed to light, and all the moisture from the root area is allowed to escape into the air. Also, without light, algae and mold growth are reduced if not retarded completely. Keep these essential tips in mind for all your grows. Growth will drastically improve if there is darkness at root level.
Now the cuttings are then vegged until thriving growth resumes. Bamboo shafts are inserted into the rockwool cubes through a small cut in the plastic to support the large top colas. Be sure to do this early to avoid root damage when you jab the pole through the rockwool cube.
Flowering is induced while the plants are less than 10″ tall so that, ideally, the plant finishes between 24″ and 36″ inches MAXIMUM, complete with a large top cola and minimal side branching. Golden.
The great thing about the clones is that since we took them from a mature mother female plant, the age carries over. This means that as soon as we begin the 12/12 lighting cycle they will immediately start to flower. I strongly recommend you trim all of the undergrowth from your girls within the first 3 weeks of 12/12. Trimming all the side branching about 1/3 to 1/2 way up the plant is best.
If all goes well according to plan and your mother selection was good, you will finish your Hydroponic SOG grow with an even canopy of buds that looks something like a corn field massive bud canopy(or in other words a Sea of Green ;), and yields up to 2 pounds per 1000W light!!(when growing conditions are optimal). Since you are only using clones in the setup, all you have to do is grow them out for the remainder of their Flowering phase. This allows you to have a massive bud quantity yield turnover every 2 months.
Equipment: Good quality Ebb and Flo systems are available from many different outlets, but don’t even bother. They usually tend to be way too expensive and more complicated than they should be. For a 1000W Ebb&Flo system (ebb&flo system only, not lights, etc) you should pay no more than $400 USD. You can ind lots of ebb&Flo systems in the marketplace today for like $800 USD and most of them either just plain suck, or are not nearly as productive as the tray. This system is so simple!
Here is a list of all the equipment you will need:
- A simple Ebb and Flo tray (a plastic, black 5″ deep unit of varying shapes and sizes. It should also have 1″ deep slats that accommodate root growth as mentioned before).
- An appropriate-sized length of plastic tubing (this will act as your syphon valve).
- A water pump, and digital timer (to flood your table with).
- 1″ and 4″ Rockwool Cubes.
- A sheet of opaque plastic (described above).
- An airstone of appropriate size.
- A 12 gallon reservoir per 4’X4′ table.
Running Your System: In order to operate your SOG system, simply transplant your cuttings after they root as per directed, set your digital timer to run your waterpump once a day (approximately ½ hour after the light comes on – once a day in 4″ cubes is fine when they’re young). The water should reach approximately 2/3 up the cube before the syphon valve begins to drain completely. Another two minutes of flood time should suffice, then the timer can turn off (about seven minutes total). When the cuttings begin to grow more vigorously, and have grown to 6″ or more, the timer can be set to flood twice daily; the second time should be about three hours before the light goes off at night (during 12/12). Nutrient levels in the reservoir are increased from 1000EC to 1800EC from transplant to maturity stage, and the harvest will ultimately be AMAZING.
Strains suitable for SOG growing are:
- Afghan.
- California Orange (When untopped the CO puts most of it’s energy into growing one large, main cola and does NOT branch
out much at all.)
V-SCROG
V-SCROG is a version of ScrOG, where you place the screen vertically instead of horizontally. The principle is however the same in V-SCROG as in ScrOG.
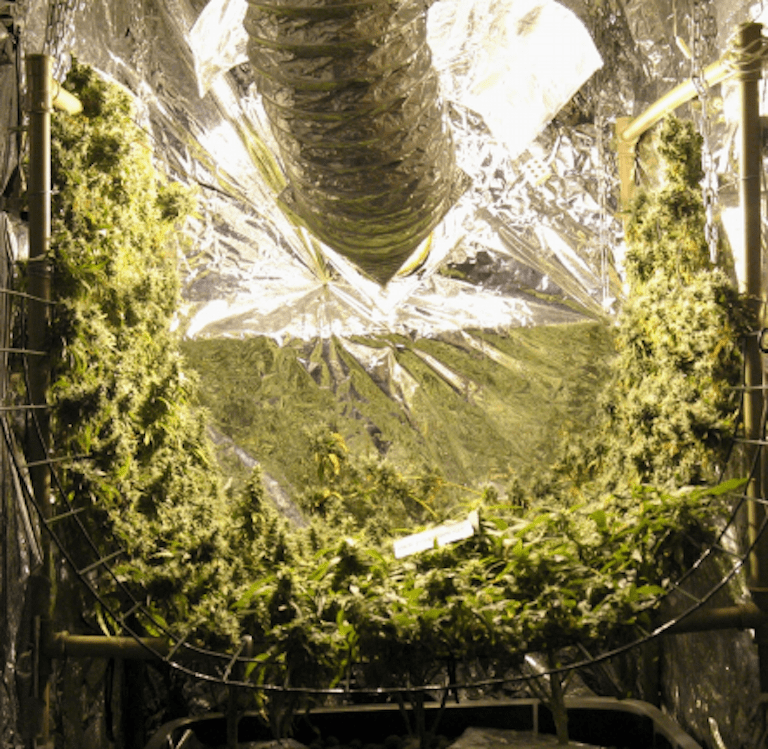
One problem with V-SCROG is top dominance. Top dominance is that buds located higher up will grow larger then buds located further down. This problem can however be solved by sideways-upwards training of the plant; spiraltraining. If you train the plant to vertical the top dominance will have effect, so you have to be precise.
Vertical screens extend from the plant medium all the way up to the top of the growing space. The light is not in a reflector at the top of the space, but is suspended vertically in the middle of a tube of foliage. Note that the entire light field is used, not just from the bottom half of the lamp and what comes off the reflector. The foliage area is stunning. Imagine a 2 x 2 cabinet with a v-scrog screen held 4″ from the walls, with a gap in the front screen for maintenance. Suppose the buds fill up about 3′ of the vertical screen. We’re talking 4 screens, each 4′ in area (16″ x 36″). Take off a couple of inches for corner overlap and a gap in the front for access, and that’s nearly 14 sq. ft. of screen in the same space that supports 4′ of flat screen. Even if the production per foot were half, and it would be less due to the loss of the 3D flat scrog field, you’re still talking 3 ounces per foot!
Even if production isn’t dramatically better than horizontal methods, v-scrog is a promising solution to growing in very restricted height conditions. It might be possible to grow a productive crop in as little as 2′, maybe less. Since the lightto-foliage gap is horizontal, the only absolute vertical needs are for the plant container and a gap between the end of the downward-pointing bulb and the planting medium. Plant growth could be controlled by training it across the vertical screen, which could be any reasonable height.
Box of Green (BOG)
Lots of enthusiastic growers have been super excited about the ScrOG method and have created up all sorts of ways to expand production. One of the coolest most noteworthy common variation is known as the Box of Green (BOG) method. Added to the horizontal screen are vertical screens around the perimeter. Either additional plants are used at the edges, or the ScrOG field plants are grown longer, but either way, the additional foliage is allowed to grow up the outside of the vertical screen, taking advantage of wasted air space above the field. It also allows plants at the edge of the field to get into the circle of intensity from the bulb.
Imagine the light field as a circle sitting tangent to a horizontal line. Imagine your plant as a point on the line outside of the circle. How can the plant get inside the circle? By going up. You might equate this method to an “arena” grow in this regard. This method allows all the screen area to be densely filled with bud sites.
There are two ways to fill the vertical BOG screens. The first is to use more plants, which are added to the edges of the grow. When the horizontal ScrOG field plants are forced to flower, the plants on the edge are allowed to grow vertically like sea of green plants, the resulting growth being trained to the vertical screens. If the growth is too tall for the screens, it can be laid down at an angle. The advantage of this type of BOG grow is reliability and speed, since the horizontal field is filled in exactly the same manner as in a normal scrog grow. The disadvantage is that the number of plants is increased to near plantlet-method Sea of Green levels. The second method is use the same number of plants as in a standard scrog grow, or thereabouts, but to allow them to grow longer before forcing, around another two weeks of growth seems to be about right. This process is a bit tricky, but other growers are having success, and the method is superior in theory.
The quickest and most successful approach to train a bog grow is to lower the horizontal screen to within 6″ of the soil and grow 2 plants per sq. ft. straight up to the vertical training screens. As it’s a box driven by a 70-watt bulb, the height from the horizontal screen to the roof is only 12″. The plants grow unhindered 18″ from the soil up through a narrow band of the horizontal screen and onto the verticals until they touch the roof. Then they are laid down horizontally and trained in a spiral fashion around the vertical training screens (SBOG). The cabinet is small; spiral training is the only way to direct the shoots so it just happens.
The spiral training can go one of two ways. The entire plant can be bent over in one direction and trained along with the rest of the plants in a clockwise or counter-clockwise fashion around the vertical training screens. Or the plant can be trained as it naturally branched, trained in opposite directions along the vertical training screens.
Any method of growing should be analyzed not only for production over the space used, but also for production over time. Just for the sake of argument, let’s suppose a plantlet-method sea of green method produces 1 ounce per ft., and the subject plant takes 60 days to complete its life cycle. That would be . 017 oz. per ft./day.
Let’s suppose a ScrOG grow takes two weeks longer, 74 days, and produces 1 1/2 oz. That would be .020 oz. per ft/day, advantage ScrOG. Let’s suppose than an extended BOG grow takes two more weeks than a ScrOG grow, 88 days, and produces 2 oz. That would be .023 oz. per ft. day., advantage extended BOG. Note that it’s possible to shorten the cycle by growing plants in a separate area for about three weeks and then adding them to the scrog setup. But most micro and mini growers don’t have room for a separate growing area. Hollow screen forms do not have to be in the shape of square-cornered boxes. I’ve seen online one grower using small HPS lights who shaped his screen into a deep bowl shape, with the light suspended in the middle. Some have utilized inverted V shapes. A single “correct” way to do this probably doesn’t exist. For those new to the scrog method: get a few fast, flat scrog grows under your belt first to get used to the process. But do add the vertical screens regardless, and capture whatever excess growth you can on the verticals, as there is no reason not to handle as much growth as you can.
Jungle of Green (JOG)
“Jogging”, also known as the Jungle of Green or JOG technique is a useful way to maximize the yield from your crop. It is very effective in a low or confined grow space.
With the JOG technique you will use wires shaped into “U”‘s to hold down the stem into the desired positions as you gradually shape it around the perimeter of the pot. The goal is to make the plant entirely fill the pots space with top buds. No matter how much training you do a plant will have a genetic maximum bud capacity that can not be exceeded. Training will help you reach that potential.
Setting Up a ScrOG Cabinet
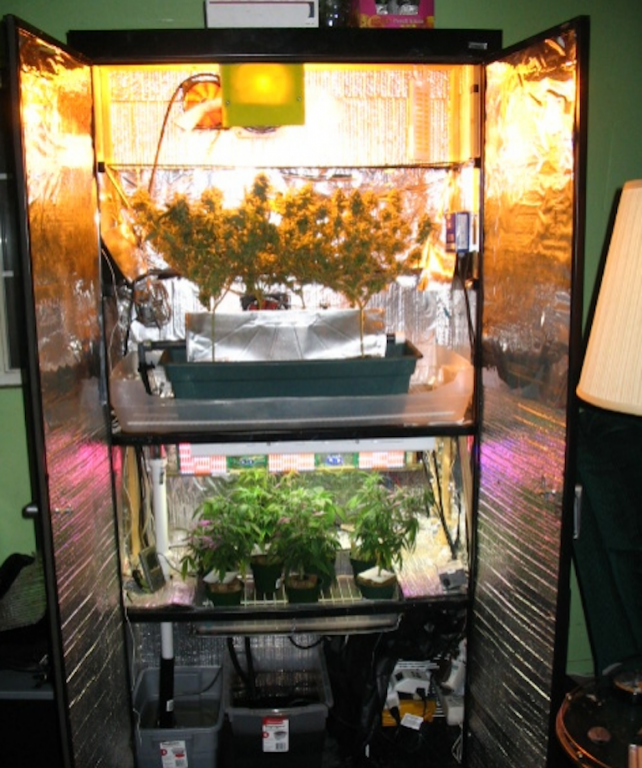
Some growers can grow in a 10′ room under 1000 watt lights, but many can’t devote that much space and effort to pot growing. For those interested in some real production (½ pound to a pound or more every crop) here’s how to do it easily in 2-4′ of wall space.
Your Space: Start with a wall. You need airflow through the cabinet, so an outside wall is best. You need to be able to get air into the cabinet, so if you can punch holes through the wall with a hole saw, all the better. You need to get air out of the cabinet as well, so if the eave / soffit line is accessible, that’s a great place to dump air.
It helps if the cabinet is not the only thing on the wall. A wall of cabinets, with your cannabis factory just being one of the bunch, is perfect; hidden in plain sight. But a couple of cabinets standing by themselves will not look out of place in a garage or storage room, particularly if they are surrounded by tool racks and other normal clutter of a working space.
Each cabinet takes up 2′ of wall space. Why 2′ and not some other dimension? Because the engine of this factory will be the 250 watt HPS, and that is a light that can best handle a space about 2′ square, 2 1/2′ tops. Further, standard size storage containers, which are used for growing and for reservoirs in this system, fit right snuggly into a 2′ interior space.
Cabinets and Utilities: The incoming power source should be on a GFCI circuit. If you wire up wall sockets around the cabinet, only the first one need be a GFCI. All the other power outlets can take off from the first GFCI circuit. Never gang up GFCI circuits. If you are using power cords, buy a GFCI stub cord and put it in the main line. Transformers, motors, submerged pumps, HID lights; a recipe for fire or shock.
Each cabinet system occupies a footprint of just about 2′ square. A standard floor to ceiling height of most finished spaces is 8′, which is just right for this setup. Plywood is great for the walls, as insulation is not necessary, and the thinner the walls, the more room for buds. You can design hollow spaces in the cabinet walls to carry electric power if you like. You might run a power supply wire into the hollow walls of the cabinets and install standard wall switches and outlets to supply power to the various systems.
You can supply electricity with cords snaked up through the floor or from a nearby wall plug, so long as the wire is sufficiently thick; at least the same gauge as the wall supply, and you will need at least a 15 amp circuit with little or nothing else on the line (like maybe a garage light).
The doors need to fit nearly airtight, but not perfect, as the fan blowing air out of the space creates a slight vacuum that sucks the door in. It would be better to create an overpressure in the space, but that complicates sealing the doors quite a bit, so the ventilation fans suck air out of the cabinets rather than blowing in. You can seal the door in your unit with foam weatherstripping, using strips of 1 x 2 boards to frame the opening and mounting the foam along the 1 x 2’s. The board strips can be mounted on the interior walls so that the foam stands slightly “proud” of the outside of the cabinet, allowing the door to crush the foam slightly as a seal. The foam also effectively seals the light inside the cabinets. You can stand next to the cabinets in the pitch black darkness and see no light.
The Layout: Focus on a single cabinet, taking up 2′ square of space, 8′ tall. You’ll need three separate compartments in the cabinet, each with its own door to allow working in one compartment without blowing a dark period in another. The top compartment is for flowering, and should be 4′ tall. Why on top and not in the middle? The heat will be generated by a 250 watt HPS light in the top of the cabinet, and that heat needs to be removed. If the light was up against the floor of an upper cabinet, it could roast the roots of the plants above. Heat rises, so put the biggest heat source as high as possible.
Why should the flowering cabinet be 4′ tall? Because if you follow these plans, the relationship between the height of the container, the stem length to the scrog canopy, the thickness of the ScrOG canopy, the distance between the lights and the canopy and the thickness of the light hood fits almost ideally in a 4′ tall space. It would be difficult, in fact, to change the relationship between the elements of the scrog system with a 250 HPS light. 4′ is not the minimum space required; you can get by with 44″ in one cabinet be stealing an inch or two from the stem length and the light gap. But more than 4′ is probably wasted.
Next is a mother compartment, to be lit by a single 70 watt HPS bulb. You can maintain 8 mothers under the one small bulb, more than adequate. The 70 HPS runs very cool, but even so, this mother space needs to be ventilated.
The height of the mother cabinet is negotiable. First subtract 4′ for the flowering cabinet (no less than 44″). Then figure the space needed for the reservoir on the bottom. Include some air space above the re ervoir for access to mechanicals. The leftover height goes to the mothers. They don’t need much. Probably the minimum height would be 2′ or so.
Cloning can also be handled in the mother compartment by installing a small shelf on the upper part of the wall; nice and warm up there, good for rooting. You could mount a 20 watt stick fluorescent above the cloning shelf. It’ll work OK just with the side-lit HPS. Cloning only happens every two months, so the shelf could even be made to fold up against the wall when not in use, allowing more space underneath for another couple of Bonsai Mothers.
Finally, heat rises, so the lowest compartment holds the reservoir. An 11 gallon Rubbermaid storage container is the perfect size.
There you have it, an integrated system of mothers, clones and flowering plants, all in a 2′ footprint. You can get about 2 ounces per foot of ScrOG canopy with a 250 HPS, so we’re talking 1/2 pound per crop here on a good day.
But, let’s take this a little further. The mothers only need to produce 4 clones per crop, and are obviously capable of making many more. So, how about another 2′ cabinet next door? Two more 4′ tall flowering cabinets could easily be supported by the mothers, and now you’re talking 1 1/2 pounds per crop. That’s 3 ounces per foot of floor space, mothers and reservoir included!
You can have a second cabinet, but three crops at once is more work than you probably care for, and the electric load of the lights and fans probably is excessive for a 15 watt circuit, so you’re probably better off modifying the plans a bit and building three compartments. The bottom compartment holds a second reservoir and pump, which allows more time between topping off than if one reservoir was servicing the whole unit. The middle compartment is another 4′ flowering cabinet, but note that it overlaps the mother cabinet next door and shares part of the wall of the upper flowering cabinet in the first stack. Cut out a passage way in the shared wall, so that the two flowering cabinets both share the same air system, a 200 CFM Dayton pancake mounted in the top of the upper flowering cabinet. To help the airflow along, mount two 100 CFM axial fans in the passage way. You can light proof the passage way by mounting a darkroom air grill, a special plastic baffle that allows air to pass through but blocks light. The damn things cost a fortune, but they work well. That allows you to flower in one cabinet while the second cabinet is working vegetatively. Usually the two cabinets are in flowering mode, and you’d remove the darkroom grill to assist airflow.
That leaves 2′ on top of the second cabinet; guess what goes there? How about the ballasts for all the lights? This keeps the heat from the ballasts out of the plant spaces, and eases the load on the fans.
By using two flowering cabinets, you only grow about two ounces per square foot of floor space, including all reservoirs and mothers. I don’t think most room growers include the mother area in their yield reports, so I bet this blueprint stacks up pretty well even against the 1000 watt crowd, except for the real pros getting 3-4 ounces per foot.
Ventilation: If you can punch holes right through the outside wall to bring fresh air into the space. You could drill two 3″ holes with a hole saw in the bottom of the lower flowering cabinet, and install a short section of 3″ PVC drain pipe through the wall. On the outside of the wall mount dryer vents with the air inlet pointed down, and a screen mounted to keep bugs out. You could then paint the PVC tube and the inside of the vents with flat black paint to limit reflected light.
On the inside, clamp fabric shop vacuum bags over the ends of the PVC tubes, which protrude into the cabinet a bit for that purpose. The vacuum bags keep the mites out.
Moving over to the first cabinet stack, the mother compartment is serviced the same way, but you could only use one 3″ opening. Airflow from the lower flowering cabinet next door is sufficient as an inlet in the upper flowering cabinet, but add one 3″ inlet for use in summer, when some additional cool air is needed.
Use 200 CFM Dayton squirrel cage fans both in the mother compartment and the upper flowering compartment. If you were designing a system with three flowering cabinets, I would use one in each. These fans are compact, easily mounted with integral tabs flat on a wall, and they are efficient and quiet. The big Dayton may be a bit of an overkill in the mother compartment, but it’s easier on the mechanicals to use a large fan on now and then vs. a smaller fan huffing away all the time.
CO2? There is little room for the mechanicals, the scrog blanket will already get as thick as it can be, and the fans are on quite a bit with the hot lights in the enclosed space, and would blow out the CO2 regularly (every five minutes or so). So, I doubt it would be useful in this limited growing situation.
The outlet can also be a 3″ PVC pipe punched through the wall. The inside will protrude into the cabinet as a place for the flexible dryer conduit to be clamped. The outside outlet is another dryer vent, with the flap pieces left in place to prevent insects and debris from floating in through the outlet tube. You can run the outlet right out through the eave line in the soffit, where it exhausts into the outdoors.
What if you don’t have the luxury of being able to tap the outside air so easily? Well, you can draw air from a crawl space if there is one below the cabinet, by running 3″ PVC tubing up inside the cabinets to the desired compartment. If you use Rubbermaid 11 gallon containers mounted sideways, there will be enough space in back to run several such conduits. The same holds true for the outgoing air. The fan can exhaust down a 3″ PCV pipe into the crawl space, and flexible tubing can carry the air to the nearest available hidden outlet. You can’t run air through tubes that are too long, or the fan won’t be able to push the air needed.
Controls: The fans need to be wired up to thermostats as controls, a humidistat too, if you can afford it. When selecting a thermostat, I recommend you avoid cheap units and get something decent.
You’ll want to mount the thermostats up high in the cabinet, where the buds will be growing, as that is the airspace that is critical. Generally a temperature of 70-75°F (21-23.8°C) is recommended.
All the lights and pumps can be controlled by cheap hardware store dial timers, which you’d plug into wall sockets you can build into the cabinet walls. Ballasts should be by themselves in a separate compartment. That means you’d have to run some power cords from the timers through the walls into to the ballast cabinet, but it wouldn’t look too messy; there would already be cords coming from the ballasts to the light hoods.
The reservoir cabinet will have its own outlet and timer. You could run the pumps for both reservoirs and the air pump from a single timer.
Water: The bottom compartments should hold the reservoirs, and 11 gallon Rubbermaid storage containers work great. They will be in the dark, but it’s not a bad idea to wrap them in black plastic to keep all light out, which prevents the growth of algae. Cut out a window to check for water level of course. The 8′ compartment stack requires a pretty hefty pump, as there is quite a vertical distance for the water to climb.
1/2″ drip system tubes work fine to deliver the water up into the cabinets, but you can also use hard-wired PVC plumbing bits and pieces, and there are adapters to mate the two. If you use PVC, go 3/4″ to allow the water to mix with air on the drain leg.
The water needs to get from the plant containers back down into the reservoirs, and gravity handles that. There are myriads of ways to plumb the system. One method is to open drain holes cut into the floors of the compartments. You’d use Rubbermaid containers to grow in, and mount a cheap chrome sink drain in the bottom of the containers. The chrome drain piece will sit in the hole in the floor and drain into a large PVC adapter fitting that is plumbed into the drain system, all would be connected together and flowing back into the reservoir below. Add a good quality aquarium air pump connected to an airstone in each reservoir.
Every couple of weeks the reservoirs need to be drained, and while you’re plumbing away here, add a fitting to the cabinet to connect a hose, plumbed into the pump outlet line. That way you can connect the hose, turn on the pump and allow it to drain the tank to the outside. The hardware store is an endless source of valves and connectors to fulfill any elaborate design you like, to get water in and out of the reservoirs.
Water is added to the reservoirs with a 1/2″ drip tubing piece connected to a quick connect hose coupling. The drip tube piece pokes through a hole drilled in the container top (yes, another hole saw to buy). Filling up is clean and easy. Nutrient mixes are added from a jug with a piece of the same 1/2 drip tubing mated to the top.
Lighting System: The main lighting in this setup is a 250 watt HPS.
You can find a standard hood for sale at the local growstore just about 2′ long, a perfect tight fit, covering the area completely with reflected light. There is no need to mount the hood on chains or anything like that. The vertical distance in scrog growing is fixed, so the hood can be screwed right into the top of the apartment – you can mount the hoods using wingnuts (in case of maintenance, etc).
The light could be mounted to run into the cabinet rather than side to side, but it’s easier to maintain the plants if the container is in front of the cabinet, with the air and water supplies running up the back wall.
To allow the hoods to be removed for maintenance, connect the light socket to the ballast outlet cable with three-prong plugs and sockets. Unplug the light from the ballast cable, spin off the wingnuts holding the hoods to studs mounted in the ceiling of the compartment, and the whole light assembly will come out in one piece.
While the 250 HPS does a great job in this space, they tend to sit offset on one side of the hood, favoring the ScrOG canopy nearest the socket. To remedy this you can supplement your hoods with a 70 HPS light mounted on the other end.
Plant Containers and Medium: You don’t have to grow this way, but it works, and it works as well as it needs to work. You will grow thick ScrOG canopies. Use 11 gallon Rubbermaid containers to grow in. The Rubbermaid containers solve many problems. The drip system doesn’t have to be water tight, because leaks are confined in the container. The ScrOG net can be attached to four poles attached to the corners of the container. The Rubbermaid container has a lip around the edge. Drill a hole in each corner, insert one of those plastic plant stakes in each corner, and run duct tape around the outside of the container to hold it all together. If the compartment needs maintenance, the drip system inlet can be disconnected (quick connectors again), and the whole plant mass, scrog net and all, can be lifted out of the cabinet in one move. If you connect the scrog netting (chicken wire) to the walls of the cabinet, well, you can’t do that obviously.
Use rockwool, but it wont act as the primary nutrient carrier. Four plants adequately support the scrog canopy, each started in 4″ cubes. The cubes sit on a slab, but the slab is first sliced in half, just a thin layer. The purpose of the slab is only to spread the roots out horizontally, as the grain of the slab runs 90 degrees to the cube.
The thinned slab sits on top of an open plastic grate, an eggcrate grill for a fluorescent light fixture is perfect. The plastic grate is set up off the floor of the container on blocks, allowing a 1-2″ air chamber for the roots to grow into. The roots quickly grow through the cube into the slab, spread out and then grow through into the bottom of the container, pooling up into the indentations molded into the Rubbermaid bottom. It is the flow of water over the roots in the container bottom that primarily supply the root mat.
Accordingly, I don’t recommend a drip system, but an open flow, using spaghetti tube connectors as emitters. I recommend five half hour cycles per day, three during the light period and two during the dark period. The rockwool gets saturated with water, but the solution drains through the wool very quickly, flowing down the drains back to the reservoirs. There is never any build up of salts in the wool to worry about, and the roots will be very happy.
Mothers are also grown in the same fashion, but skip the half slab. You can cram many mothers into the Rubbermaid tub, as they are never allowed to get very tall or big. In order to keep a mother small over an extended period of time, it is necessary to avoid giving it a “haircut”, as that would encourage it to become bushy and top-heavy. Instead, remove whole branches from near the bottom of the plant, oldest branches first. Eventually a mother will get tired and will start to fail due to the many prunings, but she can always be replaced with a clone.
Conclusion: I could discuss many other bits and pieces of the system, but hopefully this has been sufficient for you to get the basic idea. I don’t think you can design any other system that will produce more weight of buds from 250 lights in this space. If you are new to this hobby and you want to go first class in a minimum of space, you can feel confident that your efforts will succeed in a big way if you duplicate this system. If you choose to do something different, at least I hope my experience will provide some ideas for your dream cabinet.

Next: Part 9. Growing Outdoors
Previous: Part 7. Hydroponics
