Part 7: How to Grow Weed Hydroponically – Step by Step Guide for Beginners
Growing Marijuana Hydroponically
Growing marijuana hydroponically is method of growing cannabis plants without soil. The plants get fed by soluble fertilizers that are dissolved in water. Hydroponic gardening can be more productive than soil growing, but it is not nearly as forgiving. Soil works as a buffer for nutrients and holds on to them longer than a hydroponic grow medium does. Hydroponic grow mediums contain no nutrients – all the nutrients are supplied via a nutrient solution. Contrary to popular belief, hydroponic gardens often require more care than soil gardens. Because the plants grow faster, there are more things to check and way more things that can go wrong.
To help you out, here are the best place to buy marijuana seeds that work in any country.
See also:
How it basically works is that scientists in the 19th century discovered plant roots absorb the nutrients when dissolved in water. Soil acts as a nutrient reservoir, but the soil itself is not essential for plant growth. Hydroponic gardening is ideal if you are looking for massive bud quantities or growing bud all year long. Most growers claim a hydroponic system will grow plants much much faster than a soil medium, given the same genetics and environmental conditions. Fast growth allows for earlier maturation which means shorter total growth time per crop. The plant’s in a hydroponic garden system also breathe easier, therefore their growth time is greatly reduced.
Hydroponics should be used indoors or in greenhouses to speed the growth of plants – so you have more delicious bud in less time. Hydroponics allows you to water the plants daily, and this will speed growth. Also, hydroponically grown plants do not derive nutrients from soil, but from the solution used to water the plants. Hydroponics reduces worries about mineral buildup in soil, and lack of oxygen to suffocating roots, so leaching is usually not necessary with hydroponics. Hydroponics allows you to use smaller containers for the same given size plant, when compared to growing in soil. A 3/4 gallon pot can easily take a small hydroponically grown plant to maturity. This would be difficult to do in soil, since nutrients are soon used up and roots become cut-off from oxygen as they become root-bound in soil.
This problem does not seem to occur nearly as quickly for hydroponic plants, since the roots can still take up nutrients from the constant solution feedings, and the medium passes on oxygen much more readily when the roots become bound in the small container. Plant food is administered with most waterings, and allows the gardener to strictly control what nutrients are available to the plants at the different stages of plant growth. Watering can be automated to some degree with simple and cheap drip system apparatus, so take advantage of this when possible. Hydroponics will hasten growing time, so it takes less time to harvest after planting. Growing Hydroponic marijuana will also produce very potent and clean crops. Clean crops should be of concern if you are using the marijuana you grow for medical reasons or selling it to a clinic.
The Benefits:
- No soil is needed, so the entire operation is easier and cleaner.
- No nutrition pollution is released into the environment because of the controlled system.
- Increased plant growth rates and yields with improved aromatics, potency and taste.
- Dry spots and root drowning do not occur.
- The water stays in the system and can be reused; lower water costs.
- It is possible to control the nutrition levels in their entirety; lower nutrition costs and more potent specialized formula.
- No “repotting” labor if rockwool is used.
- Very clean, potent crops.
- Pests and diseases are easier to get rid of than in soil because of the container’s mobility; clean, potent crops.
- Fast total growth time.
- Hydroponics can be used in places where in-ground agriculture or gardening is not possible, such as a bedroom.
- Stable and high yields.
The Disadvantages:
- Price tag.
- Regular maintenance is required.
- Requires close monitoring of pH and ppm levels.
- Total reliance on constant electricity.
- Nutrient screw-ups are less forgiving than soil.
In addition to the above disadvantages, larger plants can deplete 5 litres of water in a single day so you are also in constant danger of the system literally running out of water. To emphasize this a little better, as plants uptake water they do not necessarily uptake nutrients at the same rate and as this occurs, the plants might be drinking lots of water but not eating much food. The result is that in a matter of hours, as the water is depleted, the concentration of the nutrients in the bucket can reach toxic levels. So it is critical to always under feed your plants in this system. With this in mind, the pH will also fluctuate as the water is depleted but the nutrients are not. So, you are advised to keep a constant check on monitoring and maintaining this system.
Now, assuming you’re new to growing hydroponics, most of the people who want to learn how to do it never get around to it thinking it is going to be some insurmountable herculean task, and I am here to tell you that growing hydroponic marijuana is actually pretty simple, anyone can learn and succeed in due time. So have at it!
Remember you start it is important to fully acknowledge that growing hydroponic marijuana requires a decent amount of monitoring & regular maintenance, so if you plan on being away from your grow area for extended periods of time then hydroponic growing may not be the best option.
Hydroponic Taste
Some growers feel that Cannabis or any other plant grown hydroponically using chemical fertilizer salts, must have a chemical taste. This is not always the case and has been shown in many research studies that hydroponically grown produce tastes no different than that which is soil grown. Plants that are hydroponically grown take up plant nutrients in exactly the same way as a plant does in the soil, no matter what the original source of nutrients (organic or inorganic) was, if you can notice a difference in taste, it may be you have not flushed or cured correctly. Still, others are convinced soil grown entirely organic holds supreme bud taste, and this is logical. Try both and see for yourself. If you want to play it safe, stick with organics.
How Hydroponic Growing Works
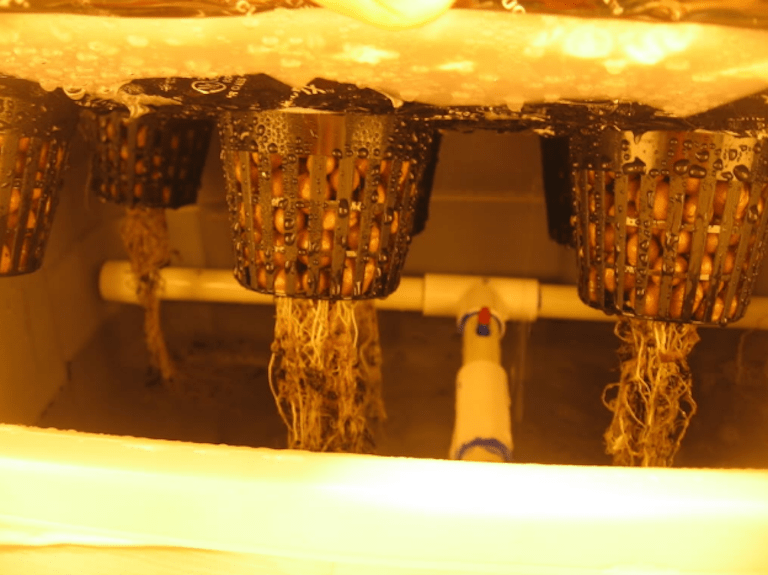
The gist of it is simply this: a reservoir containing your nutrient solution is located below a growing tray. The growing tray contains the containers that hold the plants growing in some medium such as rockwool, clay pebbles, sand, gravel, etc.
The system itself consists of a top layer and a bottom lower layer. The top layer holds your grow medium and the bottom layer holds the water with added nutrients. The plant is grown in the medium where it will develop it’s stem and a set of roots. The roots will then grow through the medium and down into the nutrient solution. The bottom layer growing bed is filled with nutrient solution using a small pump on a timer that feeds and waters the plants. The timer then shuts off the pump and the nutrient solution drains freely back into the reservoir.
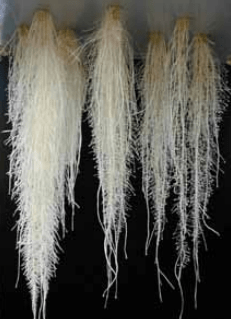
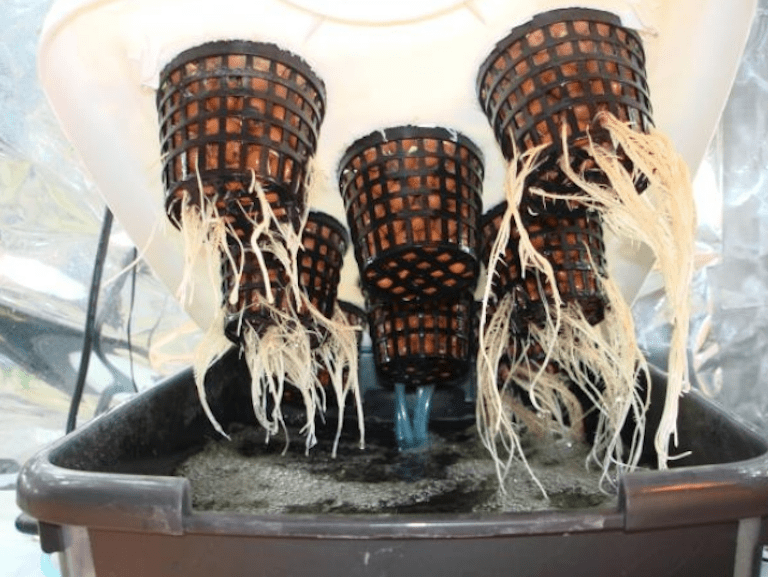
Another great thing about hydroponics is that due to the plant’s hanging root structure, they get exposed to air. This allows the plants to beautifully flourish! A key secret of hydroponics is that the plant’s energy can be used for maximizing growth instead of wasting precious energy on growing roots in soil and searching for water, food, and air. Get ready for a mass of root clusters! As you will come to see, Marijuana plants truly thrive in Hydroponic systems. If you decide to go with a hydroponics system over soil, you will not be disappointed as the results are nothing short of incredible.
Hydroponics have become massively popular among modern cannabis growers today. Hydroponics isn’t all milk and honey though, if you do not properly maintain your garden your plants will die off just as quickly as they will flourish into frosty big buds. Hydroponics allows growers to grow bigger and higher quality buds in ¾ the time it takes to grow the same strain in soil.
Choosing Your Hydroponic Garden System
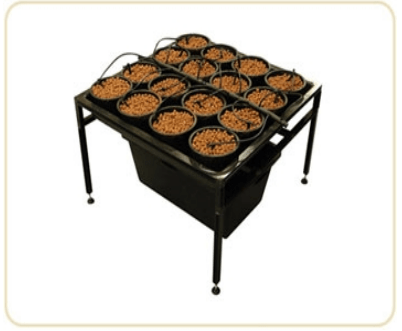
Now that you have chosen your ideal grow location, you will now need a hydroponic system, also commonly referred to as a Hydroponic Garden. There are different types of hydroponic systems available to marijuana growers today. Hydroponic systems are distinguished by the way that the nutrients are applied. Passive systems have no moving parts, so seldom does anything break or malfunction. These passive systems rely on capillary action to transfer nutrients to roots from the reservoir to the grow medium via a pump. Growing mediums such a peat moss and vermiculite are ideal for passive systems. Low initial cost, and low maintenance are the main reasons why growers choose passive systems.
Active hydroponic systems actively move the nutrient solution. Examples of these include flood & drain (also known as Ebb & Flow), nutrient film technique, and top feed. Active hydroponic systems use growing mediums that drain rapidly and hold plenty of air (such as expanded clay, pummus rock, rockwool and coconut fiber).
The ones most commonly used today by growers worldwide are Manual hydroponics pots, Automatic hydroponics Pots, Aeroponics, Drip Irrigation Systems, Nutrient Film Technique (NFT), and Flood & Drain Ebb & Flow. Keep in mind the NFT and Aeroponic systems are the most efficient types of systems, but they are the hardest to maintain and the most expensive. Ebb & Flow tends to be the easiest, these have proven track records of the easiest to use with low maintenance.
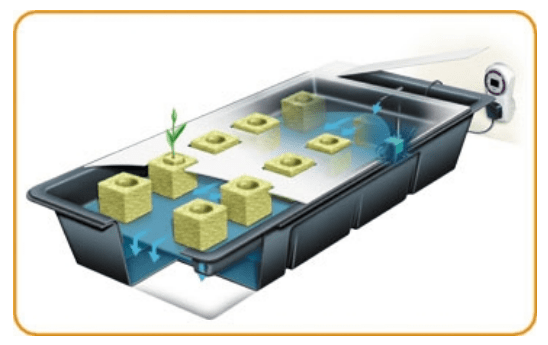
Flood & Drain – Ebb & Flow
The Ebb and Flow system is currently the most popular hydroponic method for growing weed. It will produce potent quick-flowering crops and is easy to use!
This is an all-in-one system. The plant is grown in the medium where it will develop it’s stem and a set of roots. The roots will then grow through the medium and down into the nutrient solution. The bottom layer growing bed is filled with nutrient solution using a small pump on a timer that feeds and waters the plants. The timer then shuts off the pump and the nutrient solution drains freely back into the reservoir.
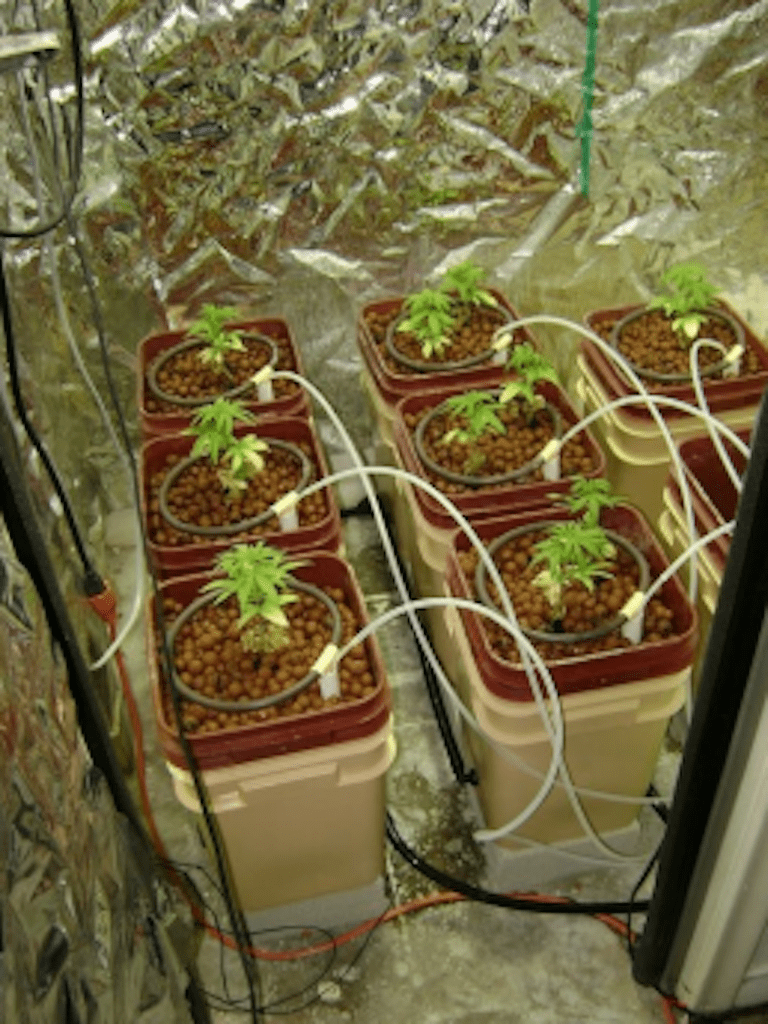
A basic Ebb & Flow setup will have the individual plants and pots set up in rockwool cubes or some other growing medium on a table called the growing bed. The growing bed can usually hold about 2 inches of nutrient solution. Nutrient solution is then pumped onto the table or growing bed, flooding the medium from the bottom up while also pushing out oxygen. Once the liquid nutrient solution reaches it’s maximum level a drain pipe is filled.
An ebb and flow system uses a timer to activate a pump that periodically floods the plants grow medium with nutrient solution and then drains the solution out. Often these system are designed using two plastic tubs, one sitting in another. The bottom tub contains the nutrient solution reservoir, the water pump, and an air stone (more oxygen means healthier roots) and the top tub or tray contains the plants. A single hole in the top tub allows the pump tubing into the tub, when the pump shuts off or in the event of a pump failure the water drains right back down the hole it came out of.
It is usually best to put another hole where it will drain down to the bottom tub at the highest level you want the water to reach. This prevents flooding. A system like this can run at different intervals depending on the grow medium you use but a common choice is 15min on and off cycles, or 30 minute on and off cycles.
Be very careful with a system like this. If a pump failure is not detected plants can die in a very short time period.
pH and Nutrient problems can be corrected in the reservoir with the need to fiddle with the plants themselves.
Nutrient Film Technique
An NFT system is an all-in-one package system. The reservoir that holds the pump and nutrient solution is contained within the same system. This enables a constant flow of aiirated nutrients to the roots (located in gullys) and the runoff nutrient solution is then directed back into the reservoir. These systems tend to be flat, and long.
NFT generally involves plants potted so their roots dangle down into a thin film of constantly running nutrient solution. This technique can work well for large scale hydroponic growing operations but if the nutrient film is interrupted it can be devastating.
A separate reservoir is maintained in this technique and it is not commonly used in practice.
Seedlings or cuttings with a strong root system are placed on capillary matting ( located on the bottom of covered channels). Constantly aerated nutrient solution flows down the channel (gully) over and around the roots and back to the reservoir. Only growers with a year or so more of experience should try growing with a Nutrient Film Technique setup, as they tend to be quite tricky!
Drip Irrigation System aka “Top Feed”
The Drip Irrigation System is another all in one system that feeds each plant individually. Each plant is located in separate chambers where the nutrients are fed to the medium by means of a small dripper. The solution is cycled and drained very much like an Ebb & Flow system.

Deep Water Culture aka “The Bubbler”
Another effective hydroponics system is the classic simple Hydroponics system known as Deep Water Culture(DWC) or called by it’s street name, “The bubbler”. Growing in a deep water culture system is easy and productive. The benefits of using this system is that it is very cheap to assemble and it provides pretty good growth rates. As you will see, the bubbler is also a very fun rewarding way to grow some serious buds.
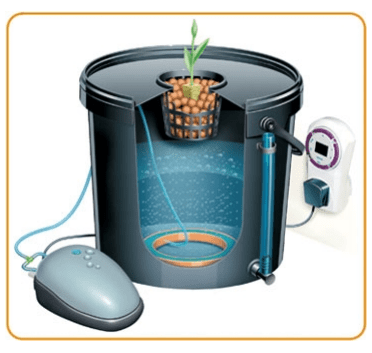
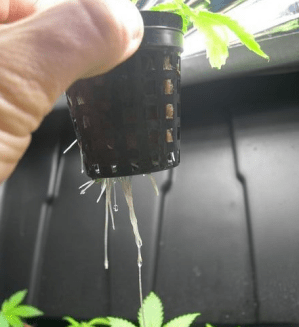
A Bubbler, as complicated as it may sound, is actual quite simple. It’s basically a bucket with a pump. Seedlings or clones are held in net pots in expanded clay pellets, rockwool, or another growing medium. The net pots are nestled in holes in a lid that covers the reservoir. While the roots of seedlings and cuttings dangle down into the nutrient solution, a submersible pump lifts nutrient solution to the top of a discharge tube where it splashes into the access lid. Nutrient solution then cascades down, wetting the roots and splashing back into the self-contained reservoir below, aka it BUBBLES constantly. The potential of this little hydroponics system is awesome – it can grow a plant from 5 ft. to 8ft. with an abundance of fresh quality buds. That is, if you maintain it properly.
How To Start Marijuana Seeds In DWC System
A deep water culture setup is excellent for the personal use marijuana grower. Starting marijuana seeds for this popular cannabis growing method is rather easy. This system is excellent for germinating marijuana seeds.
Start with standard rockwool cubes. Soak them in water. Get your marijuana seeds ready. When your cubes have soaked up enough water take them to a bathtub. Give them 2 or 3 hardy shakes. DO NOT SQUEEZE OUT! A few hard shakes will release plenty of water, making air pockets within the cube itself. These air pockets are very important for marijuana seed growth. By shaking out the cube you keep your marijuana seed from drowning to death (too much moisture will kill delicate little marijuana seedlings).
Poke the marijuana seed in the rockwool cube where the hole is pre-made. If you find that’s too big for your marijuana seeds, turn the cube over and poke a smaller hole.
With most of the water out, pick the marijuana seeds you want to grow and drop them in the hole about 1/4″-1/2″ down. Carefully squeeze the hole closed and place in a humidity dome. Light isn’t all that important until the marijuana seed sprouts, however its very important to keep the temps around 80°F (26.6°C). Warmth will speed up the process considerably.
Within 4 to 7 days (up to 14) you should see marijuana seedlings poking out of the cube.
When this occurs move the cubes to a 2 gallon rooter DWC bucket with 3″ net pot holes with a few rocks on the bottom to support the cube. Leave plenty of space for the roots to grow.
This method of marijuana seed germination isn’t too difficult to learn. It might take a few times to master, but use the free marijuana seeds most marijuana seed banks offer to learn on.
These free marijuana seeds are excellent way to learn germination without possibly ruining the best marijuana seeds you actually want to grow.
Deep Water Culture is excellent for the personal use marijuana grower who plants a few marijuana seeds. The method of gardening cannabis is known to produce very heavy yields.
Automatic Hydroponics Pots & Manual Hydroponics Pots
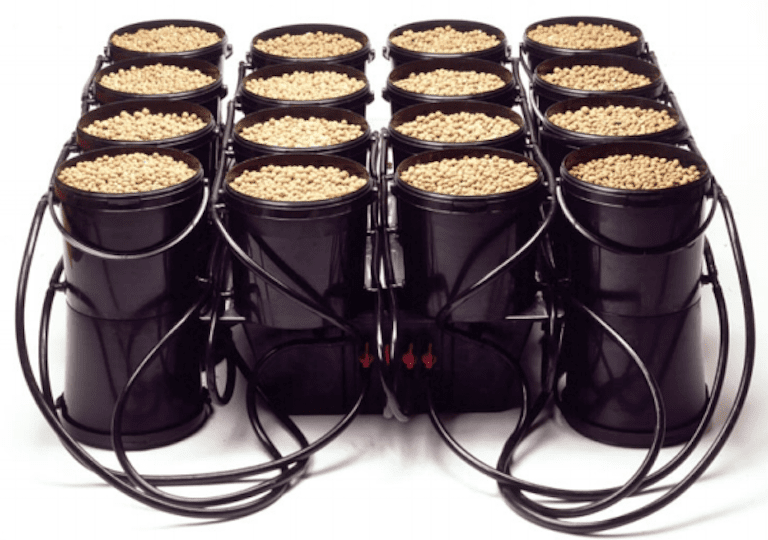
These systems consist of pots used for growing one plant at a time. Each pot has it’s own pump that delivers the nutrients. You can also feed them by hand. The nutrients are fed into the bottom of the pot until they reach the roots, then the roots suck up the nutrients until dry, where more nutrient solution is then added and the cycle continues. These Hydroponic Systems are ideal for the grower who wishes to grow very large bushy cannabis plants in a simple standalone unit.

Wick/Hempy Bucket: Wick systems and Hempy buckets are very similar. In a wick system a pot with medium has a wick placed down it that extends down into a reservoir and draws up nutrients via capillary action as they are needed or water evaporates. This is much like the way a lantern or wick lighter works, drawing flammable fluid up the wick to be burned until it is exhausted. A simple 2.5 to 5 gallon bucket has a 3/4 inch hole drilled about 2-2.5 inches above the bottom.
Depending on the medium and size of the medium used it may not be needed but it is common to glue a piece of plastic screening over the hole on the inside of the bucket. This bucket is then filled with a mixture of perlite and vermiculite (popular mixes are 3 parts perlite to 1 part vermiculite and 1 part vermiculite to 1 part perlite).
The bucket is then watered with full strength nutrient solution every 3-4 days, you water until nutrient comes out the hole in the bottom. This flushes out any built up nutrient salts with every watering assuring that you have a perfect balance.
A hempy is as simple as hydroponics gets and is capable of producing the same yields and quality output as other more complex hydroponic systems. Because it allowed to mostly dry between waterings and pulls nutrients up via perlite wicking the roots are very well oxygenated. Since fresh nutrient is added every 3-4 days there is no reservoir to become imbalanced. Although it looks like dirt the perlite/vermiculite medium is completely inert, it contains no nutrients and provides no pH or nutrient buffer. Plants can drink all the nutrient they want just as in other hydroponic systems.
The hempy system has the advantage that because it is simple there are fewer mistakes to be made. Also important is the fact that the hempy bucket has no pumps of any kind that can fail without you noticing. Hempy buckets can be used in a greenhouse outdoors with no power at all. Like a soil grow the medium retains moisture so you can leave the bucket for up to a week with no adverse affects.
The downfalls compared with other hydroponic systems are that plants must be moved one by one in buckets if moved. You also must water a hempy bucket by hand every 3-4 days and with a large number of plants that can become very labor intensive. For instance, for someone who could not carry a five gallon bucket filled with water a hempy installation of more than 3-4 plants would probably be unmanageable unless the water source was very close by. Because you flush out the nutrient solution and any unused nutrients in it every few days the hemp bucket also requires more nutrients than other hydroponic methods.
Aeroponics
Aeroponics are an extremely efficient hydroponics systems. Expert growers unanimously agree, these are the best systems money can buy.

Aeroponic systems are very expensive and generally are only used by professional growers. They offer the highest performance possible featuring unsurpassed plant growth, resin, potency and yields with incredible aromatics and taste. They also require heavy maintenance and great attention to detail. Aeroponic systems require extremely close monitoring of pH and ppm levels and have a total reliance on constant electricity.
Aeroponics is a relatively new technique. Like in NFT, plants are suspended over the nutrients, but instead of a film of moving nutrients there are instead air stones spread under the roots in the nutrients that highly oxygenates them and produces bubbles. The bubbles burst and splash the roots with highly oxygenated nutrient solution.
 This can stimulate very impressive root growth, which leads to unbelievable bud growth. In practice aeroponics aren’t considered especially effective for large plant growth, though there is no theoretical reason they could not be. This type of system is very often used for maintaining small clones.
There is no growing medium to act as a water nutrient bank, which makes the system very delicate to use. The plants are grown in a medium that is placed into slots along a long tube. Roots are suspended in a dark chamber without growing medium where they are misted with oxygen rich nutrient solution at regular intervals. If the pump fails roots will soon dry and plants will suffer almost immediately. Tubes can vary in length anywhere from 1 meter to 20 meters! Looking inside the tube we will discover nozzles which mist down the roots of each plant with grow nutrients. The nutrient-filled reservoir is kept outside the tube in a tank. The nutrients are pumped from the tank into and out of the nozzles and then the remaining solution that drips down from the plants is drained into another tank that is monitored and modified before being recycled and used again.
Growing the Stealth Hydro Way
Some growers want to reap the amazing benefits of utilizing hydroponic growing methods to enjoy the unbelievable bud they produce, but they feel they can’t afford these expensive systems or worse yet, can’t fit them in their limited grow space. Well, Stealth Hydro has done it again and came up with a solution for modern day growers. Many growers right now are raving about their newly developed Bubbleponics line. Their most popular “beginner” Bubbleponics system right now can grow six huge flowering plants and they’ve made it available for only $99! It literally is the world’s first continuous plant feeding system. Bubbleponics is a hybrid design that takes the best from both worlds of the bubbler and drip systems. Since the nutrient mix is highly oxygenated, Bubbleponics converts its drip function to a constant feed flow directly to the inner roots. Without needing to take breaks to allow the root base to drain and absorb oxygen, plants in the Bubbleponics system are able to deliver unparalleled growth energy.
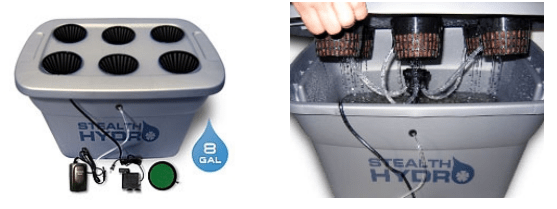
Stealth Hydro system
This advantage is particularly pronounced during early vegetative phases when the plant’s root mass is still relatively small. Cuttings placed into the system experience no noticeable transplant shock and practically start growing immediately. In experiments measured against leading Aeroponic systems, the Bubbleponics design shaved, on average, four days from a two week growing cycle, a 30% growth rate increase over Aeroponics in the early vegetative stage; truly amazing. This is incredible, a small-time closet grower with one of their systems can reap the EXACT (actually more) benefits of extremely expensive professional Aeroponic systems, and the best part is they’re super inexpensive. Many growers report “unreal” buds coming from these systems. But shhh keep it a secret, people aren’t going to believe the buds you’re going to be holding in your hands.
As the root mass of the respective plants grow larger, growth rate advantages were less evident, however, the plants in the Bubbleponics planter maintained their 4-5 day lead over the Aeroponic plants throughout the entire cycle.
In a series of stress tests, plants in the Bubbleponics system performed remarkably when recovering from an over-fertilized condition. With almost the entire root mass destroyed, Bubbleponics was able to revive 67% of the plants which started re-growing new roots and were able to complete their cycle. None of the other plants in the Aeroponic products survived this stress test. The tests concluded that the Bubbleponics system provided significant recovery advantages over other systems when it came to anything that stressed or killed that root mass.
The Bubbleponics system is great for the grower who is turned on to the incredible benefits hydroponic systems offer growers, but turned off from the heavy maintenance and complicated operation involved. Stealth Hydro has designed their Bubbleponics line with ease of use in mind. Considering that there are no timers to set and tweak for the water pump, and that the unit is totally self contained and mobile, this is one of the simplest hydroponic designs most growers report they have ever used. From setup to final clean up, bar none, one of the best high speed hydroponic systems on the market. Stealth Hydro’s Bubbleponics line has raised the bar and changes everything we are to expect from modern-day hydroponics.
Final Considerations
Before you make your final decision on what type of hydroponic system you are going to use, consider these last crucial factors: It is important with any hydroponic system to remember that unlike with soil, there is no buffer. Plants will respond very quickly if there are no nutrients being supplied and/or water or the pH of the nutrient solution is incorrect. Roots need high oxygen levels or they will rot. And remember that plants need ample space to grow and should never be planted where their roots will intermingle.
If you can effectively monitor and maintain a hydroponic system, go for it. You will not be disappointed. They are incredibly fun systems to grow some awesome weed in.
Oxygen
Hands down the single most important aspect of Hydroponics. The importance of clean fresh air or oxygen in the water is critical for vigorous plant growth (aka dense heavy big resin-rich potent buds!). Add an air pump. Heck, add two. The addition of a 2nd air stone can make a significant difference in the speed of growth. You can use a plastic T-coupler so you can add a second stone to the one air pump. You can force growth spurts by draining the tank, waiting five or ten minutes to allow the roots to “air out” and then replenishing the water, even if you add back the same water and nutrient mix that you just drained out. Try it! Your plants will thank you.

Lighting
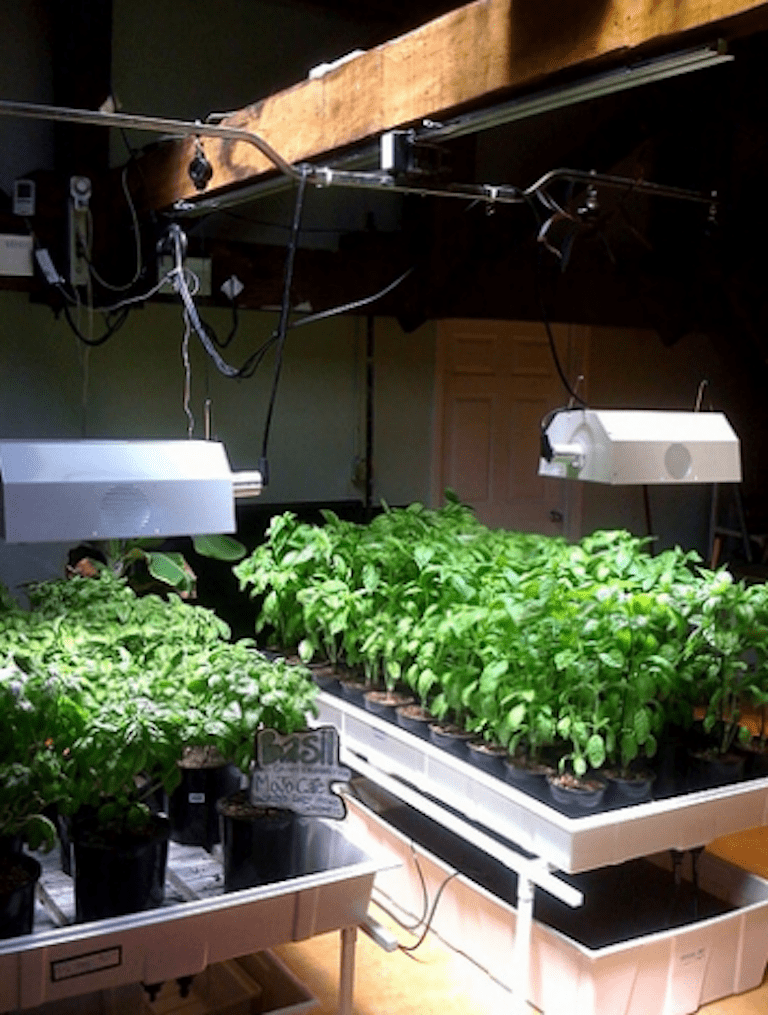
Refer to the Lighting section, same rules apply. 400 watts is about the best size of light for growing hydroponic marijuana in a personal garden. You should be able to grow about 4 to 12 plants at a time. 250 watts should be good enough for up to about 2 to 6 plants. Anything bigger (next standard size is 1000 watts) and you are going to draw a lot of electricity. Anything smaller will limit the size of your garden to one or two plants.

Growing Mediums
Hydroponic grow mediums exist to provide a stable base for your plant to grow its roots through and to hold up the weight of the plant. Over the years many substances have been found to fill this role and they have different properties. Often a grower will use one or more of these mediums depending on the methods he has chosen for growing and the desired properties of the medium in the container being used.
Remember the media will not provide any nutrition, it is just a support for the roots. All nutrition comes from the hydroponic solution. Also keep in mind rockwool and other media may have to be soaked in pH adjusted water prior to use, especially when seeds are involved.
Grow mediums are designed to be the perfect substance for your plants will take root in. Growing mediums such as rockwool or clay pebbles are the most popular and commonly used today. Grow mediums are artificial grow substances designed to contain all the plants mineral needs and allow air to reach the roots to promote exceptional growth. Rockwool is the most widely used.
The main difference between hydroponics and soil growing is that the hydroponic soil or “medium” is made to hold moisture, but drain well, so that there are no over-watering problems associated with continuous watering.
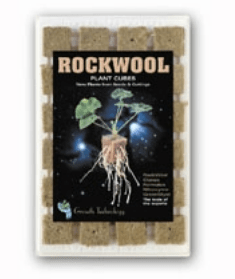
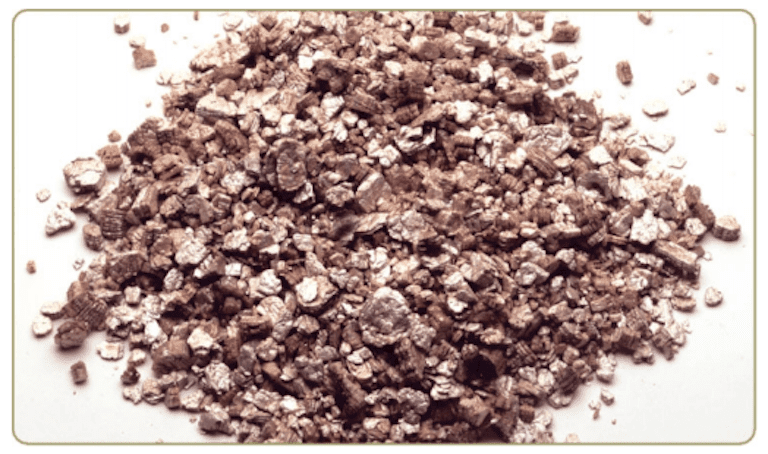
Rockwool: Rockwool is literally spun rock; the rock is spun into a material that looks similar to the spun glass used for insulation. Most growers are using rockwool in some form. If allowed free drainage rockwool will retain just the right amount of moisture.
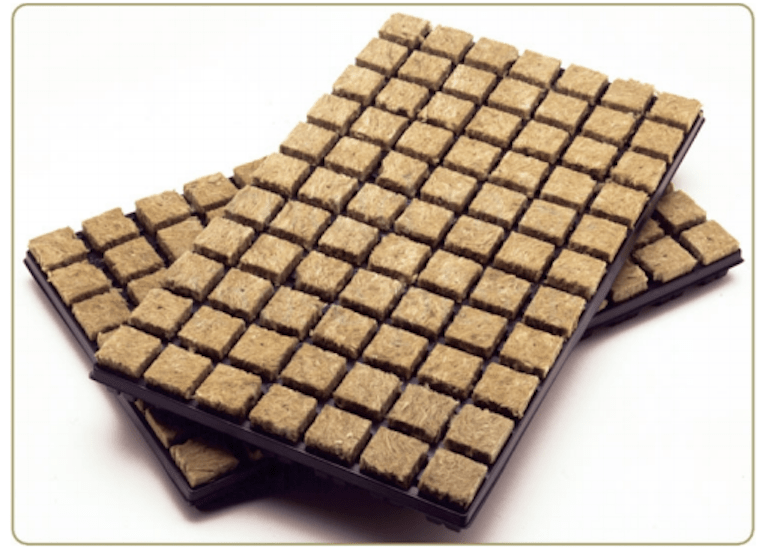
Rockwool comes in multiple sizes of cube. There are smaller cubes or plugs that are typically used for seedlings or clones and larger blocks that are used in hydroponic systems (such as Ebb & Flow trays). Some of the large blocks have holes in them to make it easy to insert the small plugs or cubes you used to clone the plant directly into the larger block. Rockwool must be completely submerged in water for 8hrs prior to use in order to remove any air bubbles in the medium.
Rockwool cubes can be reused several times, and are pre-made for use with hydroponic systems. Just place the plant’s cube on top of a larger rockwool cube and enjoy your extra leisure time. Some find it best to save money by not buying rockwool and spending time planting in soil or hydroponic mediums such as vermiculite/lava mix. Perlite is nice, since it is so light. Perlite can be used instead of or in addition to lava, which must be rinsed and is much heavier. Rockwool cubes vary in sizes from 1” to 6” cubes. They are also excellent for cloning. A lot of growers also use rockwool cubes for seed germination and rooting cuttings, as this is one of the easiest methods.

Rockwool has many advantages. For starters it isn’t very expensive, and it is reusable. It is also impossible to over water and there is no transplanting involved. Rockwool holds 10 times more water than soil, yet is impossible to over-water. This is because it always retains a high percentage of air. There is no transplanting – just place a starter cube into a rockwool grow cube, and when the plant gets very large, place that cube on a rockwool slab. Since rockwool is easily reused over and over, the cost is divided by 3 or 4 crops, and ends up costing no more than vermiculite and lava, which is much more difficult to reclaim, sterilize and reuse (repot) when compared to rockwool. Vermiculite is also very dangerous when dry, and ends up getting in the carpet and into the air when you touch it (even wet), since it dries on the fingers and becomes airborne. For this reason, I do not recommend vermiculite when growing indoors.
 Rockwool doesn’t have very many disadvantages. The thing is, it has a base alkaline pH, so you must use something in the nutrient solution to make it acidic(5.5) so that it brings the rockwool down from 7.7, to 6.5(vinegar works just fine). And it is irritating to the skin when dry, but is not a problem when wet. To pre-treat rockwool for planting, soak it in a solution of fish emulsion, trace mineral solution and phosphoresic acid (pH Down) for a minimum of 24 hours, then rinse. This will decrease the need for pH concerns later on, as it buffers the rockwool pH to be neutral. This will properly stabilize the pH level of your rockwool, creating the ideal grow medium that’ll assist in producing high quality big buds. You must do this. After check the pH of the medium every time you water to be sure no pH issues are occurring.
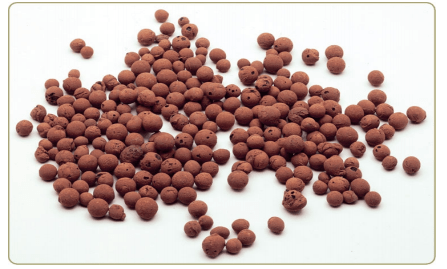
Hydroton: Hydroton clay pellets are also very effective and quite popular. Be sure to occasionally move them around so that the hydroton stays wet all the way through. Hydroton consists of lava rock or clay pellets that are available in different sizes and usually have a red coating on the outside. This inert medium is effective in continuous drip and ebb and flow systems. It is also an excellent choice anywhere you need drainage and some have used it for the bottom couple of inches of a hempy bucket to facilitate free drainage.
Soil: Mother Earth’s plant food. A.K.A. plain ol’ dirt. Soil is actually a composite of a number of substances and varies from on location to another. It is typically composed of rock, sand, clay, and organics. Organics are decomposed plant and animal matter and provide the nutrient content that is contained in soil, clay binds soil together and retains moisture, rocks and sand provide drainage to allow for root oxygenation. Additionally soil is usually teaming with microorganisms that are feeding on and breaking down the organics contained within it.
When growing a potted plant indoors you will probably want to mix perlite with your soil to enhance moisture retention. It is also highly recommended that potting soil be used in a pot rather than soil that you have dug up from the ground. A potting mix can be more carefully designed for optimal plant health and the soil outside will contain many unwanted forms of insect life that can, and will, infect and kill your plants.
Another common concern with soil is that potting soils often already have fertilizers in them (in addition to the nutrients contained in the organics). In general, try to avoid potting soils with time release nutrients. If you do purchase a bag, be aware that the plant will not need any nutrients for a period of time. You’ll need to just water with clean water to avoid burning the roots.
Perlite: Perlite is a porous white substance that is very absorbent and excellent at retaining and wicking moisture. Perlite is often used for cloning and mixing with other grow mediums, but it can also be used on its own. Growers who use perlite as a sole grow medium will often purchase large coarse chunks rather than the smaller porous perlite that is more readily available in most areas. It is not recommended to use perlite in a circulating system because the fine dust that comes off the perlite will clog pumps over time. The same fine dust brings a recommendation that when handling perlite you utilize a respirator device so that the dust does not harm your lungs. Perlite is a unique volcanic mineral which expands from four to twenty times its original volume when it is quickly heated to a temperature of approximately 1600-1700°F (871.1-926.6°C). This expansion is due to the presence of two to six percent combined water in the crude perlite rock which causes the perlite to pop in a manner similar to that of popcorn.
When expanded, each granular, snow-white particle of perlite is sterile with a neutral pH and contains many tiny, closed cells or bubbles.
The surface of each particle is covered with tiny cavities which provide an extremely large surface area. These surfaces hold moisture and nutrients and make them available to plant roots. In addition, because of the physical shape of each particle, air passages are formed which provide optimum aeration and drainage. Because perlite is sterile, it is free of disease, seeds, and insects. Perlite has been used for many years throughout the world for soil conditioning and as a component of growing mixes with materials such as peat moss or bark. Extensive studies have shown that the unique capillary action of perlite makes it a superior growing media for a hydroponic growth medium.
Perlite is a completely inert substance so will not interfere with your feeding schedules. That being said, there are some manufacturers that put nutrients in their brand of perlite even though it is not indicated on the product label. This material can be used but should be flushed thoroughly with water to wash out the nutrients. Perlite should be washed anyway to remove the fine dust that builds up in it.
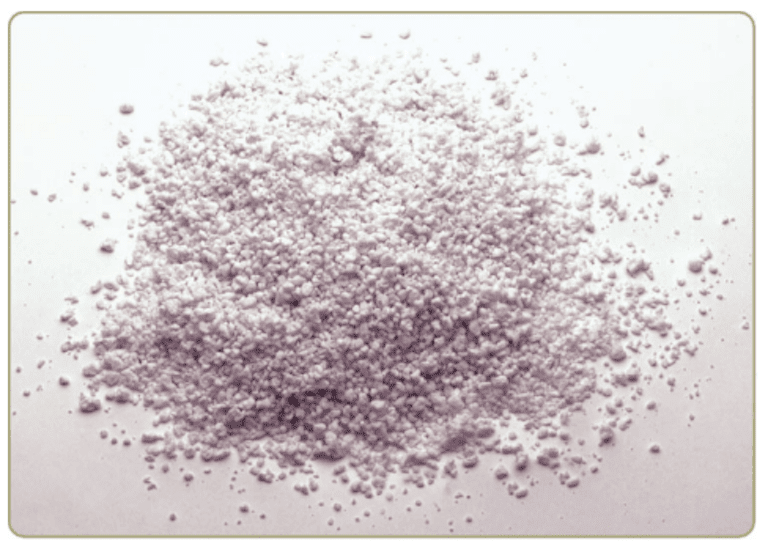
Vermiculite: Vermiculite is a crushed volcanic rock medium that provides excellent drainage when mixed with other grow mediums. Vermiculite is inert but is not particularly suitable for use as a grow medium by itself. It consists of any of various micaceous minerals that are hydrous silicates resulting usually from expansion of the granules of mica at high temperatures to give a lightweight highly water-absorbent material that both is sterile and light in weight (5 to 8 lbs).
The pH of vermiculite will vary depending on where it is mined. Most U.S. sources are neutral to slightly alkaline, whereas vermiculite from Africa can be quite alkaline (pH = 9). Vermiculite is used extensively in the greenhouse industry as a component of mixes or in propagation. It is usually sold in four size grades: #1 is the coarsest and #4 the smallest. The finer grades are used extensively for seed germination or to topdress seed flats. Expanded vermiculite should not be pressed or compacted, especially when wet, as this will destroy the desirable physical properties.
Coconut Fiber: Many modern growers are beginning to use this newer grow medium. Coconut fiber offers some of the buffering capacity of soil, drains well, retains enough moisture to be useful, and has little nutrient content.
Hydroponic Nutrients
Proper hydroponic nutrient use is arguably the most important aspect of your entire setup. Your nutrient choice and mix will determine whether your plant will shrivel up and die in a couple hours, grow, grow big, or grow very very big.
Nutrient Ratio
As you recall, all plant food is measured in the N-P-K format.
N for Nitrogen
P for Phosphorus
K for Potassium
A 15-15-15 solution contains 15% Nitrogen, 15% Phosphorus, 15% Potassium. 20-10-5 solution contains 20% Nitrogen, 10% Phosphorus, 5% Potassium. The percentage of the solution not used by N-P-K is trace elements and inert material. Make sure when choosing your hydroponic-designed fertilizer that it supplies adequate amounts of nitrogen during early growth stages. Typical hydroponic fertilizers (nutrient solutions) have a nutrient ratio of 9-5-10 or 18-6- 16. Fertilizers that will be used for later growth should have lower rations of N. In order to get vigorous growth from your plants, you will need to find a nutrient solution that also supplies secondary and micro-nutrients. This will be listed on the label of the package.
Note: If your nutrient solution is deficient in magnesium (very common) then you can use Epsom salts as described in the soil nutrient section. You can also purchase an iron-zinc-manganese combination solution at your local grow shop. Depending on what stage of growth your crop is in, you can adjust different nutrient levels needed at different times to optimize growth for producing the highest quality and biggest size buds that grow as fast as biologically possible.
You must change plant foods often to avoid deficiencies in the plants. I recommend using 2 different plant foods for each phase of growth, or 4 foods total, to lessen chances of any type of deficiency. Change the solution more often if you notice the pH is going down quickly (too acidic). Mostly due to cationic exchange, solution will tend to get too acidic over time, and this will cause nutrients to become unavailable to the plants.
Higher amounts of N are needed when the temperature will be below 80°F (26.6°C) in the grow room during vegetative growth. 20-20-20, or 23-19-17, or 12-6-6, or something similar, with trace elements should do it.
If temperatures are higher than 80°F (26.6°C) in the grow room, you need not worry about more N in the formula during vegetative growth.
During flowering the plant needs lots of Phosphorus, regardless of temperature. 15-30-15, or 5-20-10, or 2-4-3, or something similar, with trace elements should do it.
WARNING: Do not over feed your plants!!!! Too much nutrients will kill your plants. Especially when growing in hydroponics, there is no buffer! It is always better to use too little than too much. If you under feed, the plants will not die, but instead take longer to grow. Follow the instructions on your nutrient solution’s manufacture label. If you’re not sure always go with the “less is more” rule.
Best Ratios for Hydroponics 3-part
These mixes work well and are the accepted standard mix recommended for newer growers. It is simple to remember: 3-2-1…2-2-2…1-2-3.
The 1-2-3 Recipe:
- Vegetative stage: Use 3-2-1 (3 parts grow, 2 parts micro, 1 part bloom).
- Early flowering: first 2-3 weeks or until stretching stops: Use 2-2-2 (2 parts each).
- Late flowering: Use 1-2-3 (1 part grow, 2 parts micro, 3 parts bloom).
*Teaspoons per US gallon (5ml = 1 part)
$$Dilute final mixture (or adjust part size) to suit your plants nutrient strength (EC/TDS) requirements. If your nutrient solution is lacking Mg, add 1/8 to 1/4 teaspoon epsom salts per gallon of final mix. Dissolve the salts in some warm water before adding to your nutrient reservoir.
TDS, PPM, and EC
If you have any desire to mix your own fertilizers, it is important that you have a basic understanding of these three critical terms.
Electric Conductivity (EC) & Conductivity Factor (CF)
Electricity is conducted due to the presence of ions (electrically charged particles) in any given solution. In hydroponic marijuana growing, the ions get there by introduction of salts via your fertilizers.
EC (electrical conductivity) is a representation of how much potential a solution has to conduct electricity. So by testing the ability of a solution to conduct electricity, we can indirectly determine the amount of salts present… thereby knowing if we have the right concentration of fertilizers.
E.C. is a measurement of salinity by measuring its conductivity. You want an E.C. under 2.0. Anything around 4.0 signifies an extreme excess of salt which calls for immediate leeching. There are multiple devices for measuring. Getting an accurate device is critical. Many newer growers feel they can use their own “eye measurement” as a more accurate means of testing these levels, when they just end up destroying their plants.
CF (Conductivity Factor) basically represents the same information but expressed differently. 1 ms/cm is equal to a CF of 10. Conductivity Factor isn’t used nearly as much as EC.
Total Dissolved Solids (TDS) & Parts Per Million (PPM)
Total Dissolved Solids (TDS) is the best measurement of the nutrient concentration of a hydroponic solution. To estimate TDS, one can use a meter that measures the Electric Conductivity (EC) of a solution, and convert the number to TDS in parts per million(ppm). Many meters will do this conversion.
Total dissolved solids (TDS) is typically expressed in parts per million (ppm). It is a measurement of mass and determined by weighing, called a gravimetric analysis. A solution of nutrients dissolved in water at a strength of 700 ppm means that there are 700 milligrams if dissolved solids present for every liter of water. To accurately calculate total dissolved solids (TDS), one would evaporate a measured filtered sample to dryness, and weigh the residue. This type of measurement requires accurate liquid measurement, glassware, a drying oven, and a milligram balance. For example, 50 mL of the 700ppm solution would leave 35 mg of salt at the bottom of a crucible after drying.
Electrical Conductivity (EC) is expressed in siemens per centimeter (s/cm) or milliseimens per centimeter (ms/cm). It can be determined with an inexpensive hand held meter. Nutrient ions have an electrical charge, a whole number, usually a positive or negative 1, 2, or 3. EC is a measurement of all those charges in the solution that conduct electricity. The greater the quantity of nutrient ions in a solution, the more electricity that will be conducted by that solution. A material has a conductance of one siemens if one ampere of electric current can pass through it per volt of electric potential. It is the reciprocal of the ohm, the standard unit of electrical resistance. A siemens is also called a mho(ohm backwards).
EC measurements often are converted to TDS units (ppm) by the meter.
The meter cannot directly measure TDS as described above, and instead uses a linear conversion factor to calculate it. Everyone’s nutrient mix is different, so no factor will be exact. The meter uses an approximate conversion factor, because the exact composition of the mix is not known. Conversion factors range from . 50 to .72, depending on the meter manufacturer, which actually do a good job of approximating a TDS calculation from the meters measurement of EC.
Note: All ppm pens actually measure the value based on EC and then convert the EC value to display the ppm value, having different conversion factors between differing manufacturers is why we have this problem communicating nutrient measurements between one another.
EC is measured in millisiemens per centimeter(ms/cm) or microsiemens per centimeter(us/cm).
One millisiemen = 1000 microsiemens.
EC and CF (Conductivity Factor) are easily converted between each other.
1 ms/cm = 10 CF
The problem is that different ppm pen manufacturers use different conversion factors to calculate the ppm they display. All ppm (TDS) pens actually measure in EC or CF and run a conversion program to display the reading in ppm’s.
There are three conversion factors which various manufacturers use for displaying ppm’s…
USA 1 ms/cm (EC 1.0 or CF 10) = 500 ppm
European 1 ms/cm (EC 1.0 or CF 10) = 640 ppm
Australian 1 ms/cm (EC 1.0 or CF 10) = 700 ppm
For example:
Hanna, Milwaukee 1 ms/cm (EC 1.0 or CF 10) = 500 ppm
Eutech 1 ms/cm (EC 1.0 or CF 10) = 640 ppm
Truncheon 1 ms/cm (EC 1.0 or CF 10) = 700 ppm
TDS Meters
Total Dissolved Salts (TDS) meters are essentially little volt meters that look at the voltage produced by a sensor, usually a couple of metal pins. The nutrient solution acts like a battery electrolyte and the pins function as do plates (electrodes) in a battery. The idea is that a nutrient solution is more electrically conductive when there are more nutrient salts in solution, so more salts means more voltage. A little math is done in the machine to convert the voltage to ppm(parts per million of dissolved solids). There is a calibration adjustment so this math can be touched up to compensate for various factors.
You will need a test solution to verify your meter once a week. Usually you will find a single measurement at about 1500-1700ppm is enough to verify it’s reading what it’s supposed to.
You need one that will read at least 0-2000ppm (or 0-1999ppm). You could use a 0-999ppm meter in a pinch if you added an equal volume of plain water to a sample from your tank – you’d just double the meter reading. It’s best to simply get the correct meter. There are other scales of measurement of nutrient concentration. In Europe, the “EC” (electrical conductivity) meters are preferred. They measure in units of millisiemens or mS instead of parts per million (ppm).
The numbers are convertible one scale to the other, but most references and discussion here cite the ppm scale. Waterproof meters are both more expensive and worth it.
Calculating the Conversion Factor
If your meter allows you to switch between EC and TDS units, your conversion factor can be easily determined by dividing one by the other.
Place the probe in the solution and read TDS in ppm. Change to EC on the meter and read EC in ms/cm.
Conversion Factor = PPM / EC.
Note: ms must be converted to us: One millisiemen = 1000 microsiemens (1.0 ms/cm = 1000.0 us/cm
According to the chart below:
1.0 ms/cm = 500 ppm (USA Hanna)
1000 us/cm = 500 ppm
Conversion factor = ppm / (ms/cm * 1000)
.50 = 500ppm / (1000us/cm)
Your meter’s conversion factor and should be a number between 0.50 and 0.72. To improve accuracy, take EC and PPM readings from your nutrient reservoir daily for about ten days. Average the conversion factors. The more data points that you use, the closer you will be to finding your true conversion factor.
A Note to Organic Growers: An EC meter has fewer applications for a soil grower because many organic nutrients are not electrically charged or are inert. Things like Fish Emulsion, blood meal, rock phosphate or green sand cannot be measured with a meter reliably when they are applied or in runoff. Meters can only measure electrically charged salts in solution.
| EC | Hanna | Eutech | Truncheon | CF |
|---|---|---|---|---|
| ms/cm | 0.5 ppm | 0.64 ppm | 0.70 ppm | 0 |
| 0.1 | 50 ppm | 64 ppm | 70 ppm | 1 |
| 0.2 | 100 ppm | 128 ppm | 140 ppm | 2 |
| 0.3 | 150 ppm | 192 ppm | 210 ppm | 3 |
| 0.4 | 200 ppm | 256 ppm | 280 ppm | 4 |
| 0.5 | 250 ppm | 320 ppm | 350 ppm | 5 |
| 0.6 | 300 ppm | 384 ppm | 420 ppm | 6 |
| 0.7 | 350 ppm | 448 ppm | 490 ppm | 7 |
| 0.8 | 400 ppm | 512 ppm | 560 ppm | 8 |
| 0.9 | 450 ppm | 576 ppm | 630 ppm | 9 |
| 1.0 | 500 ppm | 640 ppm | 700 ppm | 10 |
| 1.1 | 550 ppm | 704 ppm | 770 ppm | 11 |
| 1.2 | 600 ppm | 768 ppm | 840 ppm | 12 |
| 1.3 | 650 ppm | 832 ppm | 910 ppm | 13 |
| 1.4 | 700 ppm | 896 ppm | 980 ppm | 14 |
| 1.5 | 750 ppm | 960 ppm | 1050 ppm | 15 |
| 1.6 | 800 ppm | 1024 ppm | 1120 ppm | 16 |
| 1.7 | 850 ppm | 1088 ppm | 1190 ppm | 17 |
| 1.8 | 900 ppm | 1152 ppm | 1260 ppm | 18 |
| 1.9 | 950 ppm | 1216 ppm | 1330 ppm | 19 |
| 2.0 | 1000 ppm | 1280 ppm | 1400 ppm | 20 |
| 2.1 | 1050 ppm | 1334 ppm | 1470 ppm | 21 |
| 2.2 | 1100 ppm | 1408 ppm | 1540 ppm | 22 |
| 2.3 | 1150 ppm | 1472 ppm | 1610 ppm | 23 |
| 2.4 | 1200 ppm | 1536 ppm | 1680 ppm | 24 |
| 2.5 | 1250 ppm | 1600 ppm | 1750 ppm | 25 |
| 2.6 | 1300 ppm | 1664 ppm | 1820 ppm | 26 |
| 2.7 | 1350 ppm | 1728 ppm | 1890 ppm | 27 |
| 2.8 | 1400 ppm | 1792 ppm | 1960 ppm | 28 |
| 3.9 | 1450 ppm | 1856 ppm | 2030 ppm | 29 |
| 3.0 | 1500 ppm | 1920 ppm | 2100 ppm | 30 |
| 3.1 | 1550 ppm | 1984 ppm | 2170 ppm | 31 |
| 3.2 | 1600 ppm | 2048 ppm | 2240 ppm | 32 |
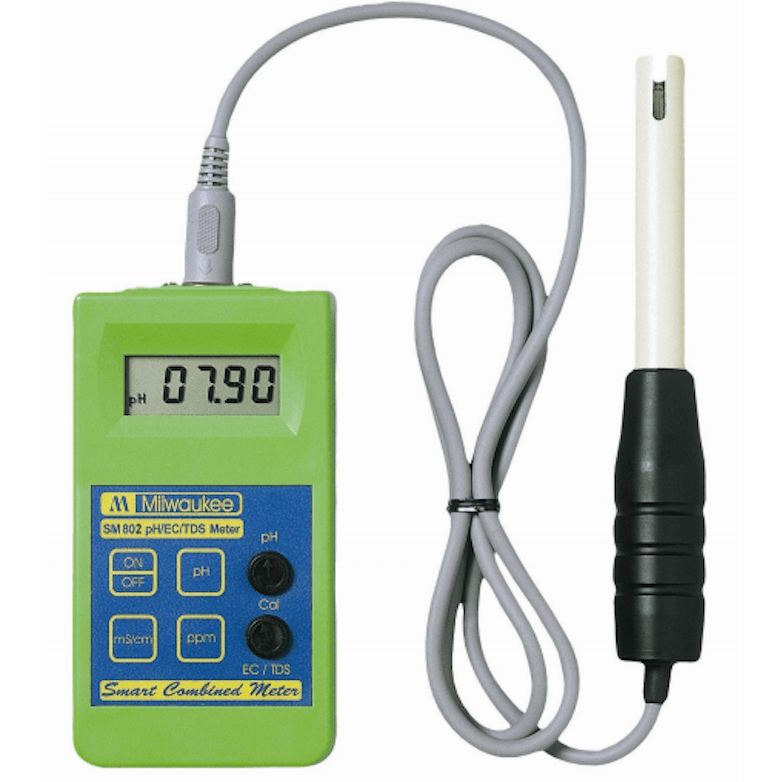
Combination Meters
The combination type meters (like the one pictured above) are real handy for the convenience of being able to take both readings simultaneously, or with a single touch of a button to switch between modes.
The problem with combination meters is pH sensors like to be stored in a fertilizer solution, but TDS probes like to be stored indistilled water. Storing the pH probe in plain or distilled water will damage the ph membrane, so the combination probe needs to be stored in a fertilizer solution so as not to damage the pH portion, so the TDS probe ends up being “dirty” from salt buildup.
Purchasing “single function” pH or TDS meter for this purpose is advised.
A Guideline for NPK Strengths
There are many parameters for acceptable PPMs floating out there today. Here is a decent guideline for the N-P-K standards. Feel free to experiment, but make only gradual changes. These guidelines act as a foundation. Approximate tolerance range of PPMs per nutrient; most micro-nutrients are tolerated by plants within the same ranges (but the plant just doesn’t need nearly that much!)
N – 200-400
P – 200-600
K – 200-600
Approximate Tolerance Range of TOTAL PPMs in soil/medium:
(Obviously the plant can tolerate more as it gets larger and has more root area to uptake nutrients and leaf area to transpire water.)
Seedling: 500-600ppm
Vegetative: 800-1000ppm
Flowering: 1000-1500ppm
Flushing: 0-500ppm
Approximate Tolerance Range Hydroponic Nutrients TDS/EC:
The ideal TDS for a hydroponic solution is 500-1000ppm, EC .75-1.5. A reduction in solution TDS/EC reduces osmotic pressure and allows the roots to draw the nutrients “easier”. Young, established seedlings or rooted cuttings are started at 500-600ppm. The TDS is increased to 800-900ppm during peak vegetative growth. During the transition from early to heavy flowering, TDS is further raised to 1000-1100ppm. It is then reduced to 400-500ppm during the final 2 weeks of flushing. The plants demonstrate their preference for a lower TDS/EC when running a lower pH by clearly sustaining higher growth rates.
PPMs for Each Growth Phase
You may desire more Nitrogen during vegetative growth stages for example. The key is NOT to obsess over the exact numbers. There are many other factors involved in the actual UPTAKE of these nutrients by roots to claim specificity. These are just general arameters that you can tweak under your own conditions. And again, the plant can tolerate more as it gets larger and has more root area to uptake nutrients and leaf area to transpire water. Start light, gradually increase with each feeding as your plant can handle it.
Keep in mind, the following estimates are given for soil mediums which can tolerate higher levels because the soil components will bond with many elemental ions; a hydro system needs to be more precise. Also remember that these parameters are based on the assumption of using distilled water. Tap water will add another 200-400 PPMs, so you would have to adjust accordingly…especially with Cl, Ca, Na, and in rare case, S.
Seedling:
(2-3 weeks…look for 4-5 sets of alternating nodes
before moving to veg.)
N – 150
P – 100
K – 150
Ca – 75
Mg – 75
S – 25-50
Fe – 15
Cl – 15
Mn – 7
Cu – 9
Zn – 3
Total: 600ppm
Vegetative/pre-Flower:
(Usually 2-4 weeks.)
N: 300
P 100
K 200
Ca 100
Mg 100
S 50-75
Fe 25
Cl 25
Mn 10
Cu 15
Zn 5
Total: 1000pm
Flowering:
(Strain dependent; usually 6-8 weeks.)
N – 300-400
P – 400
K – 200
Ca – 100-150
Mg – 100-150
S – 100-150
Fe – 25+
Cl – 25+
Mn – 10
Cu – 15
Zn – 5
Total: 1300-1500ppm
Flush/Harvest:
(2 weeks)
N – 0
P – 75
K – 75
Ca – 50
Mg – 50
S – 50
Fe – 25
Cl – 25
Mn – 10
Cu – 15
Zn – 5
Total: 400ppm
It cannot be stressed enough that these are estimates. I wanted to offer a solid foundation for newer growers to measure from. These are quite conservative ones due to the fact that chemical fertilizers allow less room for error. Also, different strains and conditions will result in different ratios. Experiment often and use caution when making adjustments!
How To Tell If Your PPM/EC is Too High or Too Low
It’s simple to find out if you are using too much food or not enough by watching the nutrient concentration levels in your tanks day to day. Don’t be concerned with the exact reading, rather watch how it rises and falls from each day to the next. The differences between when you put the solution into the tank and the readings you get several hours later or the next day are what tell you if your plant is eating, drinking or happy.
Start with 1.00 EC (or a SAFE nutrient strength). Next day, if it reads 1.4, it means your plants have been using water and your nutrient solution is becoming more concentrated.
This means the concentration of nutrients is too high, so you dilute.
If the meter reads lower than the previous day, 0.7 say, it tells you that the plants are eating nutrients faster than they are drinking water, so you should increase your nutrient strength. If it remains the same, your feeding schedule is on target for now. The nutrient/water intake fluctuates with the growth of the plant, so you must continually monitor it day to day.
Your plants will tell you the optimum nutrient levels. When they are receiving optimum food and water, the readings remain constant. The more you do it, the easier it gets. The reason no one can tell you what PPM/EC levels to use is because every garden is different and every plant has different requirements due to their particular environment. That’s why you have a ball park starting figure, but after that your plants will tell you almost exactly what they require.
When to Add More Nutrients?
New growers tend to rely on a ppm meter, but a veteran grower has learned how to read the plant. It actually takes a few grows to learn how to be able to read the plant. The plant can tell you if it is getting too much or too little nutrients. Most of the nutrient mixes are explained extremely well on the packs. If you follow the instructions properly and remember that cannabis grows best within 30% – 50% strength nutrients then you will be fine. Cool beans.
The ppm depends on what stage your plants are in, it should NEVER exceed 1600.
Here is how one grower does it:
~4 days: ppm = 200
~10 days: ppm = 300
~17 days: ppm = 400
~22 days: ppm = 450
~24 days: ppm = 500
~26 days: ppm = 650
~30 days: ppm = 800
~38 days: ppm = 800
~40 days: ppm = 1200
~52 days: ppm = 1300
~59 days: ppm = 1400
~66 days: ppm = 1550
~70 days: ppm = 1550 (the ppm during the plant’s final days are cranked high)
Figuring Out The PPM of Fertilizer
To figure out the ppm of your fertilizer (or fertilizer mix), you need to be able to measure grams and liters. Look at the 3 numbers on the side of a fertilizer bag. These are the percent contents of the nutrients. For every one gram of said fertilizer in one liter of water, it contributes 10 ppm of the given nutrient per percentage point.
A 20-20-20 gives 200 ppm (10 ppm X 20) of each nutrient for each gram in a liter of water.
The formula is this:
grams of fertilizer per liter = A/B
A=your desired ppm
B=10 ppm X the % of nutrient in mix or your ppm = C X B
B=10 ppm X the % of nutrient in mix
C= grams of fertilizer per liter
So to make a 200 ppm-100 ppm-200 ppm NPK mix using a 13-0-44 (potassium nitrate), a 12-62-0 (monoamonium phosphate), and a 33-0-0 (ammonium nitrate) you would work backwards from your sole P and K sources (it makes it easiest in this case), and make up the N at the end. I have rounded numbers to the nearest 0.1 g for the following. You would use 0.5 g of potassium nitrate (200 ppm/(10 ppm X 44 K)) and 0.2 g of monoammonium phosphate (100 ppm/(10 ppm X 62 P)) in one liter.
This would give you 89 ppm N (10 ppm X 13 N X 0.5 g + 10 ppm X 12 N X 0.2 g), 124 ppm P (10 ppm X 62 P X 0.2), and 220 ppm K (10 ppm X 44 K X 0.5 g). 111 ppm are needed to raise the N to the 200 ppm level, so we can use 0.3 g of the ammonium nitrate (111 ppm/(10 ppm X 33 N)) to bring us up to finish.
The actual mix would yield a 188 ppm N, 124 ppm P, 220 ppm K mixture in one liter of water. To get more precision, you need to mix larger batches or get a better scale (you would need to make a 10 liter batch of the above with a scale that is only accurate to the gram). If you mix your own fertilizer, you can adjust your N source to meet your pH needs, rather than being dependent on adding acid or base, which is nice. This works for formulating hydro mixes, as well as for us dirt farmers
Nutrient Solution
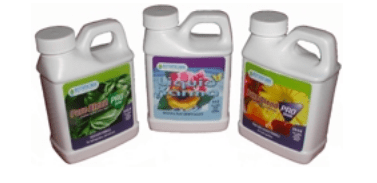
The first step is deciding upon which nutrient solution to get. Nutrient solutions come in lots of forms. Make sure you get a hydroponic nutrient solution only. Some are made for soil and we do not recommend you use these in your hydroponic garden. This is because soil-based nutrients contain many wrong elements for hydroponic use, this will severely negatively effect your plant’s growth.
Most hydroponic nutrient solutions available on the market today are complete nutrient solutions. They provide every element required for optimal plant growth. When planning your hydroponic setup financially make sure you DO NOT go cheap on the nutrients, as taking any short-cuts here will greatly undermine your ideal growth goals.
Dry or Wet Nutrients?
Wet nutrients are very trendy and hip in the hydroponic world. There is nothing wrong with a “wet” nutrient, they mix quite well. But, wet nutrients generally tend to be more expensive. This is because the bottle contains more water and less actual nutrient content. This makes them more expensive to ship and transport. When it comes time to mix them and feed your plant either dry or wet works equally well. Many prefer liquid.
Mixing Nutrient Solution
Whether using liquid or dry hydroponic nutrients, you should only add to the water after filling the container rather than adding nutrients and then filling. Adding before filling can lead to severe nutrient imbalances.
Here’s a great tip for you to avoid your nutrients locking up (greatly lowering absorption rates): Mix your solution in the sink. Get a watering can and clean it. Let your water run directly into it and while water is flowing into the can then pour in your nutrients. This will keep your nutrients from locking up. Rumor has it that when you mix your nutrients inside a cup they will lock up. This is very bad! Now just carry your watering can over to your reservoir and pour it in.
Nutrient Packs
Single packs are not ideal. This is because having all the nutrients in a single pack runs the risk of having the elements in the pack combine and precipitate. When precipitation occurs this causes your solution to become unbalanced. This will render your solution not only completely useless to your plants but most likely toxic and harmful as well.
For best growing results the solution then is to obtain your complete nutrient solution in a bottles labeled “twin” or “triple” packs. The chemicals are held in different packs to entirely prevent precipitation. 3-part system triple packs allow you to adjust these nutrients to get optimum thriving growth from your plants. Check the specific instructions on the bottles for an explanation how to mix the nutrients into water.
Note: When growing in an organic garden, make sure to buy nutrients that are hydroorganics, for organic hydroponic growing only.
Example Nutrient Solutions
Many growers wonder what a sample quality hydroponic nutrient solution would look like when mixed together. Using popular products today I have included some samples to give you an idea:
Hydroponic Vegetative Growth Phase Solution, per gallon:
-Chempak no3 20-20-20 balanced feed (UK) / Peters 20-20-20 (USA).
-Epsom salts 1/2 teaspoon.
-Human Urine (OPTIONAL – may create odors if used indoors.) 1/4 cup.
-Oxygen Plus Plant Food (OPTIONAL) 1 teaspoon.
This mixture ensures your plants are getting all major and minor nutrients in solution, and will also be treating your plants with oxygen for good root growth, and potassium nitrate for good burning qualities.
Another good vegetative growth phase mix is 1/4 tsp Peters 20/20/20 fertilizer per gallon of water, with trace elements and oxygen added, or fish emulsion. Fish emulsion is great in a greenhouse or outdoors, where smells are not an issue – it is not recommended indoors due to its pungent odor. If you don’t mind the odor, you will love the results!
Hydroponic Flowering Solution, per gallon:
- 1 tsp. high P plant food, such as 15-30-15, or 5-50-17, etc.
- ½ tsp. epsom salts
- 1 tsp. Oxygen Plus Plant Food (Optional).
- 1 tsp. Trace Element food.
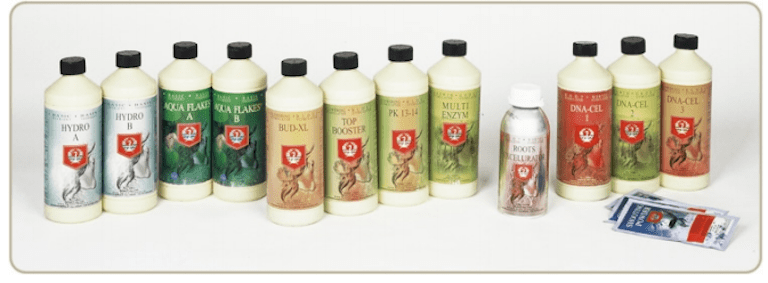
Example of a Standard General Hydroponics Flora Series
Feeding Strategy
Here is another quality hydroponic nutrient solution example, as well as how exactly one would apply it. This should give you a general overview of how to correctly mix and apply nutrients.
The Formula:
G-M-B (Grow-Micro-Bloom)
0-5-10 – For Vegetative cycle (~18/6)
0-8-16 – For Flowering cycle (12/12)
The numbers above indicate the number of milliliters (ml) of Flora Grow, Micro or Bloom formulas that you’ll use in one gallon (U.S. Liquid) of nutrients.
You will notice there isn’t any of the Flora Grow formula included, this is because it is not needed, the Flora “Micro” provides plenty of Nitrogen.
There are two ways to work with this formula:
- Top off the reservoir daily using a pH corrected water solution as required to maintain full reservoir level. After adding back an amount of water equal to the amount of your reservoir capacity you should change the reservoir and put in fresh solution.
- Top off the reservoir daily using a pH corrected 100% strength nutrient solution as required to maintain full reservoir level.
Continue to use this nutrient solution without dumping the tank unless the PPM rises above acceptable levels. Between vegetative and flowering cycles you should dump your nutrients, then flush (perhaps with a commercially available clearing solution) to remove salt buildups, then change to the other feeding program. Always shake your nutrient bottles before using them!
For young plants (freshly transplanted into the hydroponic setup), give them 50% strength nutrient mix to prevent overfeeding them while their young.
Gradually bring up the mix to full strength as they grow over the next few weeks or so.
The lucas formula is normally intended for use with RO or near 0 PPM water.
Note: The Lucas formula eliminates the need for Epsom salts to correct (Magnesium) Mg deficiencies in most normal feeding programs recommended by manufacturers. Cannabis will need a lot of Magnesium to thrive and flourish.
As you can see, The Flora Micro is providing the Nitrogen and the Magnesium in the proper balance, thus there is no need for the Grow formula and little or no room under the maximum acceptable ppm limit of 1600 @ 0.7 conversion.
Regulating Your Hydroponic System Water
Many newer growers have concerns that the water is not flowing rapidly or strongly from the ends of the tubes into the rock wool cubes. A strong flow is not necessary at all. A slight trickle (bubbling) is all that is needed to keep the rock wool cube moist and the baby roots fed until they reach into the deep water. You do need to check for crimps and folds in the water tubes, especially when you first set up your system.
Water Quality
The water must be clean. Hydroponic plants must be grown in a sterile medium. In this context clean means that you have to make sure that the water does not contain microorganisms, harsh chemicals, algae and that the water doesn’t have the wrong pH values (which will create nutrient lockup). The easiest way to make sure your grow medium stays sterile is to change water on a regular basis and check the pH each and every time you add nutrients.
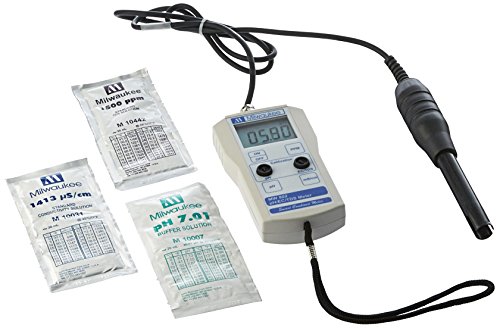
It is important to check your water. Crusty faucets and shower heads mean your water is “hard,” usually due to too many minerals. Tap water with a TDS level of more than around 200ppm is “hard” and should be looked into, especially if your plants have a chronic problem. Ask your water company for an analysis listing, which will usually list the pH, TDS, and mineral levels(as well as the pollutants, carcinogens, etc) for the tap water in your area. This is a common request, especially in this day and age, so it shouldn’t raise an eyebrow. Regular water filters will not reduce a high TDS level, but the costlier reverse-osmosis units, distillers, and de-ionizers will. A digital TDS meter(or ECM = electrical conductivity meter) is an incredibly useful tool for monitoring the nutrient levels of nutrient solution, and will pay for itself before you know it.
The best waters to use with your hydroponic garden are spring, distilled or reverse osmosis filtered water. If you can get access to these many issues that plague growers can be bypassed. However, most household water is also fine to use. If you have city supplied water you can use it directly from your faucets inside your home or apartment. Or, if your house has a well and softener system, you will want to take your water from a faucet that supplies water straight from the well; i.e. water that has not been through the softener system.
Softener systems add salts to the water that are harmful to plants. Note that well water can potentially cause mineral build up and blockages, so regular cleaning is required. The faucets in your yard generally supply un-softened water; and there should also be one right next to your softener system that also supplies water that has not been through the system yet. If you have a Reverse Osmosis System, you should use the RO filtered water as it is close to the quality of spring and distilled water.
WARNING: It is critical that you keep a close watch on your plants to be sure they are never allowed to dry too much when growing hydroponically, or roots will be damaged.
If you will not be able to tend to the garden every day, be sure the pans are filled enough to last until next time you return, or you can easily lose your precious crop. It is necessary to change the solution every month if your circulating it with a pump, but the reservoir system does away with this problem. Just rinse the medium once a month or so to prevent salts build up. This can be accomplished by watering from the top of the pot or rockwool cube with some pure water as mentioned above.
Green Algae
Algae is one of the problems you will encounter if you do not take the following steps to prevent it. Algae will grow anywhere there is nutrient solution and light. Many newbie growers allow algae to grow in their tank, and this is a big problem! Algae appears in your tank following several mistakes but have no worries; as it can be remedied pretty easily.
Preventing Green Algae: First off you must never allow a dead root or fallen leaf to stay inside the tank and decay. Also do not allow the lights to shine into the water through the rocks. If the grow cup is full of rocks, the lights can not penetrate through the cups. And most important, you have to start with clean, pure water. You can not use rain water, or water from a stream, river or lake.
You should exchange the water after the first ten days, and then every 10 to 14 days as you grow. As the plants get over 12 inches tall, exchanging the water every 7 days is more efficient. Your water should smell like clean green alfalfa sprouts. If you detect an unpleasant odor, you have waited way too long to drain and exchange the water. When you do replenish the water and nutrients, you should look for and remove any dead roots that were accidentally torn from the plant. You can use chlorinated city tap water (some growers even recommend it for it’s purity).
If you’re concerned about the chlorine being harmful, no need to worry because the chlorine dissipates fast and is never a problem. You can use RO filtered water, or store bought distilled or spring water. If you use well water or detect algae growing in your tank, you can add 1/6 teaspoon of Hydrogen Peroxide per gallon of water to your tank as a cure or preventative. Be sure to never ever use more than a level teaspoon per tank of 6 gallons of water!
Also do not use water that sat out uncovered or was stored for an extended period of time.
Green Algae Slime on Rockwool: Algae needs light and nutrients to live, it will spread to your reservoir and will block feed lines. Because of rockwool’s unique vertical tube-like structure(which takes up nutrients via capillary action and pulls air into the medium as the nutrients drain outward), a heavy buildup of algae can effectively block this crucial breathing action. To prevent this from happening, use light-proof and water-proof material to cover your rockwool. Black/white panda film or thick black bin liners work great.
Algae will tend to grow on the medium with higher humidifies in hydroponic systems. It will quickly turn a slab of rockwool a nasty dark green. To prevent this, use the plastic cover the rockwool came in to cover rockwool slab tops, with holes cut for the plants to stick out of it. It’s easy to cut a packaged slab of rockwool into two pieces, then cut the end of the plastic off each piece. You now have two pieces of slab, each covered with plastic except on the very ends.
Now cut 2 or 3 4″ square holes in the top to place cubes on it, and place each piece in a clean litter pan. Now your ready to treat the rockwool as described above in anticipation of planting. If growing in pots, a layer of gravel at the top of a pot may help reduce algae growth, since it will dry very quickly. Algae is merely messy and unsightly; it will not actually cause any complications with the plants.
Mixing Nutrients Properly
So many growers get upset and post on forums; “Dudes when I throw in a packet of nutrients into my tank, they just settle to the bottom and don’t dissolve!!”, that is the wrong way to introduce the nutrients and feed your plants. These nutrients are natural elements, so they do not perfectly dissolve in water. For example, seashells are not ever going to completely dissolve in water, no matter how much they are pulverized, but are an excellent source of calcium. You should add the packets to a quart jar half full of warm water and stir them rapidly, mixing them as well as possible in the water. Then pour them through a tea strainer or some kind of mesh screen or filter, to filter out the small particles that did not dissolve. Then add the nutrient water mix to the tank.
Be sure to remember when you first start and set up your system, you should start with 1/4 of a packet of grow nutrients if you are starting with seeds, sprouts or baby seedlings. If you started with clones or baby plants, then start with half a packet of grow nutrients. Your plants should be about 3 inches tall before you use the nutrients full strength. Then stand back and watch for a growth explosion!
-Easy to use
-Easy to clean
-Very popular
-Great for anyone who wants to produce a lot of plants in a short period of time
Solution Strength
Mixing a hydroponic nutrient solution is as easy as following a recipe in the kitchen, but the first couple times you do it you are going to have to be VERY careful to make sure you have go the right proportions. Be careful of using full, and even medium strength nutrient solutions, as they can burn your plants! Rich bud content can be produced with only a 40% strength solution, be sure to check your package for the recommended strength. One of the most common problems reported with hydroponics is plant burns. Be sure to consult the information printed on the packs. Over feeding is a very common, not to worry though as time goes on you will get to know your strain and what it likes and eventually be a master of controlling your nutrient amounts.
Generally speaking though, you will use a half strength solution for your young plants for the first two weeks, after that it is going to be full strength. Always read the directions before you mess with them!!!! If you mix your solution too strong it is going to kill them, if you mix it too weak there isn’t going to be enough nutrients to grow big potent buds!
Nutrient Tips
Marijuana plants tend to be very adaptable, but a general rule of thumb is to use more nitrogen & less phosphorous during the vegetative period,and the exact opposite during the flowering period.
For the vegetative growth period try a N:P:K ratio of about 10:7:8 (which of course is the same ratio as 20:14:16), and for flowering plants, 4:8:8.
Check the pH after adding nutrients. If you use a reservoir, keep it circulating and change it every 2 weeks. A general guideline for TDS levels is as follows: seedlings = 50-150 ppm; unrooted clones = 100-350 ppm; small plants = 400- 800 ppm; large plants = 900-1800 ppm; last week of flowering = taper off to plain water.
These numbers are just a guideline, and many factors can change the actual level the plants will need. Certain nutrients are “invisible” to TDS meters, especially organics, so use TDS level only as an estimate of actual nutrient levels. When in doubt about a new fertilizer, follow the fertilizer’s directions.
System Maintenance
Maintaining your hydroponic garden is what makes the difference between okay weed and the greats. Take your time with this section.
Maintaining a Reservoir
Proper maintenance of your reservoir is essential to growing healthy vigorous marijuana.
If you want your buds to grow out to their fullest potential than you will need to maintain your reservoir right. The most influential factors are nutrient levels and pH, as discussed in their appropriate sections.
Nutrients pH Level
The pH of water after adding any nutrients should be around 5.9-6.5 (in rockwool, 5.5-6.1). Generally speaking, the micro-nutrients (Fe, Zn, Mn, Cu) get locked out at a high pH (alkaline) above 7.0, while the major nutrients (N, P, K, Mg) can be less available in acidic soil or water (below 5.0). Tap water is often too acidic. Soils with lots of peat or other organic matter in them tend to get overly acidic, which some dolomite lime will help fix. Soil test kits vary in accuracy, and generally the more you pay the better the accuracy. For the water, color-based pH test kits from aquarium stores are inexpensive, but inaccurate. Invest in a digital pH meter($40-80), preferably a waterproof one. You won’t regret it!
Your nutrient solution’s pH level is incredibly important. Just like with soil, you must adjust your pH level, but this time the methods used to raise and lower the pH is much different. The pH level will affect the solubility of your nutrients. It’s harder to maintain a set level of your water, so shoot for being within the above ranges for the maximal amount of time possible. An easy way to measure your pH is to use pH paper. You can pick this up cheap at any garden or grow shop, but remember, it may not be as accurate as a well invested meter. The good news is, it’s super easy to adjust hydroponics liquid nutrient pH levels. This can be done by purchasing a pH UP and pH DOWN solution, which is added accordingly. These are typically very cueap and are all you need for balancing your solution’s pH level.
WARNING: Never ever mix pH up and pH down together directly in a concentrate. This stuff is very dangerous and needs to be handled with care. Use one pipette for each job and color code the pipette to the bottle.
A pH level of 6.5 works best. The method is simple. Before mixing nutrients into the water, adjust the pH using sulfuric, nitric, or citric acid if it’s too high. If it’s too low: lime or baking soda. When you first set up your tank, you should do a pH test on your water before adding the water to the tank. Then adjust the water with pH UP or pH DOWN before it goes into the tank. That way, the pH perfect nutrients will work best.
It can be dangerous to adjust the pH in the tank, especially if you overly adjust it. It is also dangerous to adjust it frequently. A very slight adjustment is OK, but if you change it drastically in the tank by using a large amount of PH UP or PH DOWN, you are taking a big risk of seriously harming your plants. If you do a test on your tank’s water and it is extremely out of range from 5.8 to 6.8, then it is best to drain it and replenish it with PH corrected water and nutrients. Let us repeat, you should add the nutrients to PH perfect water to start with. If you insist on adjusting it in the tank slightly, then use no more than 1/2 level teaspoon of PH UP or PH DOWN to the tank, and no more frequently than 4 hours apart. Plants do not adjust well to rapid changes in PH levels.
The results can be dreaded Nutritional Lockout.
(No worries, consult the 8-Step Complete Nutritional Lockout Remedy located in the Emergency Marijuana Plant Guide.)
In order to measure your pH level easily you can use an electronic meter reader.
Note: Be sure to check your pH level as much as you possibly can. Unlike when growing in soil, with Hydroponics systems the pH level can tend to fluctuate very rapidly. You will get a feel for it.
In a normal hydroponic system keep the pH between 5.5 and 5.8 In an organic solution keep the pH between 6 – 6.5.
pH Adjustment Tips
The pH of the nutrient solution is a major determinant of nutrient uptake by the plant. If the pH wanders outside the optimum range of between pH 5.1 and pH 5.9, then nutritional deficiency and/or toxicity problems can occur. For hydroponic nutrient solutions used with inert media, keep the pH at 5.2 for optimal elemental uptake. It is at this point that roots most readily assimilate nutrients. This pH recommendation may seem low relative to the normally suggested range, but are based upon information garnered from “Hydroponic Nutrients” by M. Edward Muckle and Practical Hydroponics and Greenhouses. They both document the low pH resulting in increased nutrient uptake and discernible health and yield improvements at a ph of 5.2 over higher levels.
The widely accepted soil based pH chart growers base their hydroponic pH ranges on is frequently misapplied to water culture applications. His research and that done by others, documented in Practical Hydroponics and Greenhouses, indicate that iron and phosphorous precipitate in nutrient solutions at pH levels above 6. Stay below a pH of 6 by all means to avoid this problem and watch your plants benefit.
Raising hydroponic pH: (to make it more alkaline)
In hydroponics: use PH UP, potassium silicate, provides silicon at an effective dosage.
In bioponics/hydro-organics: add small amounts of sodium bicarbonate or lime.
Lowering hydroponic pH: (to make it more acidic)
In hydroponics: use PH DOWN, nitric acid during vegetative; phosphoric acid during flowering.
PH Nutrient Availability Chart

Temperature
The nutrient assimilation rate is further enhanced by the reduction in solution TDS/EC, which reduces osmotic pressure and allows the roots to draw the nutrients “easier”. Young, established seedlings or rooted cuttings are started at 500-600ppm. The TDS is increased to 800- 900ppm during peak vegetative growth. During the transition from early to heavy flowering, TDS is further raised to 1000-1100ppm. It is then reduced to 400-500ppm during the final 2 weeks of flushing. The plants demonstrate their preference for a lower TDS/EC when running a lower pH by clearly sustaining higher growth rates.
The optimum temperature for hydroponic solutions to be is 75°F (23.8°C). At this point, most elements are assimilated highest and atmospheric oxygen is most readily dissolved. Although increases in temperature increase the rate of photosynthesis, avoid exceeding the maximum listed of 78°F (25.5°C). Elevated temperatures make some elements more available, but reduce the solution’s dissolved oxygen capacity, increasing root disease likelihood.
Cold weather below 50°F (10°C) can lock up phosphorous. Some strains, like equatorial Sativas, don’t grow very well in cold weather. If you can keep the roots warmer the plant will be able to handle cooler temperatures than it otherwise could.
If the lights are too close to the plant, the tops may be curled, dry, and look burnt, mimicking a nutrient problem. Your hand should not feel hot after a minute when you hold it at the top of the plants.
Raise the lights and/or aim a fan at the hot zone. Room temps should be kept under 85°F (29.4°C) or 90°F (32.2°C) if you add additional CO2. The optimum temperature for hydroponic solutions to maintain is 75°F (23.8°C). At this point, most elements are assimilated highest and atmospheric oxygen is most readily dissolved. This part can get tricky. Increases in temperature increase the rate of photosynthesis and might make some elements more bioavailable, but exceeding the maximum listed of 78°F (25.5°C) will reduce the solution’s dissolved oxygen capacity, increasing root disease likelihood.
Monitoring and Maintaining your Recycle System
As you have learned by now, depending on which hydroponic setup you are using, your nutrient solution goes through a system that recycles and reuses the nutrients in the reservoir over and over. As the plant extracts the minerals and nutrients from the solution it will become more and more depleted & empty of it’s nutritional value to the plant. Remember, the pH of your water should always be around 5.0 – 7.0.
Reservoir maintenance is the routine task of keeping the hydroponic nutrient solution in the reservoir from becoming too strong or toxic as the water is being evaporated and the nutrients within the solution are taken up by the plants. Simply put; Top off daily with half (half the strength of your current new reservoir starting strength) strength nutrients, alternating days topping up with plain water. Change the entire reservoir with fresh solution every ten days to two weeks.
One problem in hydroponics solution maintenance is that as water is being taken up by the plants (as well as evaporating out of the solution), the concentration of nutrient salts in the solution becomes gradually stronger, sometimes to the point of certain elements becoming toxic to the plants. The TDS will always become stronger as water is taken away from the solution. Another common problem is that hydroponically grown plants will take up what they need as they need it from the nutrient solution. This means a nutrient solution left alone will end up lacking key nutrients, with a build-up of toxic levels of other key nutrients.
The only way around these problems for the average hydroponic grower is to practice sound reservoir topping off procedures. The most widely accepted maintenance method involves daily topping off and routine reservoir solution replacement.
An example of this would be topping off the reservoir daily with a nutrient solution (which is half of the current new reservoir strength), alternating days by topping off with plain water and finally; changing the entire reservoir solution at least every two weeks.
Changing the reservoir solution every two weeks will give the plants a fresh and well balanced nutrient mix which has not been altered by the plants nutrient uptake.
Many scientific studies have been performed which demonstrate these facts by GCMS testing of the nutrient solution contents and the nutrient salts contained within the actual plant tissues, as the plants “take-up” the specific nutrients in the solution. Plants will take up excessive levels of some nutrients, leaving the solution lacking in certain key nutrients. Plants grown hydroponically can harm themselves with nutrient deficiencies, lockouts and overdoses, if allowed to continue feeding without some control over whats available in the reservoir.
Therefore it is critical you learn how to properly monitor your reservoir’s nutrient levels. A TDS meter will allow you to see how much of your nutrients have been used up and how much more you need to adjust in order to reach your optimal nutrient level. There is no way around it, over time your reservoirs will become depleted and will need replenishing. The more dissolved solids you put in the water, the better it conducts electricity. A PPM or EC reader is extremely accurate and recommended for this purpose, but it is quite expensive. Over time it balances out though because you will save lots and lots of money on the cost of hydroponics nutrients and burned plants.
Note: Burned plants, commonly referred to as a chemical burn, is what the plant suffers from due to over-feeding. No “burning” takes place, the outer edges of your plants just slowly deteriorate and flake away withering and dying.
Changing Your Solution

As water evaporates and is absorbed by the plants, your water reservoir level will drop. Every 2 weeks you need to change the nutrient solution. Be sure to clean out the reservoir and discard the old solution. Clean out the reservoir, pumps, and any other equipment that is used with HOT WATER. Then add tap water that has been aged 3 days or longer to the reservoir then add your nutrient solution. And don’t worry just yet about the cups and tubing the plants are in, you generally only really need to clean them out before you start a new crop.
The timer that stars to pump the nutrient solution should turn on and the solution should submerge the plants roots every X minutes (‘X’ is dependent upon your system). As soon as the roots are submerged, the pump can shut down.
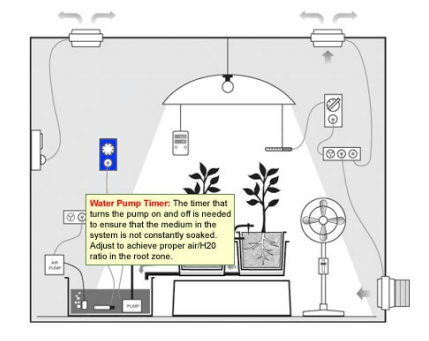
Note: If it takes longer than X minutes for the roots to get water, the roots will tend to grow long, They usually grow very long because they are looking for the nutrient solution source.
In fact, if this happens they can grow so long and thick that they prevent the solution from reaching all the way up your grow medium. This will also raise the chance of root material being ripped out and clogging the system. Once the flow is clogged by root or any other kind of material inside, you will have to take the garden apart and clean it. Not cool dude.
To make sure this doesn’t happen, check the root length every few weeks. If it is hard to remove the grow medium the plants are in because the roots are anchored to the internal channel, the roots are too long. The root should be short enough to not touch the narrow point where the solution enters the cup holder. If they are too long, trim them down with scissors. Make sure they are not going too far, but don’t cut them down unnecessarily. If you need to trim the roots, it has been reported that trimming the roots 6 inches down will not hurt the plant.
There are several ways to drain your tank. One is by adding the drain plug or faucet. Or you can obtain a plastic hose like you can get at the aquarium store to drain your aquarium, and siphon the water out. Another way is to attach the hose to the submersible pump, using your fist as a coupling, and simply allow the pump to pump it out into a bucket.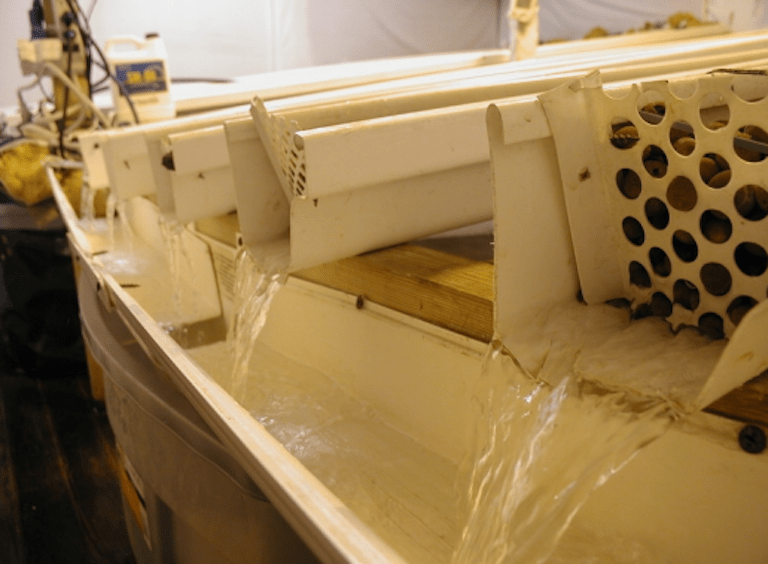
Since the plant will not absorb nutrients in the same proportions you are adding them imbalances will result over time. To correct this you will periodically need to drain and fill your reservoir with fresh nutrient solution. To begin with do this at least once a month and just before you start flowering. During flowering change the reservoir every two weeks. How often you actually need to do this depends on the plants, the nutrients, the size of the reservoir, etc. Luckily the plants will let you know how often you need to do this. They will start exhibiting signs of nutrient deficiency when there is an imbalance and you will know that you can’t go longer than that before changing the reservoir. Especially with clones you will be able to get reservoir changes down to a system of clockwork since the clones will generally all have the same nutrient preferences.
About every month, replace the water nutrient solution. Every other time you change the water, rinse the medium with clear water to wash away any salts that have been left before adding a new nutrient water solution.
Keeping Your Reservoir Cool
Maintaining a highly aerated root zone at optimum temperature is key to achieving high potent yields and problem-free grows. High root zone temperatures often plague indoor growers running water culture (aero/bubbler/dwc/hydro) systems. These systems are subject to rapid heating by intense HID lighting which increases root zone temperatures, which decreases Dissolved Oxygen(DO) levels. Rapid plant growth combined with low DO levels can cause oxygen deprivation which in turn can result in infection by opportunistic pathogens such as pythium (root rot). The key to maximum growth is to keep the air temperature at 75-80°F (24-
27°C), but the root zone at 68°F (20°C) or less.
Note: The reservoir should be kept slightly cooler than the rootzone – irrigation and system heating will warm the water by the time it reaches the roots.
Optimum root growth occurs at 70-75°F (21-23.8°C); however, destructive root diseases also grow and reproduce rapidly at these root temperatures. Maintaining nutrient temperatures at or under 68°F (20°C) maximizes root growth and DO, and also prevents root rot.
Warm summer temperatures often require aggressive cooling measures. Bubblers and DWC systems are difficult systems to temperature regulate due to their (usually) small volumes and lack of external reservoir.
Make sure and spray, drip, mist, or circulate nutrients on a frequent basis to equalize reservoir and root zone temperatures. Intermittent spraying may require a slightly lower tank temperature to compensate for system heating occurring during the “off” spray cycle. For example; keep tank temp around 64°F (17.7°C) for intermittent spray cycles, 68°F (20°C) for continuous spraying.
Note: Submersible pumps add heat. Use an external/inline pump to minimize heat transfer. High quality digital thermometers are recommended.
14 Easy Ways to Keep Your Reservoir Cool:
- Add cold water when topping up. But be careful; abrupt changes in temperature may shock roots.
- Use frozen pop bottles/milk jugs. Keep extras in the freezer to replace thawed bottles with new frozen ones, replace as necessary.
- Increase the size of reservoir. Larger volumes are slower to warm up, pH/ppm is more stable and tank changes are less frequent.
- Put reservoir/bubbling buckets onto floor, or set on concrete blocks to conduct heat away from the water.
- Insulate. Paint all exposed system surfaces white or use reflective material (such as mylar). Wrap insulation around tank. Use a camping cooler for a reservoir (pre-insulated and comes with a drain!).
- Use a swamp cooler. Blow a fan directly across the surface of reservoir for excellent evaporative cooling. This method works well (expect a 10°F (-12.2°C) drop in reservoir temperature), but humidity and TDS will increase, and more frequent topping up will be required.
- Add a computer fan to a duct blowing into your tank (cut air exit holes). You can run it on a timer (i.e. 1 hr on, 1 hr off).
- Remote reservoir. In-room reservoirs will quickly heat up to room temperature. Put the reservoir (and ballasts) outside of the grow room to minimize tank heating.
- Airstone / Power head / Venturi air supply should be drawn from a cool source (ie. Cool outside air).
- Peltier coil (Thermoelectric chillers). You can purchase an Ice Probe and it works well. It uses 50 watts and pulls the temperature down 4 degrees under ambient. Cools 10 gal or less.
- Use cooling coils.
- Blow air through the root zone. Divert small amounts of cool intake air directly into the root zone.
- You can custom build a heavy box with fan and compressor coils, with a 5 foot refrigeration line with a titanium coil at the end. All you do is plug it in, set the controller and put the coil in the reservoir. Circulate nutrients for the best cooling. Get a bigger model than you need.
- Reservoir chillers – These are electric A/C units made specifically for cooling water. Also known as “Aquarium Chillers”.
Sterilizing and Disinfecting Your System
Sterilizing and maintaining clean conditions inside your hydroponics/aeroponics systems is extremely important. This cannot be stressed enough! Keeping cloning, vegetative and flowering systems clean gives your plants a fighting chance against pythium (root rot) and other harmful diseases, ensuring healthy, vigorous, potent crops.
Cleanliness is particularly important in closed (recirculating) hydroponic / aeroponic systems due to the favorable conditions these systems present to water and airborne diseases. Failure to periodically clean a system can result in stressed plants becoming infected and rapidly spreading disease throughout the entire system. Once infected, the entire crop will experience reduced vigor and yield, and possibly die.
Prevention is the best cure for disease. Sterilization between crops, adding antipathogen additives, and attention to system design can help combat disease.
Materials Needed:
- Hot water
- 35% hydrogen peroxide (3% and 17% available at pharmacies, 35% at hydro stores). Oxidizes, then quickly (24 hrs) degrades to water (Sterilizing strength for 1-4 hours).
- 99% Isopropyl (rubbing) alcohol. Kills bacteria and viruses on contact.
Note: bleach is not recommended. It leaves a toxic residue.
System Sterilization
Wear gloves when handling concentrated peroxide. Do not use bleach. Strong h2o2 will not burn off slime and salt buildup by itself.
Remove all plant matter from system. Pre-flush netcups/pots with water and inspect to ensure all roots have been removed. Put netcups/pots in dishwasher, then remove and soak in strong h2o2. If infection was present, replace any grow medium; soak gro-rocks in strong h2o2. Remove and replace all irrigation. Biologically-resistant poly tubing is can be cleaned and re-used. Soak all accessories in strong h2o2 (misters too, if possible).
System Cleaning
Remove and sterilize reservoir by initially flushing with water and wiping with a clean cloth, then spraying 50% h2o2 with a spray bottle on all surfaces. Wait for one hour, then thoroughly flush with water twice. Flush system with water and do a pre-wipe (hot water + h2o2) to remove salt and slime buildup on all system surfaces.
Mix up a very strong (ie. 20%) H2o2 solution and spray it onto all system surfaces and allow to dry. Run re-connected system with 10% h202 + hot water for several hours, dump, and flush again thoroughly with water. Don’t plant right away!
Tips
Do not share tools and other equipment between systems or reservoirs. Isolating systems will contain any problems. Keep separate and dedicated transfer buckets, measuring cups, trays and other equipment; do not share between systems. Keep your moms healthy and vigorous! Pythium (root rot) will pass systemically to clones.
Inspect and remove unhealthy, slow growing plants early. Use a pond strainer to keep leaves and debris out of tank. Tap water often contains elevated levels of chlorine to inhibit bacteria, but it also contains a lot of other nasties.
System Design Considerations
- Isolate systems with separate tanks, irrigation and pumps.
- Use reflective surfaces (mylar, white poly or titanium paint) to keep the root zone cool between misting periods.
- Keep system light-tight. Cover tank (but do not seal).
- If possible, use low-cost UV / biologically resistant poly irrigation hose to minimize residue buildup. PVC plumbing is difficult to inspect and clean. Maintain nutrient temperatures in the 65-70F range for optimum growth and o2 saturation.
- Maximize o2 levels in your system: waterfall-drop your nutrient return, use airstones/venturis/skimmers.
- Be sure to frequently circulate nutrient solution to avoid stagnant water.
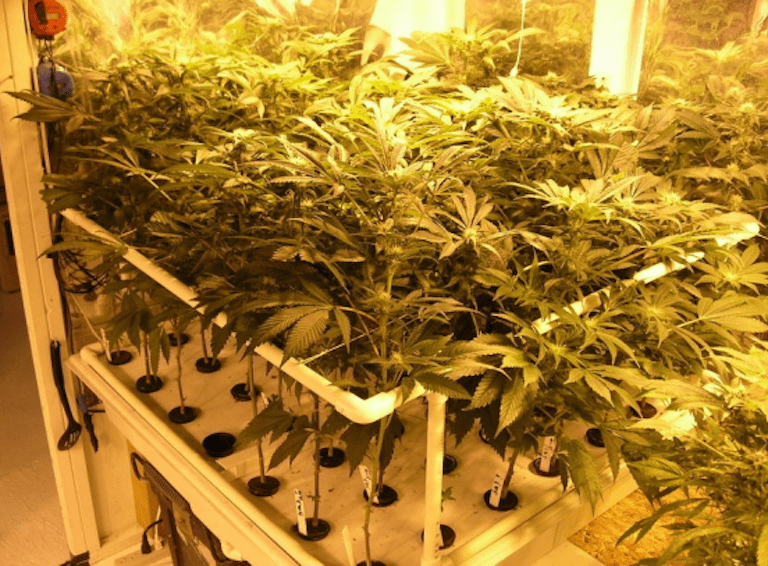
Mixing Your Nutrient Solution Step-By-Step
Properly preparing a nutrient solution is important. Take your time and do not rush. You’ll probably want to get a container that will be able to hold the same amount of water as your reservoir. That way you can prepare your mixture in the mixing container, then empty your res and immediately pump the fresh solution into your system so that they will be out of the water for a minimal amount of time to reduce shock. Oh and it is essential that you use high quality water. Reverse Osmosis is best.
Step 1. Add all of your “extras” to your reservoir. In flowering for example, you could add 80ml of Bcuzz Bloom Stimulant (Bcuzz’s suggested strength for 25 gals), or a similar “extra”; and a small amount of Epsom salts – about 2 TSP (10ml). You must mix your Epsom salts in warm water or they will take forever to dissolve and consequently throw off your readings. This little trick will help you whenever you need to mix something solid into your nutrient solution. Make sure you dissolve it first.
Step 2. Mix your nutrients. What you can do is get a gallon of water, and mix your nutrients ratios into that container, then simply add that solution to your reservoir until you reach the desired ppm. You CANNOT mix them together in their pure form, they must be diluted or nutrient lockout can occur. I’ve never heard anyone speak well of pouring their nutrients directly into the reservoir.
Step 3. Use a submersible water pump to keep everything mixing in your main reservoir. You can then add stuff like a GH (Growth Hormone) mixture slowly to the mixing container (if you’re going to be using them) until you reach your desired ppm.
Step 4. After you have the ppm’s set, adjust your pH until your mixture is perfect. Then quickly dump your res and put the contents form your mixing container into your reservoir. Be sure your nutrients are fully mixed before trusting your readings. pH usually will take longer to stabilize than ppm’s, so allow the tank to really mix up well before you count on a pH reading to be true.
Mixing Nutrient Solution Tips
- If you have a nutrient deficiency, or some other problem that you think might be nutrient related then change your nutrients!!
- Nutrients strengths should be qualified with the ppm/us conversion factor used (such as 0.5, 0.6 or 0.7), which can make a significant difference to the actual strengths.
- Another mix-up procedure is to mix the nutrients directly into the main reservoir. This method takes longer, as adjustments require additional mix-up of separate nutrient components.
- Keep your nutrients at a pH between 5.2 – 5.8. If it is in this range DO NOT try to get it “perfect” by adding pH up and down. If you mix up your solution and you don’t HAVE to use the pH up or down DON’T. When you do adjust try to hit 5.5 but once again don’t be too picky. If it’s a little higher or lower let it go. You’ll just mess things up by trying to mix it exactly, over-analyzing is a mistake.
- If system heat is a problem, you can use a silicone solution to raise pH and give the plants a little something to help them out in hot weather. Use it sparingly. I wouldn’t add more than 1 ml per gallon into your reservoir. It may slow down growth if used in excess.
- Some growers prefer to add main nutrient components first, additives later. Anything organic will throw your EC/PPM measurements off and it will be harder to judge how much salt fertilizer you’ve added. It is best to put the additives in last after you’re happy with the chem levels.
- Be careful when mixing highly concentrated nutrients, as lockout can occur when adding pH UP (As may occur in a smaller volume). K can precipitate out of solution so make sure pH UP or DOWN is added to the nutrient solution with additional water.
- When you give a range of ppm, start off low and mix a little extra GH (growth hormone) to slowly bump up the PPMs as the days go on to make sure the plants can handle it. Every strain will grow a little different.
- Don’t try to add all kinds of stuff to your res, the simpler the better. That is why I recommend adding so little Epsom salts. If you start having Mg issues you would then bump it up.
- You will not need H2O2 (hydrogen peroxide) unless you have an improper nutrient solution. If you keep your reservoir temps at 68-72°F (20-22.2°C), and it is light tight, you won’t have algae problems and your plants will be the happiest. The higher your nutrient temperatures go, the less O2 the water can hold. It is a property of water itself and no amount of bubbles will help.
Nutritional Lockout
One of the most frustrating difficult common problems growers encounter is Nutritional Lockout. Nutrient Lockout basically occurs when the optimal nutrient levels are not pH and nutritionally balanced so your plants cannot get access to a specific nutrient or group of nutrients it needs, and consequently it develops a deficiency. After being in your tank for 5 or 6 days, and being eaten for 5 or 6 days, the nutrients become imbalanced. Perhaps you are growing plants that ate all the nitrogen first and just snacked around the iron, magnesium and calcium, or vice-versa. It can also be caused by a chemical reaction in the medium/solution that causes a toxic substance to block the roots, or causes a chemical reaction that creates another substance that changes the chemical properties of the other nutrients. There can be many causes, but almost always the results are discoloration in the leaves, yellowing or rust spots, or curling up of leaf tips. It also becomes apparent when your plants were consuming a gallon or half gallon of water every day, and then suddenly when you check the levels the next day, they did not drink any water at all. This is a classic case of Nutritional Lockout.
Daily/Weekly Hydroponic System Maintenance Checklist
Daily:
- Dip your portable ph/tds/temp tester(s) in Isopropyl alcohol, then rinse with water before testing solutions to minimize contamination between reservoirs. When taking a reading, submerge only the sterilized portion of the tester into the reservoir.
- Periodically inspect roots for signs of pythium. Consider pulling any plants with these symptoms.
- Optional: Add 1.5ml 35% h2o2/gallon. H2o2 can attack beneficial bacterial; H2o2 use is not recommended when using these enzymes. H2o2 at low concentrations can add beneficial oxygen to the reservoir without killing these enzyme additives.
Weekly:
- Mist all tools, transfer buckets, etc with isopropanol alcohol in a spray bottle, then rinse with water before use.
- Weekly or bi-weekly nutrient changes are recommended. (Go longer if using enzymes to maintain).
- Remove and soak all pump filters/gaskets, thermometers, strainers, air stones, etc in strong h2o2 + hot water.
- Wipe away salt and slime buildup.
- Add pythium-inhibiting enzymes to tank (weaker h2o2 strengths are recommended when used in conjunction with these biological additives.) It is important to maintain enzyme strengths.
Next: Part 8. Setup Grow Room
Previous: Part 6. Cloning
